Felt bookmarks for preschoolers. Felt bookmark with your own hands. Master class with photo. Felt owl: product diagram
We all read books, at school, at university, and just in life. And what do we use as bookmarks? Calendars, small pieces of paper, in principle, everything that comes to hand. Therefore, I suggest you make a cute felt bookmark today.
You will need:
- embroidery threads, floss (color of your choice)
- a small circle of dense double-sided interlining
- elastic band
First, cut out two circles of felt with a diameter of 7.5 cm. You can use the lid of the baby food jar as a template.
Circle the outside of the jar lid on one of the circles. This is where the line will go. You will use it as a boundary that cannot be crossed. So, let's start embroidering the first bookmark. It will be a daisy stitch made up of lazy Daisy stitches, they don't have to be flawless. The petal of each flower is one stitch. Bring the needle to the right side of the felt at point A. Bring the needle to the wrong side near point A, stepping back just a little, and then back to the right side at point B, holding the thread under the needle so that you get a loop.
The loop should lie freely and convex. Here's how it should look.  To secure the loop, bring the needle to the wrong side on the other side of the tape, at point C, and a straight stitch is formed above the loop.
Bring the needle back to the right side through point "A". This will allow the action to secure the small stitch at the top of the petal and will hold it in place.  Now continue making petals with one touch point "A" to make a flower.
  It's not perfect, but it's cute. Continue to make flowers by arranging them in a circle. The picture shows three flowers of the same color. Now add a few more flowers of a different color and other details, such as individual petals and small stars, to fill in the space of the circle. After you have finished embroidering, put together the details of the future bookmark. Cut out a circle from non-woven fabric with a smaller diameter than felt. Place the elastic in the center of the non-woven circle, and place the embroidered circle on top.
Sew all the layers together with felt-colored thread using a simple running stitch. Make sure you grab the elastic band as you sew. When you have sewn all the way around the circle, the knot should not be on the front (embroidered) side of the bookmark. Fasten the thread, do not cut off the tail: bring the thread to the center of the back circle, without piercing the needle through all the layers of the bookmark. Pull a little and then cut the thread next to the felt. Once you cut the thread, it will disappear inside. The knot will turn out nice and flat. Now you have a small bookmark. You can use it for its intended purpose. The bookmark is good, but it holds pages better in large books. In small books, the elastic band will be too loose. So let's make the second version of the bookmark. Silk ribbon works great. Here's the second bookmark! The ribbon can be tied and untied, making the bookmark suitable for both large and small books. For this bookmark, we will cut out several flowers, petals and leaves from felt. We sew them with a regular stitch, and embroider the center of the flowers with a French knot. Instead of an elastic band, we will insert a silk ribbon between the layers of felt. In this way, you can pass one end of the ribbon through the book, and then tie the two ends into a bow.  Looks pretty!
  You can choose your favorite bookmark!
In our age of modern technology, a book can be read on various electronic devices by simply downloading it from the Internet. But there are people who will always give preference to printed publications. These are people who love the smell of a new book, who turn the pages of printed pages with real pleasure. And this article is just for them.
In order not to spend too much time searching for the desired page, a bookmark is used. It's always been that way. And in this article you will clearly see how you can make beautiful bookmarks with your own hands from various improvised materials. It can be paper, and felt, and old film, and ribbons, and templates that you just need to print. We will only look at some of the ways.
It is easiest to make a beautiful paper bookmark with your own hands. Hundreds of options! Below we show some bookmark options for inspiration. In the meantime, we will describe how to make a bookmark in the form of a heart.
Necessary materials:
- White paper without lines;
- Cardboard (also white);
- Scissors;
- Unnecessary postcard;
- Glue (stationery)
- Simple pencil.
As you can see, these materials are not some unusual ones, but those that everyone, if desired, can find at home.
Procedure:
- We fold the paper diagonally;
- Below (in the corner) we draw the upper half of the heart;
- Cut out carefully. This is a template for a future bookmark.
- I put it on a postcard and circle it;
- We make a cardboard heart less than a paper one about half;
- We glue the details.

This is a very simple way, so you can make such a bookmark even with a child. You can also make origami bookmarks, monster bookmarks and other variations on the corner from paper, and much more. It would be inspiration.
This bookmark will also be in the form of a heart. Its plus is that it will not wrinkle or tear, as can happen with paper or cardboard bookmarks.
We need:
- Felt sheet;
- Scissors;
- Needle with thread.
How to create:
- Fold a sheet of felt in half, draw a heart on it and cut it out;
- Sew two halves with thread, except for the top. This is necessary to put a bookmark on the corner of the desired page.

In this case, you can include your imagination. The bookmark doesn't have to be a heart, it can be anything. For example, a triangle. But the principle of operation remains the same.
This is one of the options. In fact, you can make a huge variety of different bookmarks from felt. This is an amazing material, needlewomen know. Here are just a few bookmark options for felt books:
- with lace
- with a ribbon
- sewn in the form of flowers or animals,
- using felt and ice cream sticks,
- and many many others.


The paperclip itself can be a bookmark. But you must admit that just a paper clip does not look very attractive. I want the bookmark of my favorite book to look beautiful. For this you need:
- Paperclips;
- Beautiful or unusual buttons;
- Hot glue;
- Felt.
Stages of work:
- Glue a paperclip to the back of your chosen button;
- To cover this part of the paperclip, glue a piece of felt on top.

There are no restrictions here. Choose buttons of different shapes, sizes, colors and so on. Experiment, and you will surely be able to create an unusual and beautiful bookmark.
Just remember that a paper clip can ruin book pages.
No matter how strange it may sound, a beautiful do-it-yourself bookmark can also be made from such a seemingly unusual material as an old photographic film.
Materials:
- Old film;
- Hot water;
- Needle and thread;
- Scissors;
- Nice picture.
Algorithm:
- To remove photographs from the film, it must be dipped in hot water for several minutes;
- Carefully remove old images with a knife, without damaging the holes at the edges. The film should be transparent. The strips from the knife will gradually become invisible;
- Choose the desired length, fold in half and sew along the edges with colored threads;
- Insert a two-sided picture inside.

This is an unusual bookmark. It is expensive in stores, but making it yourself will cost you much less.
- Decor (any beads, pendants, etc.);
- Wide colored satin or velvet ribbons;
- Scissors and wire cutters;
- Glue, needles, thread. Think about what you want to attach to the tape. Start from this;
- To neatly trim the edges of the tape, you need tape clips.
Work steps:
- Attach the tape to the page and measure. Then lay it twice as much, because the bookmark will be double-sided;
- To choose the right combination of colors, attach different pendants and rhinestones to the ribbon and choose the one you need;
- We glue each tape properly, folding it in half;
- Attach a clip to the end of the tape;
- Hang your chosen decor.

Thanks to this bookmark, your book will look royal.
Bookmark with pompom
The pom-pom bookmark is very similar to felt ribbon bookmarks. Only there, instead of felt - pompom. To make such a bookmark with your own hands, we need:
- Knitting;
- Scissors;
- Cardboard.
Stages of work:
- Make a skein of thread;
- Tie it with thread;
- cut the edges;
- Straighten the threads;
- Glue to cardboard.
This is a very simple, but no less effective way to bookmark.
Bookmark with a bracelet
Such bookmarks are quite rare, and thanks to this, it will look even more beautiful.
What do you need:
- wire cutters;
- Thin wire;
- Various beads;
- Ribbon;
- Scissors.
Action algorithm:
- Make a small bracelet: take a wire and put beads on it, twist the ends of the wire and insert it into a bead. Choose the diameter of the bracelet yourself, there are no limits.
- Measure the length of the tape, which should be twice the size of the page. Tie it to a bracelet.
That's all. It looks pretty nice.
Suede bookmark
We will need:
- A piece of suede;
- Awl;
- Cutter;
- Acrylic paints;
- Waxed cord;
- Pen.
Work steps:
- Using a ruler made of metal with a cutter, cut out a rectangle of the size you need from suede.
- Along the edges with an awl, make holes that are at the same interval from each other;
- Lace up the bookmark with a cord. Life hack: to make the lace easily enter the holes, grease its end with superglue. Then it will harden and it will not be difficult to stick it into the hole;
- With a pen on the suede, draw the design or pattern you want to see on the bookmark;
- Acrylic paints paint what you have drawn. To make the picture bright, the paint can be applied in several layers.
A beautiful do-it-yourself bookmark made of suede is ready. It remains to wait until the paint dries, and you can use it.
Although it is simple to perform, it is very effective to use.
What do you need:
- A piece of scrap paper;
- Rubber;
- Cutter;
- Scissors;
- Pencil or pen.
How we do:
- Cut out a small rectangle with scrap paper scissors.
- On the reverse side, draw an arrow with a pen or pencil. Choose the size that is comfortable for you. The size of the rectangle also depends on this;
- Cut out the arrow. For a neater look, its edges can be rounded;
- With a cutter we make two cuts along the arrow. After that, we pass the elastic;
- We put an elastic band on the page of the book and tie it with a tight knot. We remove the excess parts with scissors.

Such a bookmark will help you find not only the page, but also the line where you left off, since the arrow can be moved.
Satin ribbon bookmark
This option can be done in just 5 minutes.
We will need:
- Clip;
- Satin ribbon (width according to your desire);
- Glue;
- Threads and a needle;
- Scissors.
How to do:
- Cut off a piece of tape about 10 cm long;
- Fold this piece into a beautiful bow;
- In the center, gather the fabric and sew them with threads or glue them together;
- Attach the resulting bow to the paperclip using a small piece of the same tape, wrapping around the center.
This is a fairly simple method that does not require too much time and money.
Template bookmark
This is a super easy way that doesn't require too much effort. Just find a template on the Internet to your taste, print it out, cut it out and you can use it.
As you can see, there are many ways to make a bookmark for a book yourself, with your own hands. Some bookmarks can be made with children, which, of course, is a tangible plus.
In addition, a self-made bookmark can be a very good gift, especially for someone who loves to dive into the world of books.
P.S. Ideas for creativity can be peeped on Pinterest (there are a lot of them, the photo is from there) or on YouTube.
"People stop thinking when they stop reading" D. Diderot
The Internet is gaining more and more fans every day, but we do not stop reading printed publications. And what do we use as bookmarks for books? A candy wrapper, a pencil, or even worse - bending the corner of the page? But you can make a beautiful bookmark for a book with your own hands, which serves not only to quickly find the desired page of the book, but also is a beautiful original accessory.
The Hobby Territory website contains a variety of ideas for creating bookmarks for books. Today we offer to replenish the collection with another idea and sew a bookmark in the form of a bunny with a carrot out of felt. Such a fun and pleasant to the touch bookmark will help you not to lose the right page in the book. A bookmark in the form of a little bunny will definitely please the child and will help make the process of reading a book more interesting.

For work you will need:
- blue, red, white and green felt;
- threads of blue, white, red, green;
- needle;
- satin ribbon;
- black beads.

Master class bookmark from felt "Hare with a carrot" for a book with your own hands:
We transfer the pattern of bookmarking a bunny with a carrot to paper, cut out the details. We cut out the details of the future bookmark from felt:
- two parts of the body of a hare - made of blue felt;
- muzzle and belly of a hare - from white felt;
- two parts of a carrot and one part of a nose - made of red felt;
- two parts of carrot tops - from green felt;
- cut off a piece of satin ribbon.

We sew with white threads to one of the details of the hare's body a muzzle and belly. We sew the hare's nose to its muzzle with red threads. Sew eyes from black beads of beads.

We sew the two parts of the hare's body together with an overcast seam, inserting and securing a satin ribbon between his ears. If you don’t have a satin ribbon, you can replace it with a rope crocheted from Iris threads.

We sew the details of the carrot tops with green threads with an overcast seam, inserting the second end of the satin ribbon between them.

We insert the green tops between the details of the carrot and sew them with an overcast seam with red threads.


The felt bookmark for children's books is ready!

According to the proposed pattern, you can make not only a bookmark, but also an original one for a children's thing. To do this, you need to cut out one detail of the body, muzzle and belly of the hare, sew all the additional details on the main one and sew the hare appliqué along the contour with hand loop stitches (or a thick zigzag stitch on a sewing machine) to the product.
It is not difficult to sew a bookmark for books from felt, as felt is a very convenient material that is easily cut with scissors and does not crumble. For sewing bookmarks, it is better to take hard Korean felt 1.2 mm thick.
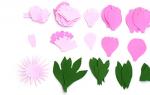
We prepare materials. For such a beautiful product in the form of a bookmark, we need: brown felt, three shades of green, light pink, dark pink felt and a beautiful flower button.

Cut out two rectangles of brown felt 20 cm long and 4.5 cm wide.

We draw two circles with a compass: one with a diameter of 6 cm, the second with a diameter of 2 cm. We got two circle patterns - a large and a small one.

We cut out two parts from light pink felt, attaching a pattern of a larger circle (6 cm), and cut out 5 parts from dark pink felt according to a pattern of a small circle.

We draw a pattern for leaves about 3 cm long.

We put the pattern on the green felt and cut out 7 leaves, you need to get leaves of different shades of green.

We fold the thread into four threads and embroider the veins of the leaf with a chain stitch. We take the same thread for all the leaves, preferably a contrasting one.
To embroider with a chain stitch, you need to bring the thread to the front side of the part.

Threading the needle into the same place where the thread was brought out, we stretch the needle forward, bringing it to the front side, while making a loop.


Thus, we make four loops on a leaf.


We embroider from the middle of the chain stitch chain another 1-2 loops to the sides to make the leaf more beautiful.


Now we turn to the design of the flower, sew a button in the form of a flower to the middle of one of the details of the larger circle.

We apply small circles (petals) to a larger circle, put a circle with a button on top. We mark with chalk five lines that go from the button to the petals.


On the marked lines, we embroider three loops of the chain with a chain stitch.


We impose embroidered leaves on a brown trunk and chop off with pins.


We sew the leaves on a sewing machine, choosing threads to match the petal.
We fold the two brown trunks inside out and sew around the perimeter on a sewing machine.
Bookmarks for books in the form of corners are very convenient. They allow you to quickly open a book on the desired page and mark two important places in the book at once, for example, highlight the beginning and end of a chapter or story. And an unusually designed one can also become a small cute gift, for example, for a birthday. The corner bookmark can be sewn from felt and decorated with heart appliqué.
To make a corner bookmark, we need:
- blue felt with white stars;
- pink felt with white polka dots;
- plain white, yellow and red felt;
- scissors;
- threads of white, blue, pink, yellow and black colors;
- a needle.

The procedure for making a bookmark-corner with hearts
1. Draw on paper an isosceles right triangle with sides of 14 cm and cut it out - this will be the main part of the bookmark. To decorate the bookmark, cut out decorative elements - a bunny, a heart and a double heart. You also need to cut a strip of paper 20 cm long, make one edge of the strip even, and the other wavy.

2. Put a paper triangle on a red solid felt, circle the triangle with a pen or pencil and cut it out along the drawn outline. This will be the bottom of the bookmark.

3. Now put the paper triangle on the blue felt with white stars. Circle the triangle and cut it out with sharp scissors. This will be the top of the bookmark.

4. Put a paper strip with a wavy edge on pink felt with white polka dots, circle it and cut it out. Then move the strip to the free space, circle it again and cut it out. In total, two such strips are needed for bookmarking.

5. Put a double heart on the yellow felt, circle it and cut it out. Two ordinary hearts need to be cut out of plain red felt and pink felt with white polka dots.

6. Cut out the bunny figurine from ordinary plain white felt. Now all the details of the bookmark are cut out, you can start stitching it.

7. Take a blue triangle with stars and attach to it a bunny figurine cut out of plain white felt. We will thread a white thread into the needle and sew the bunny with short basting stitches.

8. Take a strip with a wavy edge, cut out of pink felt with white polka dots. Attach the strip to the blue triangle as shown in the photo. We will thread a blue thread into the needle and sew the strip to the triangle with a basting stitch.

9. Take the part of the double heart cut out of yellow felt, and on the left we will attach a heart cut out of pink felt with white polka dots to it. Sew on a heart with pink basting stitches.

10. On the right, to the detail of the double heart, we will attach an ordinary heart cut out of plain red felt. We sew it with red threads with basting stitches.

11. Attach the prepared part with hearts to the blue part and sew it with yellow basting stitches.

12. Take a triangle cut out of red solid felt and attach to it a strip with a wavy edge cut out of pink felt with white polka dots. Sew the strip with blue threads with a basting stitch.

13. Match the red and blue triangles so that the pink stripes match. We sew two sides of the triangles that form a right angle, and leave the third side unsewn. We will sew the sides with blue threads, using an overcast seam.