Autumn leaves for kindergarten. Autumn crafts for school. Crafts for an exhibition on the theme "Autumn": tree in a jar
In contact with
Classmates
Looking for fall crafts for back to school? We are very glad that you decided to visit us! We tried our best and prepared for you a lot of really cool options for fall crafts for school.
You need to start preparing to work on crafts by searching for natural materials. These include chestnuts, nuts, acorns, seeds from any fruit, leaves, seeds, beans, cones, tree branches, and a variety of vegetables and fruits.

This type of creativity significantly develops the child’s imagination and forces the student to remember, think and invent.

Crafts for school from leaves
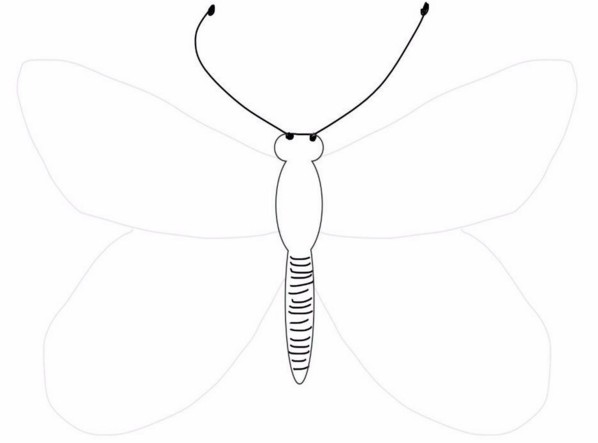
A butterfly made from autumn leaves may well take first place among first-graders' applications. Leaves will be needed different forms and flowers. If you use dry leaves, you can glue them with PVA; for fresh leaves, it is better to use a glue gun.
- leaves of any shape
- PVA glue (glue gun)

Butterfly made of leaves.
Use leaves to create fish oval shape and ready-made plastic eyes. To keep the eyes firmly on the surface of the sheet, glue them with hot glue.
- oval shaped leaves
- plastic eyes
- glue or glue gun


Leaf fish
A variation of the popular hedgehog made from leaves involves making a face out of a leaf instead of a drawn face. The eyes and nose can be cut out of colored paper and glued to PVA. For the hedgehog's face, use a leaf bright colors, for example red.
- oak or maple leaves
- PVA glue


Hedgehog made from leaves on a shelf
After wandering under the golden maple, do not forget, in addition to the leaves, to also collect its seeds (helicopters). Draw the contours of the squirrel on the cardboard, generously coat the surface of the cardboard with PVA glue and fill the squirrel’s body with cereal, and glue “helicopters” to the tail.
- maple seeds
- buckwheat
- half a walnut shell
- PVA glue

Protein from buckwheat and maple seeds
A tree branch, a small chestnut, a few helicopters, two leaves and you have a truly autumn flower ready.
- chestnut
- leaves
- maple seeds
- glue gun
- tree branch

Flower made from maple leaves and seeds
And from the same helicopters, glued to a twig with a glue gun and painted with bright colors, soaring dragonflies are obtained.

Dragonfly from maple seeds
Spruce branches can be used as hedgehog needles. Roll out a large oval piece of foil and spread a layer of salt dough or plasticine on top. Decorate the muzzle and attach small spruce branches instead of needles.
- plasticine
- foil (as a base)
- spruce branches
- acorns, leaves, rowan fruits as decoration

Hedgehog made from spruce branches
Crafts for school from pine cones
From the cones you can create an unimaginable number of animals and birds. In this case, the cone will serve as the body of any animal, and all additions can be molded from plasticine or cut out of felt.

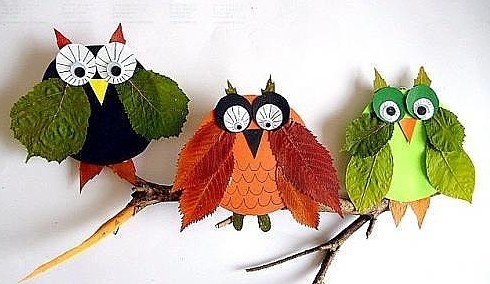
Glue two large paper circles to the pine cone and plastic eyes to them. Attach a beak between the eyes, and ears above the eyes. Plant such an owl on a branch, add leaves and acorns and you will have an interesting autumn composition.
- cone
- plastic eyes
- glue gun
- leaves
- colorful moss

Owl from a pine cone
The next version of the owl involves using only scales from the cone. Cut out the silhouette of an owl from cardboard, disassemble the cone and glue the scales in rows, moving from bottom to top. The eyes can be rolled out of jute or cut out of felt.
- jute or felt
- cone
- glue gun
- thin branches

Owl from a pine cone on a string
To create a pine cone swan you will need feathers, chenille, plastic eyes and a piece of orange felt. You need to glue the parts of this craft using a glue gun.
- feathers
- chenille
- plastic eyes
- glue gun
- cone

Swan made of pine cones and feathers
For a pair of deer, you will need to glue two oblong pieces together at right angles. fir cones. The role of the head will be played by an acorn, and the eyes and nose will be three black beads or black peppercorns. A few branches for legs and antlers and deer can already be glued to a forest clearing.
- fir cones
- acorns
- plasticine or beads or black pepper
- thin branches

Deer made from fir cones
Crafts for school from vegetables and fruits
Try making this adorable orange chicken with your child. He will definitely be fascinated by the process of turning two tropical fruits into a funny bird. You will also need the peel of a third tangerine, some raw carrots, one radish, one olive, a knife and a few toothpicks. Cut a little off one side of the bottom orange to keep the chicken firm. Using a toothpick, attach the second orange head to the body. Make eyes from radish slices and olive halves. Cut the third orange into two halves, first making zigzag cuts with a knife. Remove the flesh from the wings and attach the peel to the body, securing it with a toothpick.

Funny faces of animals and fairy-tale characters can be made from pears, lemons, apples, bananas, grapes and other fruits.

Dreams of having a dog can practically become a reality if you connect two pear-shaped zucchini together. Plus seven more cucumbers, two cherry tomatoes, one grape or chokeberry and now you have become the owner of a little puppy.
- seven cucumbers
- two cherry tomatoes
- grape berry
- two zucchini

Dog made from cucumbers and zucchini
And this eared beast will turn out if you bring from the garden a long pumpkin, a couple of oval potatoes, one eggplant, green onions and curly parsley. Cut the nose from the eggplant peel, and secure all other parts with toothpicks.
- oblong pumpkin
- a couple of potatoes
- eggplant
- parsley, onion
- toothpicks

Vegetable rabbit
And these are not ingredients for a new salad, this is a funny llama.
- squash
- five cucumbers
- two bell peppers
- two heavenly apples or small tomatoes

Vegetable llama
In order to make a crocodile from vegetables, you will have to try and find bell peppers with a slightly forked bottom. You will also need six small cucumbers, two tomatoes and a long zucchini.
- bell pepper
- cucumbers
- two tomatoes
- zucchini

Vegetable crocodile
The rhinoceros will be heavy and bulky, so it is better to collect it directly on site (fair/exhibition). For the rhinoceros, stock up on a round pumpkin, squash, half a zucchini, three peppers, apples of paradise, four cucumbers, and a couple of rose hips.
- pumpkin
- squash
- zucchini
- bell pepper
- dog-rose fruit
- apples

Vegetable rhinoceros
The exact time, as well as the time of watching the evening cartoon, will be indicated by this alarm clock, made with your own hands from vegetables. To create it you will need half a head of cabbage, two tops of onions, a bell pepper and two potatoes.
- cabbage
- bulb
- bell pepper
- potato

Vegetable clock
Crafts for school from seeds and grains
Beans and corn kernels will also become good material for fall school work. The principle of such work is always the same, you need to draw any sketch on paper, apply glue to the surface and glue seeds or cereals in accordance with the drawing.

Cat from seeds
For a hedgehog going mushroom hunting, you will need a large number of sunflower and pumpkin seeds, a sprig of rowan and buckwheat. Print out any coloring page with a hedgehog and fill in the fragments of the picture with natural material.
- sunflower seeds
- pumpkin seeds
- rowan branch
- buckwheat
- printable hedgehog coloring page

Hello everyone, today we will be uploading interesting autumn crafts for activities with children in kindergarten. So many autumn work kids can make it with their own hands even in the younger groups of kindergarten. I will show you photos of autumn crafts for the garden and tell you exactly how to quick for the teacher and easy for the children organize similar work with children. We will paint, sculpt autumn crafts from plasticine, and work with leaves and other natural materials. To make it convenient for teachers pick up autumn ideas for classes, I arranged all the crafts by age of preschoolers (junior, middle and senior groups of education).
Autumn crafts
for kindergarten
(younger group – 3-4 years)
The easiest way to create autumn crafts with young children three years old is to teach them how to use the print technique. It seems – what’s so complicated? Dip it in paint and splash it. But the fact is that not all children do it beautifully. Here you need to follow the rules.
1) don't spank the new print, completely covering the old print(there will be an ugly stain).
2) do not place prints of the same color next to each other(Only red in the left corner of the sheet, only yellow in the right), let the children learn to create color variety.
3) fill out all given space sheet, leaving no holes or unnecessary voids.

These rules apply beautiful works on the theme “AUTUMN LEAF FALL” or “AUTUMN TREE”.
For leaf fall (in the left photo above) we are preparing stamps from small potato halves. On the cut of the potato, we use a knife to cut out the pattern of VEINS OF THE LEAF. We dilute the gouache slightly with water so that the paint is not too thick, pour it into bowls with a flat bottom (lids from jars will do). Each bowl of paint contains its own potato, do not confuse yellow potatoes, dip them only in yellow paint, orange only to orange. Otherwise (if you mix stamps), the paint in the bowls will also mix - everything will become the same orange.
Can be done autumn picture RAIN also using the stamp technique, which we will make from a roll from toilet paper, we seal it with our hands and give it the shape of a drop (as in the photo above).
Autumn craft TREE with leaves, you can also draw it using different stamps. These could be lumps of newspaper, bottle caps, cotton swabs, or just your fingers. A tree trunk can be made from a handprint (paint the palm with brown paint, print it on a sheet, and use a brush to paint over the unprinted areas).

Craft APPLE TREE - too good job not the theme Autumn in kindergarten. The trunk of the apple tree can be glued onto the background sheet in advance. And give the children the task of drawing apples and leaves.
Apples are drawn very well using the method of imprinting a carrot, or any other round cut.

You can use the APPLES THEMSELVES, CUTTED IN HALVES, as an imprint. Then you and your children can make a Compote or Apple Tree craft with real apple shapes (photo below).

Children really like it junior group– here’s an autumn craft: COLOR THE APPLE. Here we work with our fingers and the most interesting thing in this work is the UNIFORM TRANSITION of color from red to yellow. That is, first we give the child the task of painting the left edge of the apple red and the right edge yellow. And fill the middle with prints of both colors (on the yellow side - more yellow ones, and on the red side make more red fingerprints). This requires intelligence, attentiveness and constant consideration of the proportionality of colors on the left and right... Teacher repeat, the main idea is that there are more reds on the red side, and more yellows on the yellow side. At the same time, we reinforce the concepts of “more, less.”

In the autumn craft COVER THE LEAF, you can also set the task of distributing the color evenly over the leaf: red on one side, yellow on the other, it turns into green, then into burgundy.
If the child does not understand the task and blurts out all the colors into a common smeared mess, do not scold, let him new template a blank sheet of paper and try to draw a second leaf with your child, show how the colors can STAY next to each other and not mix into dirt.

You can make a HEDGEHOG craft from children's handprints. You just need to organize everything correctly (a damp cloth on the table for each child).

Autumn crafts-appliques
for the younger group of the garden.
A regular application for 3-year-old children can also be interesting and contain logical tasks.
Here is an example of such a craft in the photo below. On a sheet of paper with bright wax crayons, the teacher’s hand draws the contours of autumn leaves (orange, yellow, red), each with its own shape. There are circles in bowls on the table - each bowl has its own color. The child’s task is to fill the contours of the drawn leaves with circles of the CORRECT COLOR and fill all the spaces inside the leaves - one in each. Here the mathematical concepts of “shapes”, the concept of “one at a time” and counting within the number three are reinforced.

Children also like this autumn craft for the garden - applique DRESS A TREE. We make slits on toilet paper rolls. We insert a green silhouette of a cardboard crown into them. And children place leaves on the glue in any order and direction.
This activity can be turned into modeling - sticking leaves by peeling off pieces of colored plasticine and gluing them like cakes on cardboard, and then the teacher will put all the cardboards on trunks and arrange a small exhibition AUTUMN PARK. It looks very beautiful on the windowsill in the locker room - 25 trees in gold and crimson - all the parents gasp.

Wax graphics
Autumn crafts in the garden
With the younger group.
Here's a technique that makes all the kids gasp. They clap their hands with delight when they make this autumn craft in the garden. There are also rules for children that need to be taught to them.
The teacher draws silhouettes of leaves on a white blank sheet - WITH WHITE WAX CHALK (or a piece of a candle). It is important that the wax chalk should be thick and greasy, that is, check in advance which white chalks are suitable for this technique and which ones do not work well... now you will understand what we will check.
When drawn on a white sheet with white wax chalk autumn leaves– THEY ARE INVISIBLE. The child thinks that the sheet is clean. But the teacher says that if we paint the sheet with the colors that Lady Autumn loves, then she will give us a surprise.

On the children's table there are already bowls with gouache DILUTED IN WATER. Gouache should not be thick, it should be watery, like colored water. In different containers of the palette there are different gouache waters (red, yellow, orange, green). The child dips the brush into the coloring water and applies it to a white, clean sheet. And the paint is applied to the paper, but does not stick to the waxed areas, and the wax contours remain unpainted - white. Autumn gives us magic - its leaf fall. The children are delighted.

Important #1 . In advance, the teacher CHECK BY EXPERIENCE whether the wax chalk leaves a sufficiently greasy mark. You need to paint over the wax mark yourself with colored water and look at the result. Not all manufacturers make good crayons.
Important #2 . Dilute the gouache with water. If you paint over with regular gouache, the consistency of sour cream, you will simply cover the wax layer with “this sour cream” and nothing will happen. Gausha must be very, very diluted with water. so that it looks like colored water. Then everything will turn out perfect.
Important #3 . Place a sign on a sheet of paper that will indicate the correct side of the sheet (the one on which you want to apply paint). With this craft it happens, that the child sees a blank sheet in front of him, takes it in his hands, twirls it, twists it, turns it over and puts it on the table with the back side (wax down) and then begins to color this blank side. That's why let there be something already drawn on the sheet, for example a frame around the edges of the sheet. Like the frame of a window in which leaves will soon appear.
Important #4 . TEACH A CHILD do not scrape the brush across paper, and put the colored water in with soft movements - lick the paper sheet with the soft tail of the brush. If a child rubs the sheet with a brush like a washcloth, the wax will be erased and a beautiful mark will not be obtained (and for many children 3-4 years old this is a problem - they use the brush like a pencil or felt-tip pen - they scribble, pressing the brush tightly to the paper, SCRATCHING it). The brush is the kitten’s tongue, you need to gently lick the paper... lick-lick, lick-lick.
This activity just develops the skill of gentle painting.
Autumn crafts
For the middle group
Kindergarten
Craft PORTRAIT OF AUTUMN - children really like it middle group. A circle is drawn on a piece of paper. The child’s task is to take a dry leaf from a tree, cover it with paint, and stamp it along the edge of the circle. Repeat this imprint several times - along the entire edge of the circle - like a round dance of leaves. Draw a face in the center of the circle. This is autumn smiling at us - she likes this portrait.

In the middle group kindergarten children can make an AUTUMN FOREST craft - just give the child a sheet of paper already tinted blue and ordinary leaves from trees (not dry, brittle, but freshly fallen). The child first draws on the bottom of the sheet, the ground strewn with leaves - this is simply poking yellow-orange-red prints with his finger.
And then he “plants autumn trees” and coats the leaf with paint from that wrong side leaf where rough veins protrude. And while the paint is not dry, he quickly smoothes it onto the paper with his stem downwards - presses it with his palm so that it makes a good imprint. If the line-trunk (stem) is not imprinted, they can be painted on with a brush later.


Leaf prints can also be used in other garden crafts (photo below) - it could be a WINDOW with falling leaves, or a tree crown on a toilet paper roll.

You can use leaf prints as additional DECORATION BACKGROUND for another applique craft in the garden. For example, you came up with the idea of making a bird applique. Then we’ll decorate the background with sky blue and add branches. And before gluing the bird, the child covers the entire sheet of paper with leaf prints. And the bird will already be against the background of foliage.

Autumn craft LEAVES for the garden
(average group for 4-5 years).
In kindergarten, already in the middle group, there is intensive practice of shading. We teach the child to hold the crayon with three fingers and make up and down hatching movements - this is an important part of preparing the hand for writing. Children with undeveloped shading skills have difficulty mastering writing; letters in copybooks are written with incredible effort.
Therefore, seize the moment - while the child is small, you can put a bunch of useful “devices” in him, which will then make his life much easier, and not only at school.
Everything is simple here. The teacher traces a real maple leaf on a piece of paper. Cut out these leaves. And on each one we draw veins - which divide the leaf into sectors.
During the classes, children are shown how to color each section of a leaf with chalk - and how beautiful it becomes. Children will have fun creating their own coloring designs.

You can cut out small leaves for children. Let them paint each of them in any autumn color. And they will decorate the crown of a tree made with your own hands.

You can draw the veins on the paper contours of the leaves with WAX WHITE CHALK (thick), and then paint with gouache or watercolor paint diluted heavily with water. Then the sheet will be painted over and the white wax strips will not take the paint. And you will get a very beautiful craft with autumn leaves.

Leaves painted by children can become elements of a large COLLECTIVE APPLICATION; it can be displayed on a separate stand (above the lockers in the locker room) or on a window.


Crafts AUTUMN TREES
For the middle group of the garden.
The most difficult part of this autumn garden craft is not the coloring, but the arrangement of the branches. The branches for the trees are cut by the children themselves. The teacher gives each child a rectangle of brown paper. Using scissors, children in the middle group cut this piece into twig strips. And now one branch needs to be laid centrally as the trunk of the crown, and the remaining branches to the sides of this central axis.

A beautiful autumn craft for a kindergarten activity is shown in the photo below. We draw the outlines of trees and a lawn with a hillock on a white sheet of paper. We cut out the outlines of the trees along with the lawn and paste them onto a sheet of black paper. Next, the child will paint over exactly these white areas with gouache diluted with water or watercolor. On a dark background the paint will look brighter and more saturated.

Leaf applications
Autumn crafts for the garden.
In the middle group, children can already work with dried leaves - they will no longer crumble fragile dry leaves in their hands, but understand that they need to very gently spread them with glue and gently press them to a sheet of paper. Crafts for the middle group of kindergarten should not be complicated. Just autumn tree(trunk is a palm print). Each child should have a wet cloth on the table with which he can wipe the paint off his palm, first with one side, then turn the cloth over and wipe it with the other side.


Here is a series of beautiful autumn crafts with turkeys, where the tail is made from leaves. We attach the leaves to plasticine or thick PVA glue (or double-sided tape).


Autumn crafts
for garden
(senior group, 5-6 years old).
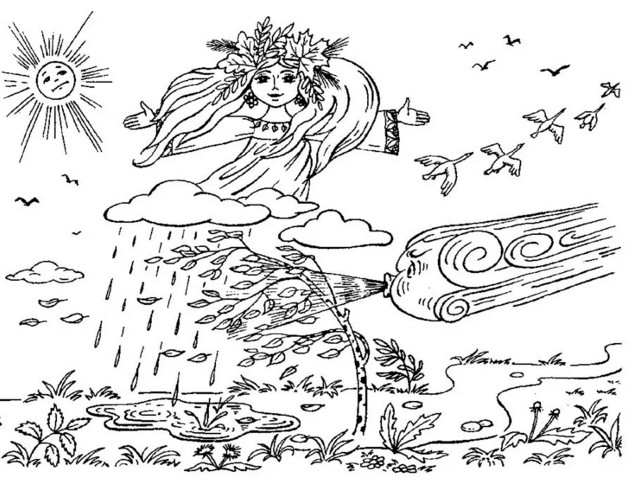
In the senior group of kindergarten you can make complex MOSAIC crafts. Duration of art activities in this age group It's already 25 minutes. And this time is enough to lay out a mosaic silhouette on the theme of Autumn (craft pumpkin, acorn, owl, umbrella with rain).

The children cut the mosaic pieces themselves. First, cut a square of paper into strips, then each strip is cut into cubes.
ads1
Important. Be sure to use colored DOUBLE-SIDED paper for such crafts. So that the color is on both sides of the pieces so that they do not turn over with the white side. And it will be easy to find pieces of the desired color in the bowl.

Stained glass technique
Crafts for the garden on the theme AUTUMN.
On a sheet of paper we draw the silhouette of an autumn leaf. We draw the same silhouette on the back side of the sheet (as if through the sheet). Child's task senior group garden is to fill with colorful pieces paper napkin, so that the entire contour is covered with a colored mosaic. Next, use scissors to cut along the contour that we see on the back side of the sheet (it was not for nothing that we drew the second contour). And we get an autumn leaf completely filled with colored mosaics.

Pieces of transparent napkin can be replaced crepe paper– it is also transparent and lines drawn with paints or markers can be seen through it (as we see the crown of a tree in the autumn craft below).

Autumn crafts in the kindergarten
Senior group.
WITH PAINTS
A very beautiful autumn craft TREES ON THE SHORE, when the trees are reflected in the water. This craft can be done by children 5 years old. Just right for the older group of kindergarten. Because it is at this age that children can quickly handle a brush.
First you need to fold a sheet of paper in half. Children of this age already have experience folding a sheet of paper evenly. And they will be happy to do it themselves.
If the teacher has not developed this skill in children in previous design classes, let them fold the leaves themselves, in advance, before the lesson. Spending precious minutes learning to fold and scolding those who cannot do it straight is a waste of time allotted for drawing lessons.

In short, we have a sheet of paper - it has a horizontal fold. Now the child takes green paint on a brush and paints grass. We put the gouache in a thick layer - and quickly print it on the back side of the sheet - FOLDING THE SHEET IN HALF along this finished fold line.
After weed, the child takes on a different color – yellow. And we draw the crown of one yellow tree. The spot is above the grass - and quickly bends the leaf so that this spot is reflected below. Next, we do the same with other crown spots. Then we do the same with the trunks.
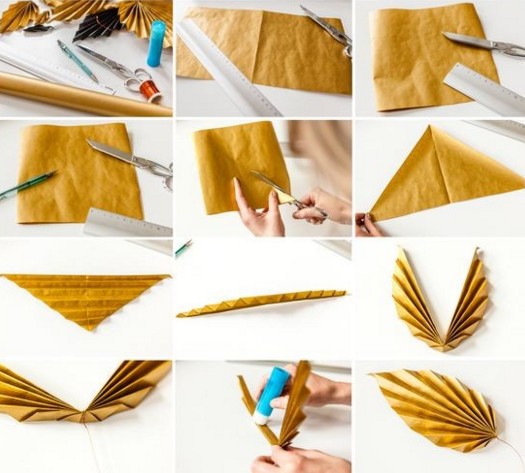
Here's another craft with paints AUTUMN UMBRELLA. We take a semicircular piece made of white paper. And fold it into a fan (starting from the center). Then we unfold this part and draw stripes on it with gouache. Then we fold the fan again along the previous fold lines. And we form an umbrella applique. Also a craft with an autumn theme. And it’s easy to do in kindergarten classes.

Children love making the AUTUMN BRANCHES craft. We take empty branches without leaves. Using colored paper, we cut out the outlines of the leaves and use plasticine to attach these leaves to a dry branch.

There is no need to paint each leaf separately. We simply paint a sheet of paper in streaks with wet paint, allowing the colors to mix freely and flow beyond each other. And then fold this dry sheet of colored paper several times (like a snowflake) and cut out the shape of leaves from this fold - we’ll get several pieces at once.

You can paint a sheet not only with a brush, but also with a toothbrush - splashing drops of paint by running your finger along the brushes. At the same time, you need to tilt the brush so that the spray does not fly into your face, but onto a sheet of paper.

You can plant a bird or a bat on such an autumn branch.

The OWL crafts look beautiful on the branches, and under the branches there is the HEDGEHOG craft or the autumn-red FOX.
This is a simple craft just for the garden. The teacher rolls half a cardboard sheet into a tube and fastens it in advance with a stapler or double-sided tape. The child only kneads the upper edge of the bell with his hands (front and back) to form protruding ears-corners (like the owl in the photo below).


Crafts WITH SCISSORS
For the older group.
At the age of 5-6 years, children already have a year's experience in operating scissors. And therefore they can cut complex contours. For example, they can cut out an oak leaf like this. The teacher draws a leaf on a rectangle of colored paper with veins on it. A child cuts out a piece of paper with scissors.
Blanks for the snail are also cut along the contour. A strip of paper is rolled up like a spital into a tube, then unfolded into a relaxed twist. And glue it onto the back of the snail.

Or you can make a snail from plasticine. This is also a quick and beautiful craft for the older group in the kindergarten - it involves modeling and cutting with scissors.

You can make a worm that gnaws on a leaf and a roll of toilet paper. Like the one in the photo below. A simple and very cute craft for children. Everyone loves the smiling worm.

These are some interesting autumn craft ideas for kindergarten classes. Now your autumn won't be boring. After all, every activity can give a child a colorful mood – as bright as this autumn.
Olga Klishevskaya, especially for the site
Useful tips
A bunch of natural materials including leaves, acorns, dry twigs and pine cones can be used to make beautiful paintings and figurines.
Here are a few interesting crafts on the theme "Autumn" that you can do with your children:
Crafts made from natural materials on the theme of autumn: autumn decoration
This craft is so simple that even a child can do it, and so beautiful that it will harmoniously fit into any interior of the house, on the porch or in the country.

You will need:
Various leaves, cones and other gifts of nature
Wire
Scissors
A wicker bowl or something that can hold all the decorations.

1. Place all the gifts of autumn on the table.
2. Cut off thin wire so that you have several segments to which you can attach autumn decorations.
3. Start attaching leaves, pinecones, etc. to the wire by wrapping the wire around them.

4. Once all the decorations have been added to the wires, attach your pieces to a wicker vase or other similar item.
Making a craft on the theme "Autumn": traces of autumn leaves on paper

You will need:
Leaves of different shapes and sizes
White paper
Spray paint or fluffy brush and watercolor paints.
1. Collect the leaves and place them on paper.

2. Start by applying spray paint on top of the leaves and a little around them, or you can splatter watercolor paints around the leaves using a fluffy brush.

3. Carefully remove the leaves and leave the paint to dry.
Ready!
Such pictures can be hung anywhere, thereby decorating the interior.
DIY natural crafts on the theme "Autumn": stained glass window made of autumn leaves

You will need:
Small leaves of different shapes
Self-adhesive film or baking paper and glue
Colored cardboard.
1. Attach the leaves to film or paper.

2. Cut out several strips of colored cardboard and attach them to the paper to form a frame.
3. The resulting stained glass windows can be glued to the window so that sunlight passes through them.
Children's crafts from leaves: labyrinth
Such a labyrinth can be made in a forest or park.
All you need to do is collect the leaves and arrange them to create a labyrinth for the children to find their way out of.


Crafts on the theme of golden autumn: tree in autumn

You will need:
Paper bag
Plasticine
Maple lionfish ("helicopters")
Rowan berries
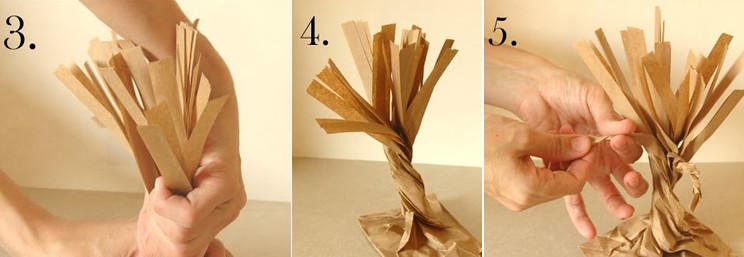
1. Take a simple one paper bag, remove the handles of the bag and twist it so that it looks like a spiral: one end in one direction, and the other in the opposite direction.
You will get a tree trunk, which should have a thickening at the bottom where the roots are - this way the tree will be more stable.

2. You need to make branches at the top of the twisted bag. Just carefully tear the paper and “unravel” the branches and twist them in a spiral.

3. Use the handles of the bag to wrap it around the tree trunk and seal it. This will make the craft stronger and more stable.
4. Prepare plasticine or glue and start attaching autumn leaves to tree branches.
*If desired, you can attach lionfish to the tree.
* If you want to “revive” a tree, you can make eyes and a nose from acorn caps by gluing them to the trunk. You can use plasticine for the pupils.
* You can make a mouth out of rowan berries and your tree is ready!
Crafts for an exhibition on the theme "Autumn": tree in a jar

You will need:
Small jar with lid
Leaves (preferably artificial and small)
Superglue or hot glue
small branch
Glycerol.

1. Take a branch and cut it so that it can fit into the jar.

2. Glue the branch to the inside of the jar lid. You can also glue several small pebbles around the future tree.
3. Take a few small artificial leaves and glue them in a random pattern onto the branches of the tree.

4. Pour glycerin and some water into a jar and stir.
5. Insert the lid with the tree into the jar.
* If you are afraid that a child may accidentally open the lid of the jar, you can glue the lid. But to begin with, it’s better to leave it unattached, in case you need to adjust the tree and/or leaves.
This craft will last for several months. Then the water will begin to change color from contact with internal materials.
Crafts from leaves on the theme "Autumn": autumn garden in a frame

You will need:
Twigs
Adhesive tape
1. Using a thread, connect 4 branches into a frame.
2. Using thumbtacks, attach a piece of self-adhesive film to the frame.
3. Place the leaves on the film so that they stick well.
*You can tie a ribbon to the frame so you can hang it.
Paper crafts on the theme "Autumn": postcard from autumn leaves

You will need:
Leaves of different colors (in this example there are 35 leaves)
PVA glue
A4 cardboard sheet
Scissors
Simple pencil
Ruler
Scotch tape (if necessary)
A4 sheet of paper
Thick book.

1. Cut the petiole from each leaf. Fold all the leaves in half along the midrib so that the wrong side of each leaf is on the inside.
2. Place the leaves between the pages of a thick book. Leave overnight to get straight leaves.
3. Take a sheet of paper and draw a leaf of any shape on it. Cut out this sheet to create a stencil. In this example, an oak leaf stencil was used - its dimensions are 7.5 x 17 cm.
4. Take your leaves out of the thick book and carefully arrange them color scheme. In this example, all the leaves were arranged from green to red.

5. Take a sheet of cardboard and place it on the table. Step back 1 cm from the left edge, attach your stencil and trace it. Cut out the shape on cardboard. After the cut out figure, step back another 1 cm and cut. You will end up with a rectangle with a leaf cut out in the center.
Hello!
Today I again propose making crafts in an autumn theme. Look out the window and see how many colorful leaves are already lying there. Memories and lines from, for example, these immediately grab you:
“Suddenly it became twice as bright,
The yard is like in the sun's rays.
This dress is golden
On the birch tree’s shoulders...”
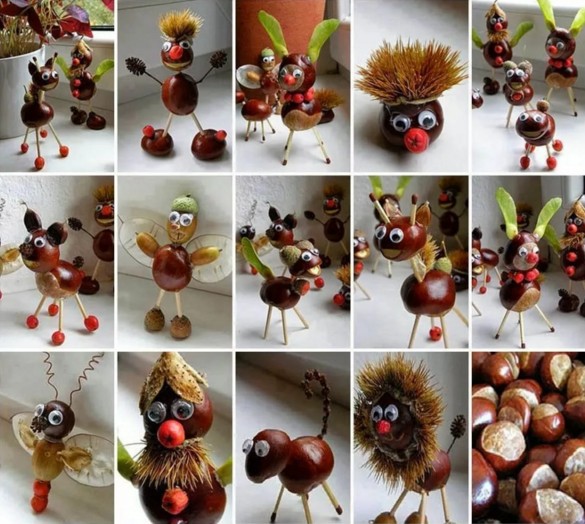
This time of year is good because there is something to craft from. Because you can take any and then you have, for example, a little man made of pine cones, or maybe you love it? Then you can also easily make a souvenir for an exhibition, for example.
You can even take ordinary leaves and create a masterpiece on paper. In general, the list can be endless. So let me introduce you to a bunch of cool and beautiful ideas about this theme.
I hope you will be inspired, and once you decide, you will immediately start making crafts with your children. After all, guys at any age really love such work, be it junior schoolchildren or preschool children.
In my previous note, we have already considered many options for what you can make with your own hands from various types of materials, it can be natural, fruits, vegetables, and even waste. This time I will show you a few more options, which are also no less beautiful and attractive.
And perhaps I’ll start with a non-traditional, but a paper-plasticine miracle. Take cardboard and make blanks of maple and oak leaves. You will also need glue for the work. ceiling tiles, disk cd.

Take plasticine of different colors in your hand and roll it into a ball.
Advice! You can use modeling dough instead of plasticine.

Roll out with your hands, as if painting the surface of the leaves.

Glue the finished blanks onto the disk using glue.

Mask the middle with oak leaves and roll up the red rowan berries. This is such a cool masterpiece with an autumn theme.

Do you want to create something extraordinarily cool from real rowan berries? I propose to make a picture of rowan in the form of a squirrel. You need to draw the image of a squirrel on cardboard (from under a box, thick) and then cut it out.

Use decorative tape to connect the edges of two cardboards. Or glue with regular PVA. And then fill the image of the animal with berries. It looks original and beautiful! She's a charmer, isn't she?

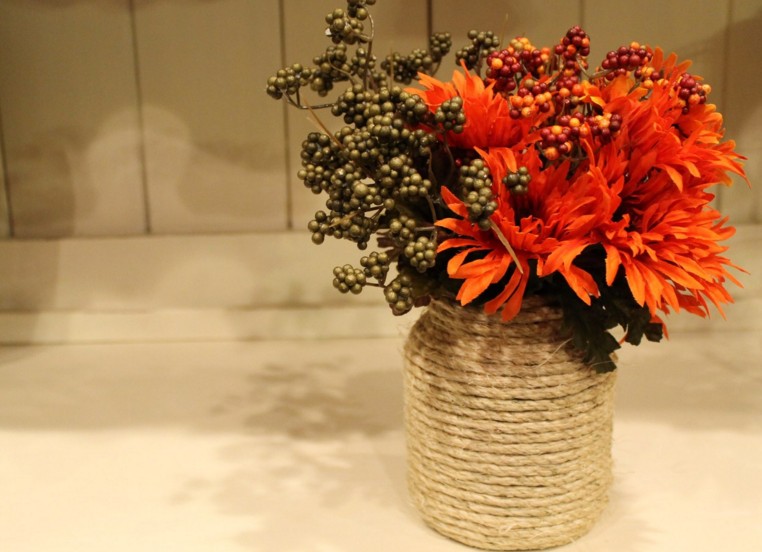
The next craft is a flower vase, you can make it yourself. Take any glass container and wrap it with woolen thread or twine. When doing this, first paint the jar with glue. You can see the stages of work below in this figure:

Now prepare the bouquet and place it in a vase. And a gift or souvenir for the exhibition will be ready. Good luck!
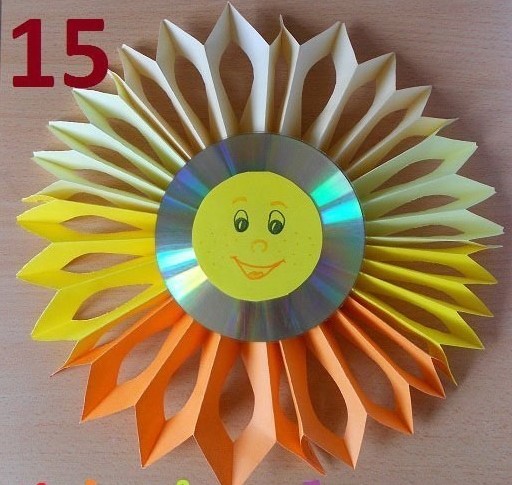
Now make a funny little guy in the shape of a sun. Cut out a circle from colored paper, glue eyes, mouth, and nose onto it. Or you can draw all these details with a marker.

Then cover the diameter of the circle with dry leaves.

Also, in order to comfortably hold the sun with your hands, glue a stick. Or then stick it in a glass, which you can also build yourself.
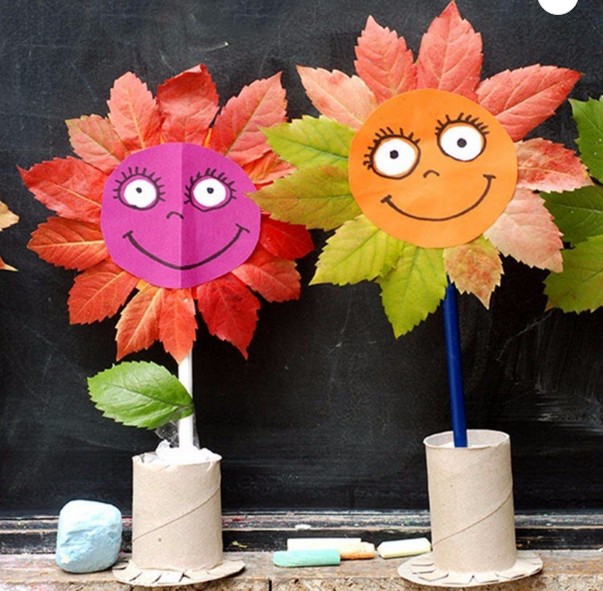
With kids preschool age in the park, collect dry leaves and then invite them to decorate them with felt-tip pens, or better yet, acrylic paints.

It turns out to be quite wonderful and cool, you won’t be able to take your eyes off it!

You can go the other way and make a cool bouquet. I remember that I haven’t shown you anything like this before. But, I repeat.


You can give this to your mother, grandmother, or your favorite teacher.
DIY crafts for kindergarten on the theme “Autumn” (all new items)
With preschool children, you can simply use your imagination. Take and lay out magical multi-colored trees from plasticine balls. And indeed it will be Golden autumn.

In addition, you can also use paints and cotton swabs for hygiene; you can use them to create paintings and scenes on any topic.

Agree, there is nothing difficult about this, just sit there and put it on a piece of paper.

Another fun work from scrap materials, made at home, such as millet, is what the author offers.


You can also make pictures from rice and semolina, or pasta, in the same way.


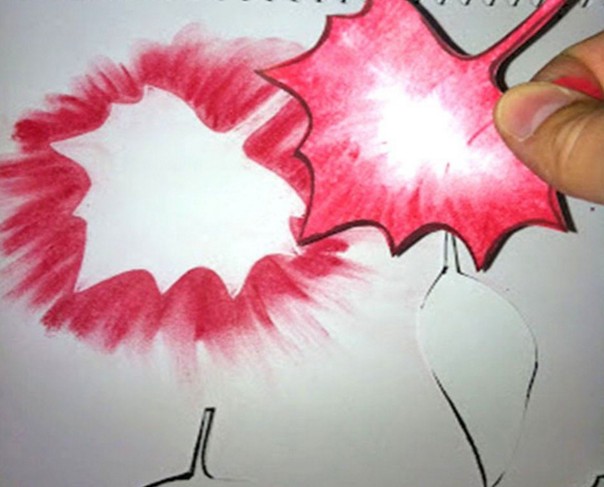
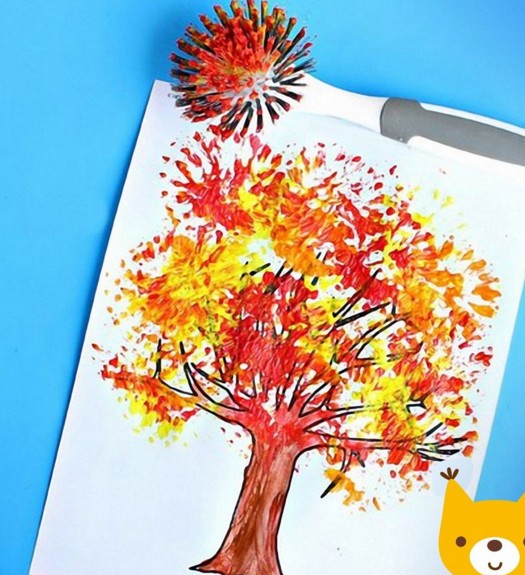
Everyone knows that kids love to play with signets, so why not take advantage of it. Dip dry leaves wounds from the ground and dip them in liquid paint, you will get an excellent print.

You see how brightly and elegantly you can decorate any drawing.

Or you can go another way, put leaves (either real or paper) and use them as stencils, that is, paint directly on them, you will get prints.

Works made from palms are popular. Well, let's use this idea.

You need to take a disposable white paper cup and recolor it green color. Make a barrel out of a toilet sleeve and glue it to the plate.

Draw the children's hands on cardboard and cut them out.

One of them Brown glue on the trunk.

And then, in this order, everything else.

Alternatively, you can make the work in the form of acorns and even squirrels, cool!


Kids also love to use natural materials in their creations; for example, you can get by with pumpkin seeds. Print out a picture of wheat or rye on an A4 sheet of paper and decorate it with these branches. Doesn't it look creative? And most importantly, it’s simple and charming!
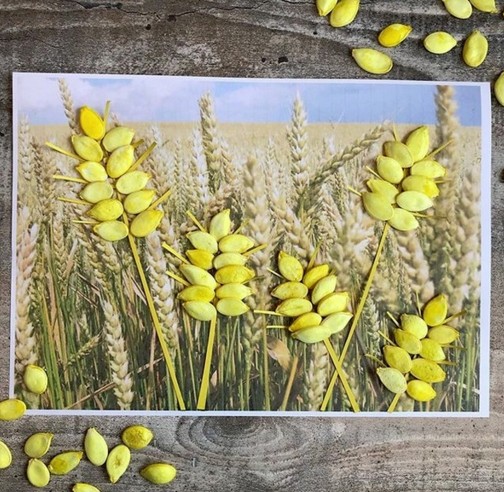
Read the finished description with materials and description below:

Do you want to use only colored paper? So you will need to cut strips different color and a couple of laps. Decide on the sizes yourself.

Fold each circle in half.

Then draw the trunk and make the crown of the tree, cut it as shown in the photo with scissors.

Glue the trunk on white paper, and the crown, that is, two circles with each other, only asymmetrically.

What is missing is, of course, colorful leaves! Cut them out in red, yellow and green.

So, what else, but here's what. You can take disposable paper plates, these are sold at a fixed price or in any hardware store. Paint them in the desired color, for example brown, and then let them dry. Cut out the body of a hedgehog or other animal from white cardboard, draw parts of the body, and let it hold a pine cone or acorn with its paws.

Probably the most primitive, but also so bright souvenir from cotton pads. Dilute the paint in a glass beaker and take pipettes. Carefully paint the discs with them. Let them dry.

And then glue it to any background, wow, beauty! And my mood even lifted, it was so bright and cool!

In my classmates I came across another such landscape, only it was made in a different technique.

Original works made from cones and acorns
Of course, forest or waste material is always in great demand. Especially in the autumn period. Because the gifts of nature can be found on paths and in parks and forests. If you have a desire to create something ingenious from ordinary pine cones, then here’s an idea for you, go for it.
Pour into a cup acrylic paint and dip each piece. After drying it, place it on any tray covered with oilcloth.

Then, from durable cardboard, you can even use a box, cut out a ring and decorate it with cones, they are glued with a glue gun. Just be careful not to get burned.
Carry out this procedure only together with adults.

Try to glue the cones tightly to each other so that there is not much space between them.

Here's a wreath for you, isn't it cute? I really liked it. By the way, you can use it as

You can also make a bouquet from them, who would have thought, but it looks so beautiful, especially if the vase is made by your own hands.

I recently showed you a lot of ideas about what else can be done on this topic. These can be bunnies, hedgehogs, owls, foxes, etc. and any other animals. Here are a few more ideas for inspiration.


I would like to show you one more video. In it you will see a bunch of new products this year. Enjoy watching.
As for acorns, there are also creation options from them. People or animals are usually made, but also cutlery and cups. Additionally, matches or twigs are used.

Well, if you want to distinguish yourself, then make an original thing, this is a brooch. Good luck.
Crafts “Autumn Fantasies” for school (grades 1-4)
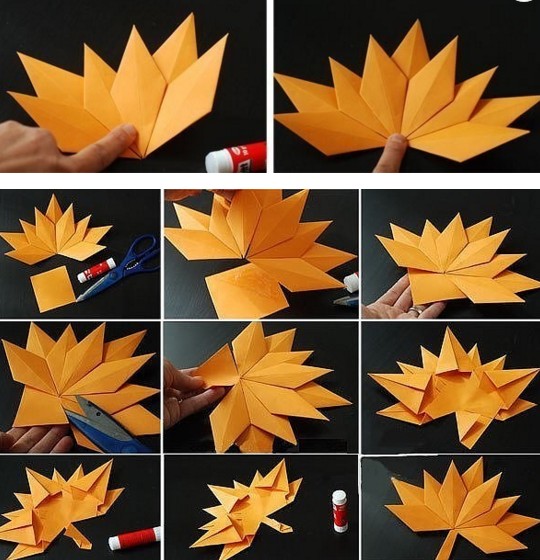
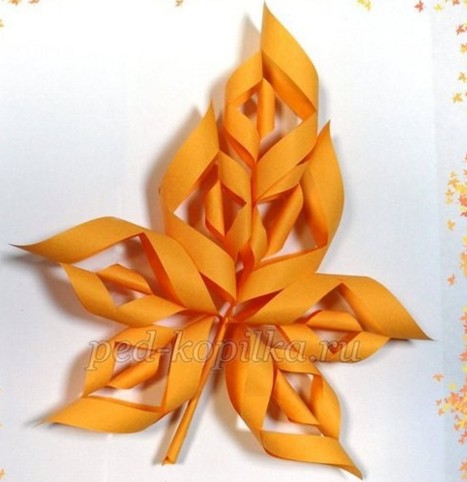
And now I propose to complete a craft according to this master class in the style modular origami. Wow, I’ve been asked for a long time to show how you can quickly and easily make maple leaves like this out of paper. So take note, because it is with these blanks that you can decorate the interior of a group, class, and even at a gala event, a matinee.
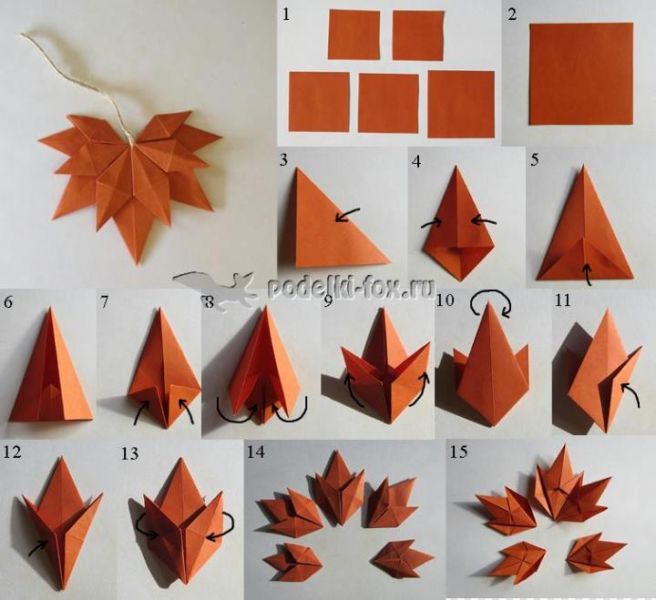
And then please, take it and fantasize. Here's how they decorated it on the Country of Masters website.

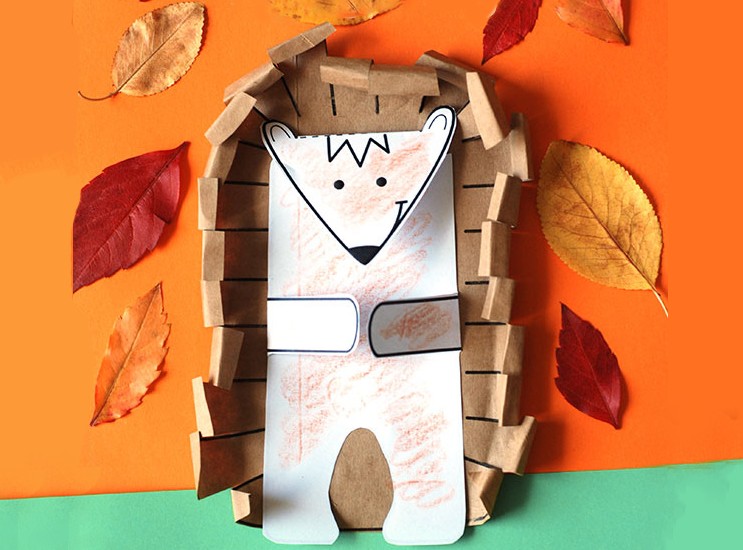
The next option, which is loved by younger schoolchildren, is of course the main character - a hedgehog.
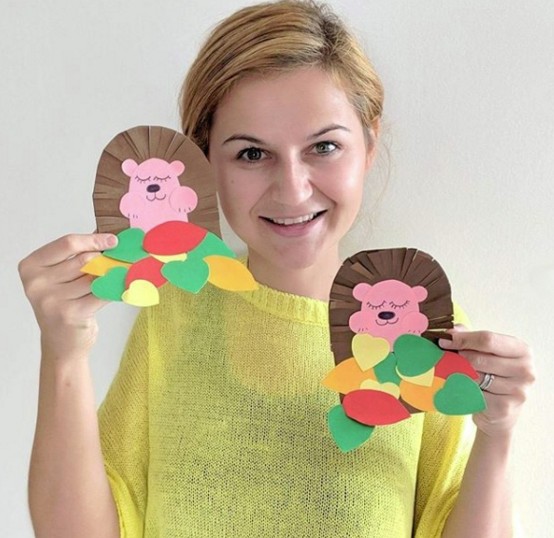
In order to create it, you will need everything that you see in the picture below. This is colored paper, a glue stick, a felt-tip pen.
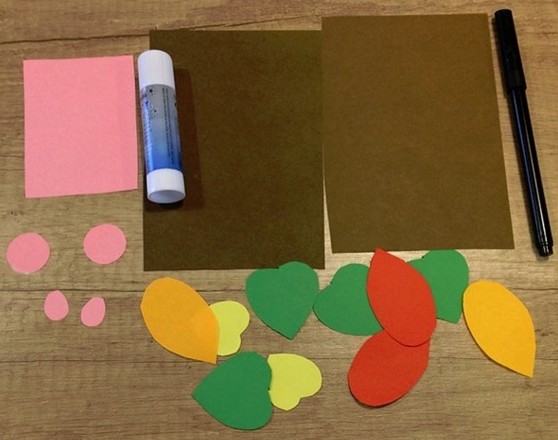
Take brown colored paper and fold it in half. Cut along the fold line with scissors, you will get two rectangles.

Then glue them together to form a stand.

After the glue has dried, draw and make round edges on the workpiece. Cut along the line. Using pink paper, also draw outlines in the form of a semi-oval.

It is also necessary to cut out round-shaped ears and paws from it. Place in correct ratio parts as shown below and glue to the base. Scatter real dry leaves or cut them out of colored paper.

Now all that remains for the hedgehog to do is make the spines; make cuts along the edge of the brown paper.

Draw the eyes and face. Your fabulous little animal is ready.

Using an accordion, make the work in the shape of trees. Look how original it looks.

Also, one of the favorite characters among children at any time of the year remains. I suggest making it this time from a CD. And again the paper will have to be folded like an accordion, in general, look at the instructions in the pictures and create.


What an unrealistically charming sun it turned out to be; my spirits lift when I see it.
And if you don’t have colored paper, then use napkins, although take them in a single color. Cut into small squares and roll each piece into balls.

Draw any still life, in this case the author depicted trees and a river. And sit and painstakingly glue each ball until the whole image is formed.


Next idea, work from cotton swabs, which, as you can see, were originally painted, their heads, in the desired color.

And for those who want to comprehend quilling, or are deeply interested in it, I would like to invite you to consider such a masterpiece.


Here's another fascinating idea, look how cool the author came up with it. Do you want to make it happen? Then let's get down to business. It will turn out to be just a living corner.


And if this is too difficult for you, then take regular package and follow the photo description.


Beautiful souvenirs made from natural materials and vegetables
I think that every time you visit such exhibitions you always rejoice. Because such events are always fun. Thanks to positive and creative works. Which are made from all sorts of things.
You can take absolutely any vegetables and fruits and use them to build

The most simple idea and easy, it’s a basket with such characters. As you can see, the author used a lot of vegetables that are found in any home.


And even build the heroes Smeshariki and Minions, catch the description:


Here are a few more thoughts that will lead you to your next creation. You can see the rest here. By the way, you can create with it too! There would be a desire.
Well, I want you to build Gena the crocodile. Especially when there are instructions with a description. We don't need much: carrots, cucumbers, tomatoes and toothpicks.

Use a knife to cut a piece of the carrot into a cylinder shape, and then make something similar to a mushroom.

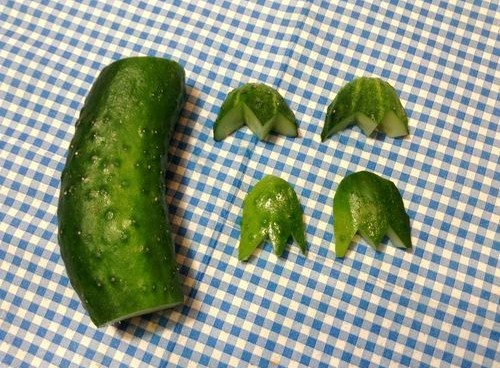
Cut off the tip of the cucumber, and cut the vegetable itself in half, but not all the way.

Connect the resulting parts with a toothpick. The result was the head of a crocodile.

Then make eyes from cucumber pulp and black olives.
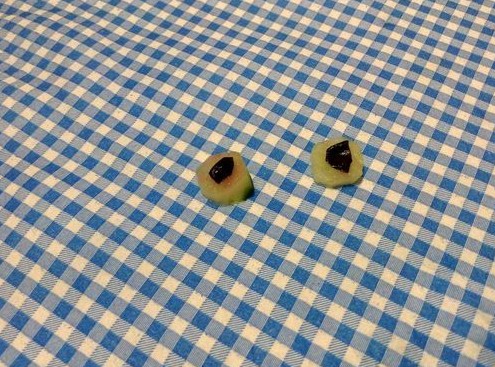
Stick them also into the head using wooden sticks. Cut the tongue out of the tomato.

For the body, use a slightly rounded cucumber, and design the legs like this.
You can also make an accordion from the greens pulp, but this is optional.

Place the weirdo on a plate and run to school or kindergarten to amaze everyone.

And then there are these faces, oh, when I saw them, I was really scared). And you?

How to make an applique from leaves: quickly and beautifully
For such works, you can take absolutely any character and easily decorate it with dry leaves that you collected in the park. For example, you can lay out funny owls using cardboard and paper.
Or you can make a huge owl entirely out of leaves.

Or plant the birds on a branch decorated with bunches of rowan berries.

You can take any face, preferably some animal, cut it out, and then decorate it.

And with what, of course, leaves. Collect them and place them on a sheet of newspaper so that they do not shrink when drying.

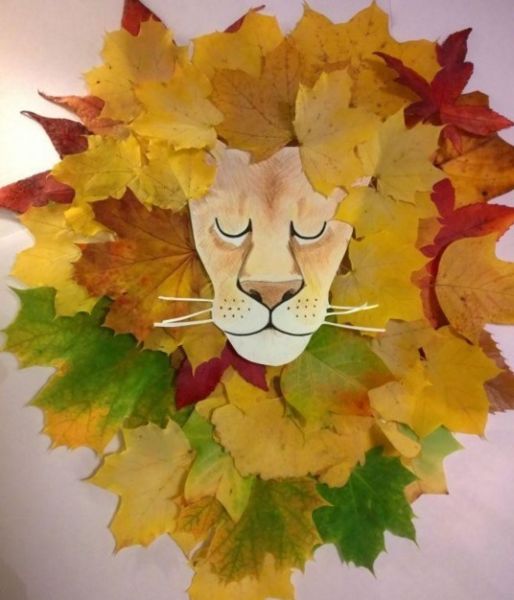
Maple leaves are best suited as decoration, for example a lion.
Or perhaps you will be interested in working in the form of a little lion cub.

Today my kids and I made these creations. And we actually sat down to do it, and then my mother remembered that she forgot to buy glue. I’m thinking what to do, mine are about to go broke))). It's good that there was plasticine. And this is what happened.


You can easily build a vase using a balloon.

Or make an applique of seeds and plasticine.

Or you can imagine the work in the form of a three-dimensional toy.


Autumn paper crafts for kids with templates
So we’ve reached another subtopic in which you can safely take templates and print them on a printer. And of course, create, get new masterpieces, adding some of your own twists.
If you use this drawing, then later you can color it, or you can safely make greeting card and write in it

You can take absolutely any piece of paper you like as a sample, or you can draw it yourself with a pencil. Fold a blank sheet of paper in half, and then cut out an image of the blank on one side. Cut crayon squares from office construction paper.

Scatter them in a chaotic manner and glue them with a glue stick.

This is how mysterious the postcard looks.

Now let’s take a closer look at one more master class. Before that, I already gave you some instructions, but this one is more understandable and the technology is different.

You need to cut 10 squares.

And then fold each of them like this.

This kind of work takes little time, don’t worry, you can do it in 20 minutes.

And then you have to glue each blank to each other.

Of course, looking at the pictures, everything becomes clear.

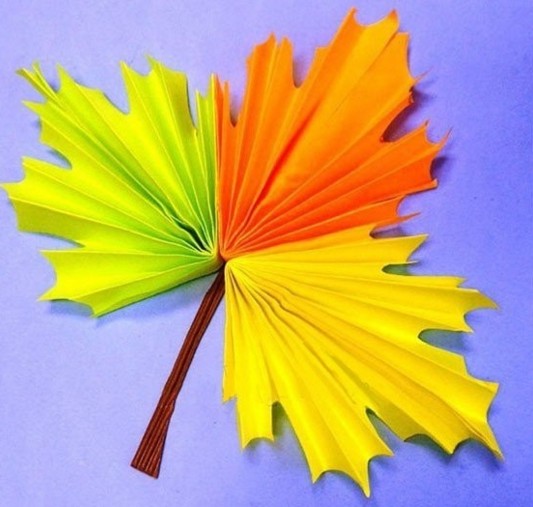
Don’t forget about other options; by the way, this craft somehow looks like

You can fold the leaf into a butterfly shape.
Also difficult, as you can see there is nothing, fold it like an accordion and glue it together.


Moreover, you can make it in completely different shapes, use your imagination.


You can make it even more interesting so that the leaf turns out to be three-colored.


Or make a bookmark using thread.


In addition, you can make a pumpkin out of paper if you cut a bunch of long strips with scissors.


How you decorate it is up to you, you can toothbrush use.
Well, and finally, take these ideas and dress up your favorite cartoon and fairy tale characters.


Well, according to tradition, I’m giving you a few coloring pages, in case they come in handy in your spare time.


Or use an anti-stress coloring book for creativity.

That's all, dear creators! I wish you a creative approach to business. And may autumn crafts win your heart and make you want to make more next year. I wish you success and patience! Bye.
Best regards, Ekaterina
The wonderful autumn season pleases us not only with bright landscapes, but also with numerous gifts. They fall from the trees, and it becomes such a pity that they will just die on earth that you want to give them a second life. How can you do this? There is a huge section of home crafts - autumn crafts from tree leaves. You can make a huge variety of beautiful works with your own hands. From tree leaves you can create panels, appliqués, topiaries, flower bouquets, wreaths and much more.
If you like to engage in creative activities with your child, then you know how boring activities with plasticine, paints, and paper can become over the summer. Then this can be replaced by activities with tree leaves. You must first collect them during a walk. This activity can not only entertain the child, but also teach him new skills. Leaves need to be collected beautiful and whole, and during the collection process you can tell your child the names of trees and interesting information about nature.
Autumn-themed leaf crafts will last much longer if made from dried leaves.

If the leaves are damp, let them air dry a little. You can put them in a spacious box so that the leaves get air. This way you will get rid of possible mold on the leaves.
If it is not important for you that the leaves are smooth and even, then leave them like that in the basket until completely dry.
But if you want even leaves, you can't let them dry out completely. Place them between book pages or sheets of paper/newspaper, but always under pressure.

Thus, the leaves should dry completely for about two weeks.
There is a special herbarium press. It will allow the leaves to dry much faster, and they will be ready for fall crafts in a few days.
But you can also speed up the process by drying with an iron. Turn your iron to the lowest setting and iron a piece of wood sandwiched between two pieces of white paper.

How to make DIY fall crafts from leaves

If you have prepared and dried tree leaves in advance, you can begin to create beautiful and original autumn crafts. They can create a cozy atmosphere in the house or become suitable job for exhibition in school or garden.
If you don’t have enough imagination and imagination to create crafts from leaves, then you can use a selection of works and master classes.
Assess your child's age and skills before you start creating your own autumn crafts from tree leaves.
Related materials for working with leaves:
Colored cardboard and paper. Cardboard usually acts as a background and basis for work. If you glue leaves onto paper, it may bend and curl due to the weight of the leaves, so it is better to use cardboard. Colored paper You will need it for additional decoration (to make eyes or other parts of the animal’s body).
How to glue leaves: this can be done with regular PVA glue (it glues dry leaves well), but hot glue is also perfect.
DIY autumn crafts from leaves
The most simple crafts Applications are made from leaves. You can use leaves for them different sizes, colors and shapes. The themes of the applications may also differ. These can be pictures of animals, landscapes and human figures.
Owl made from tree leaves

We will need:
- Dark leaves (oak, willow, birch)
- Colored paper
- Cardboard
- Branch of any tree
Draw an owl on a piece of cardboard.
Let's cut it out.
You can use willow leaves for feathers. Glue them in rows onto the owl cut out.
To make the ears and paws of owls, take oak or birch leaves.
Cut out eyes and beak from colored paper. Glue them onto the owl's head.
Glue the owl onto a tree branch as if it were sitting on it.
You can decorate your autumn leaf craft with a sprig of fish or thuja.

Leaves panel
You can decorate your house with an applique of leaves, making it not on paper, but on panel material.

We will use hot glue for this project, but young children can be involved in this work at the stage of collecting leaves. Choose the most beautiful and even leaves for the craft. Dry them first.
We will need:
- Wooden board (plywood, chipboard)
- Leaves
- Twig
- stain
- Brush
- Marker
1.Prepare a sheet of wood by first sanding it and painting it with stain.
The stain dries quite quickly, so you won’t have to wait long.
2.Draw a maple leaf with a marker.
3. Glue the leaves onto the board using the fan method. To make the panel three-dimensional, do not glue the leaves completely. Then the edges will be free and a volume effect will be created.

4.After gluing, place a heavy book or other object on each leaf as a press.

To make your picture clearer, you can trim the leaves a little along the edges of the picture, creating a clear outline.

There can be quite a few types of panels. You can attach leaves and twigs to a wide wooden frame.

A cute fairy can be made from colorful leaves and cardboard.

Crown of tree leaves
For a little princess or an autumn photo shoot, you can make a simple but interesting attribute.

Necessary materials:
- Colored leaves
- Thin branches
- Tape
- Pliers
- Wire

Cuts a wire whose length is equal to the volume of the head + a margin of a few cm for connection. The resulting hoop should sit easily on your head.

Using tape, attach the leaves to the resulting wire hoop

You can alternate leaves with twigs or flowers

Maple leaf wreath
Of the beautiful big ones maple leaves this could make a gorgeous wreath

The base for the wreath can be made from wire or willow twigs.

Attach the leaves to the base in a circle, twisting the leaf stalk on it.

Leaves should be attached along the entire diameter of the wreath base

This wreath can be worn on your head or hung as a decoration on your door.
You can add other elements to the leaves, such as acorns and flowers

Volumetric crafts from leaves
Autumn leaves that have fallen from trees can be used for more than just appliques. You can do gorgeous bouquets, lamps, compositions on the theme of Golden Autumn.
But in order to do volumetric crafts, the leaves must be subjected to special processing, and upon completion the product must be varnished.

When creating home decor, you want the craft to last as long as possible. You can extend the shelf life of autumn crafts made from tree leaves using a special floral spray or acrylic varnish. This method will keep the leaves fresh and beautiful for a long time.
Crafts from maple leaves: mask

We will need:
- Maple leaves of different sizes
- Cardboard
- Thread
- Scissors
1. Make a mask template on cardboard and cut it out
2. Make holes for the eyes

3. We insert an elastic band on the sides to put on the mask
4. Using glue, glue the leaves to the mask.
5. Trim any excess leaves inside the mask so they don't interfere with your eyes.

What gorgeous masks you can make from leaves with your own hands.


If you have beautiful leaves, you can make unusual candlesticks from wax paper.

Instead of paper, you can use a simple glass jar, decorating it with beautiful leaves.

Leaf pendants and garlands:
In order to keep this craft fresh for a long time, take the leaves and cover them with transparent varnish. Next, you should dip them into melted paraffin. Gather them in a bun or hang them on a string. In any case, they can be preserved for a long time and decorate your home.


Autumn crafts from maple leaves
Maple leaves are considered the most beautiful gifts of golden autumn: yellow, red, burgundy and orange. A carpet of maple leaves can be seen in every park in the fall, and by choosing the most beautiful leaves, we get chic crafts on the theme of golden autumn.
Rose from maple leaves: DIY craft

Roses made from autumn leaves remain very popular. For those who love flowers, this craft will be especially relevant. You can create whole bouquet from roses or make a beautiful composition in a basket.

How to make a rose from maple leaves

1. Fold the top end of the maple leaf
2. Roll it, tucking the top edge to make the flower more voluminous
.
Don't forget to hold the bud down so it doesn't fall apart.
3. To make a large rose, you will need more than one maple leaf. Choose leaves of different sizes and start with the smallest ones.
4. The edge of each leaf can be secured with a stapler or wrapped with thread.
For crafting roses from maple leaves, it is better to choose fresh material, not dried out. Having collected the resulting flowers into a bouquet, spray it with hairspray.
DIY maple leaf plate

Maple leaves are ideal for many crafts due to their size and shape. Making a plate out of leaves is quite simple, but such an unusual decor will take its place in your home or be sent as a gift to your friends.
Necessary materials:
- Leaves
- Brush
- Balloon
- A bowl
- Scissors

1. Prepare the leaves by cutting a stem from them.
2. Inflate the balloon to the required size and place it in a bowl.
3.Spread a thin layer of glue on it.

Place a leaf on top of the glue and spread it with glue. It should soften a little and stick to the ball.

We place the next sheet so that it partially covers the previous one, and apply glue in the same way.
Thus, we cover half of the ball with leaves.

Gently pop the ball to remove the resulting plate
You can decorate your front door in an original way by hanging a wreath of maple leaves on it. It is done simply by analogy with other wreaths

Glue beautiful maple leaves onto the base, complementing them with acorns, chestnuts and everything you find under your feet on an autumn walk.

Children's crafts from maple leaves
Children are especially interested in making crafts from leaves on the theme of autumn with their own hands.
Maple leaf snail

We will need:
- maple leaves
- Scissors
- Plasticine
- Scotch
- Eyes

- To make the base - the body of the snail, take red plasticine and mold it into a sausage, so that one end is slightly thicker than the other.
- Make a cut at the thicker end and shape the halves resulting from the cut so that they look like the antennae of a snail.
- The body must be bent
- To use maple leaves for a snail's house, cut the cuttings with them
- Fold the sheet to make a strip
- Roll the strip starting from the narrow part
- To make the house more voluminous, twist several leaves in this way.
- Attach the house to the plasticine body
- Attach plastic eyes and define a mouth

Turkey made from leaves: DIY children's craft

We will need:
- Cardboard
- Stapler
- Scissors
- Leaves
- Eyes

You need to cut out about 5-6 circles of different diameters from cardboard
Remove stems from the leaves except two leaves. We'll need them for turkey legs.
Attach each leaf to a cardboard circle
Stack the circles on top of each other using glue or a stapler
Glue a brown sheet to the back of the largest circle.
A triangle is cut out of a leaf to make a beak.
It must be glued to the center of the first sheet.
Attach eyes to your turkey.
Using colored paper and leaves you can make a cheerful family of owls.

Flowers from autumn leaves: beautiful DIY crafts
Flowers in any form are considered the most beautiful decoration home interior. Therefore, it is not surprising that they are made from all kinds of materials and autumn leaves are no exception.

Previously, we looked at how to make roses from maple leaves. They are most suitable for creating beautiful and lush bouquets. To keep the leaves in shape for a long time and not spoil, you can treat them with glycerin:
- Dilute 300 ml of glycerin in water (about 600 ml).
- Pour this liquid into the bag.
- Carefully place the leaves in the bag.
- The bag must be sealed and left for several days (about 3-5 days) in a dark place.
- Then take out the leaves and let them dry.
How to make flowers from leaves: step-by-step description
We will need:
- Red and yellow leaves
- Twigs
- Scotch tape or green tape
- Scissors
- Threads

Prepare the leaves first.
We begin to collect the flower from the core. To do this, take a leaf and bend it in half, face outward.
Roll the leaf into a loose roll.
In the second sheet, wrap the protruding upper part.

Wrap the leaf around the core of the flower, twisting it. Don't forget to pinch your future flower at the base.

Do the same with other leaves, twisting them onto the bud one by one.

Continue until the flower has a nice shape.

Insert the twig into the base of the flower and begin wrapping the tape.


Autumn crafts from leaves for kindergarten
The simplest crafts for kindergarten are applications. After all, it is easiest for children to cope with this process under the guidance of their parents. You can use ready-made templates.
Leaf craft templates

Lion made of autumn leaves


Turkey made from leaves


Or you can do interesting work that the baby will like.

We will need:
- White cardboard
- Dry leaves
- Black or brown paint
- Pencil
- PVA glue
1. The leaves must be crushed. Entrust this process to your baby.
2. On a white sheet of paper you need to draw a tree trunk. Here you can help your child
3. Help him paint the trunk with paints
4. When the paint is dry, you can proceed to the next step.
5. Apply glue to part of the trunk and branch
6. Sprinkle crushed leaves onto the glue.
Children love making animals, and they will love the idea of making a hedgehog applique from leaves.

And if you have collected brightly colored leaves and flower petals, then thanks to a printed template or a hand-drawn one, you can create beautiful pictures.

Beautiful DIY crafts from leaves
Autumn girl: craft from leaves
Girls with early age love to dress their dolls. Why not create an outfit for Barbie made from leaves. The result will be an original autumn craft.

Choose for her the most beautiful leaves collected during your walk.

We will need:
- Doll
- Leaves
- Cardboard

1. Dry the leaves with an iron using paper
2. Make a cone out of cardboard that will act as a skirt.


3. Attach the cone to the doll by cutting off the top
4. PVA must be diluted with water 1:1
5. Glue the leaves onto the cone with diluted glue, starting from the bottom.


6. Don't forget about a hat for a fashionista

7. The bottom of the dress can be decorated with rose petals

In a similar way, you can make an applique by first drawing a girl on cardboard, but make the outfit from leaves

Crafts from leaves for school: 2nd grade
What can be offered to children in the second grade for creative development? Of course, we can’t do without applications and crafts made from natural materials. After all, at this age it is important to introduce the child to the world around him and teach him to work with different tools and materials.
It is exciting for schoolchildren of this age to create silhouettes of animals they know.
Moose made of leaves

We will need:
- Leaves
- Maple seeds
- Brush
- PVA glue
- Sheet of white cardboard
- Black felt-tip pen or marker
- Scissors
Place the elk's body on a piece of cardboard. To do this, you will need two leaves: one large with a tail and the second smaller, round.
We will need maple seeds for our feet. Separate them and glue them in the right place to the body.
Using a felt-tip pen, draw the eyes, and the nose will be created from a dark-colored leaf.

To make beautiful horns will come in handy oak leaves and maple seeds

You can complement the picture with a small tree

Like this moose, you can make many other paintings from leaves depicting animals, birds and insects.
Owl made of leaves

Hedgehog made from leaves

Leaf Butterfly

Leaf fish

Lion made of leaves

Crafts from leaves for 3rd grade
In autumn it is impossible to remain indifferent to the beauty of nature and it is very important to teach children to rejoice and enjoy what it gives us.
Therefore, the theme of autumn crafts for primary school has been relevant for many years and is unlikely to lose its popularity for many years to come.
There are many options for fall-themed crafts for school.
Applications that look like real paintings


You can get creative with your child and create a beautiful house from leaves and other natural materials, using a cardboard frame as a basis.

By combining a child’s ability to draw and appliqué, real masterpieces can be created.

Corn Leaf Crafts
Another topic of interest for creativity was not covered in the article. Crafts made from corn leaves can be very beautiful and original.
Corn leaf flower
We cut out about 20 leaves from the pointed-shaped talash, and also prepare the substrate. We also need a strip of about 5 cm.

The strip must be folded and glued to the center of the backing. Now you need to attach the cut out petals in a circle. Let's start with the smallest ones

This flower can be used to decorate a gift or create a bouquet of leaves.
Crafts from rowan leaves
Rowan berries are often used in school work to make your work brighter and more beautiful. But you can also use rowan leaves to create autumn-themed crafts.