Nails with simple varnish with simple patterns. We draw maple leaves, flowers on the nails. Step by step tutorials with photos. Patterns can be applied using
To make a woman look stylish and attractive, it is not necessary to spend energy, time and money on visiting beauty salons. You can create a unique one at home fashionable image. In this article, we will tell you how to make fairly easy drawings with gel polish and what you need for this.


Necessary tools and materials
To realize a high-quality manicure, you should stock up on all the necessary tools in advance.
- Colored varnish or acrylic paint. These options are needed in order to give the surface of the nail the desired shade and to embody a creative pattern. Acrylic paint has more saturated pigments. It is intended for artistic painting. If you want to make drawings with multi-colored gel polish, then remember that its shades should differ from the main coating by at least a couple of tones. Then the composition will line up consistently and beautifully.


- Necessary elements for the implementation of a particular design. These can include stencils, stickers, tape, and many other items. Everything will depend on the drawing that you are going to embody.


- Brushes. They can be thin, thick, short, long. They will help to clearly draw the necessary elements. You can also stock up on a needle or pin for smaller details, or a toothpick.


- Dots. This item is an essential attribute of a beginner. It has rounded tips. With the help of dots, you can easily and simply put round drops on the surface nail plate. This will allow a person with no artistic experience to create real masterpiece on nails.

- Decorative elements. These may include foil, rhinestones, sparkles, glitter. First you need to choose a suitable design, and only then proceed to its implementation.


At home, you can find various improvised materials that will also become assistants in creating creative nail art.
For example, dots can be replaced with invisible or sewing pins with different tips.
Before you start making drawings, you should take care of your fingers and the surface of the nail plate. Nail art will be perfect when the hands are perfectly processed. This will also require certain quality tools.

First of all, this is a small container with warm water, where you will soak your hands, preparing them for processing. Then an orange stick. With its help, you can gently push back the cuticle without damaging the nail plate. Excess skin is removed with tweezers. With the help of a nail file, the desired shape is given to the nails. And their surface is polished with a buff.


Don't be reckless with preparatory stage processing and move to design faster. After all, the durability and accuracy of the manicure will depend on how well the nails are worked out. Therefore, spend your precious time at this stage so that you do not regret the efforts made later.

The easiest ideas
Today you can find the most creative at the same time uncomplicated gel polish manicure ideas. Below is a step-by-step description of how one or another design can be made, what elements and fixtures will be required.
Abstraction
Simple drawings on the nails can be implemented using this technique. Even a novice master will cope with this. You do not need specific skills and a lot of time. Such a design can look cute, stylish, brilliant - it all depends on your preferences.


For embodiment stylish design you will need a base, gel polishes of a certain shade, a needle or toothpick, a cotton swab and a lamp to dry the layers. If you want to create beauty on your nails yourself, then you should start with simpler drawings. Gradually it will be possible to draw complex elements.
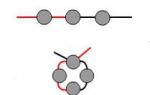
It is necessary to cover the nail plate with a base and dry it in a lamp. Then apply your preferred shade of gel polish. Do not let it dry, you should put three or four dots in the center. Their location depends on the length of the nail. Take a needle and carefully connect these points in the same direction. You can draw a line from the edge to the hole and vice versa.
The finished drawing is first dried thoroughly under the lamp, and then fixed with a top coat.


There is another option. Mentally draw a vertical line that will divide the nail plate in half. Each half should be painted over with a certain color of varnish, and two fingers (for example, ring and middle) should be painted with different colors (for example, black and red). There are red dots on the black half, and black dots on the red half. With the help of a needle, horizontal lines are drawn from the middle of the point to the center of the nail plate. In this case, the line should be slightly underestimated. So you need to go through all the points.
Well, the easiest way is to put dots in a line and connect them with a toothpick using this technology. To make such an abstract pattern look stylish and neat, the nails should be the same length.


Point technique
Before implementing it, it will be desirable to practice several times, as well as to choose the right tool. You will need a base, gel polishes of various shades, dots, foil, top coat. Instead of dots, you can choose a hairpin, pencil, pen. They will also help make your dreams come true.


First, a base is applied to the nails and fixed in a lamp. Then the surface of the nail is covered with the selected color. It is convenient to use white, blue, beige tones. Also dry everything well. We take a piece of foil and put drops of red gel polish on it. We take dots and use it to put red dots on the surface of the nail, repeating the shape of the hole.
After that, wipe the tool with a napkin and repeat the procedure, but with a different shade of gel polish. And so on until the end of the nail plate. The dots can vary in size. After the design is completed, everything is dried in a lamp and fixed with a top coat.


Gradient
This option is also easy to implement. You will need colored gel polishes, a base, a top, a piece of foam or sponge, foil, nail polish remover, cotton swabs, a toothpick. First apply the base and dry well in the lamp. Next, cover the nail plate with gel polish of the selected shade. It will be the main one in our design. Let it be a lighter scale.


Then the foil is taken. Drip there gel polish darker or more saturated than the base. Now dip the sponge into the polish and apply it to the surface of the nail, pressing, but not hard. If you want to use not two, but several shades at once, then the next color should be overlapped.
Take cotton swab, moisten it in a special solution and remove excess varnish on the cuticle and on the side rollers.
When the design is completely ready, it is fixed with a top coat and dried in a lamp.


You can make a flow from one tone to another and in a slightly different way - immediately apply the desired colors to a piece of foil. Use a toothpick to mix one shade into another at the border. After that, dip the sponge into the gel polish and transfer the color to the surface of the nail with quick and precise movements. The remains of the varnish are also removed, the top is applied and the composition is dried in the lamp.

You can make a gradient on all fingers at once. This requires more dark color cover the thumb or little finger. The rest of the nail plates will have a gamut slightly lighter than this base color. To do this, we add white gel polish to the base shade. All this is done on foil. The colors mix well, and only then are applied to the fingers. So even monochromatic coatings will look fashionable and attractive.


With tulle
An interesting and creative moment for inexperienced nail artists will be the use of a piece of ordinary tulle or lace. So you can create an attractive decor of marigolds, make them stylish and delicate. Stock up on gel polishes: base and finish. Also stock up beautiful lace with an image. Cut the same strips with similar images so as not to spoil the whole composition.
First, the base is applied, fixed in the lamp. Apply the varnish of the chosen shade to the nails, which will become the base. Now we can move on to design. Take an elongated piece of fabric, hold it with your fingers and press the lace against the surface of the nail. Apply varnish on top of it and quickly remove the material so that the varnish does not have time to grab, otherwise the whole picture will be smeared. After the composition dries, apply a fixer.


Drawing master classes
Drawing at home can be easy and simple. The main thing is to be patient and have good adaptations. First, you should use simple options to implement personal nail art. Gradually, you will expand the boundaries of your skill and move on to more ornate patterns. You can find a variety of lessons and workshops on detailed drawing of objects. Follow them clearly and you will get a positive result.
- Hearts. Created with toothpicks. In this design, the main thing is precise movements and good light. Initially, a base is applied to the fingers, which polymerizes in the lamp. Then the nails are covered with a suitable shade. We take the foil and put droplets of the selected gel polish there, with which hearts will be created. With a toothpick, points next to each other are put on the nail. From each mark down, draw a strip at an angle so that they connect. So you can get a beautiful heart.
Upon completion of the design, the nail plates are covered with a top coat and dried in a lamp.


- Watermelon. To create such a pattern, you will need suitable gel polishes and a brush. Cover the nail pink tint. The edge of the plate is framed by a green stripe. A thin strip of white is drawn above it, and then black dots are placed all over the nail plate, which symbolize watermelon seeds.


- Floral patterns. Drawing flowers is also quite simple. At the same time, such compositions look spectacular and attractive, suitable for any clothes and any event. You should be patient and persevering for the first time. Initially, the nails are covered with a base, which is well dried in a lamp. Then you should cover the nail plate with a light-colored gel polish. Use a toothpick or needle to mark the point on the nail. It will symbolize the middle of the flower. Remove the remaining varnish from the instrument. After that, around you need to arrange points in a circle that imitate petals. Using a toothpick, draw a line from the petals to the center. So you can make the required number of floral elements. After the design is completed, everything is dried in a lamp and covered with a top coat.


Secrets and tricks
Do not be discouraged if you immediately failed to carefully implement the chosen nail design. You will need to practice a couple of times to feel confident and find creative nails. The whole procedure should be done slowly and carefully. If you are a beginner, then only preparing your hands can take you a long time. Don't be in a hurry. Speed itself comes with experience. It is better to do everything slowly from the beginning, but better.

Do not neglect the preparatory procedures. Nails and fingers must be perfectly finished before creative designs can be applied to them. Sloppy nail plates look not only unfashionable, but also vulgar, even if they have the most stylish designs. Be sure to organize your workspace. The quality of the procedure also depends on this. The table should be spacious, where all the necessary accessories for manicure will fit. It must be light, otherwise you simply will not notice the small nuances of the design.

Nobody and nothing should interfere with you.
File the nail plate in only one direction. This will avoid cracks and brittleness. At first, it may be unusual, because we are all used to sawing our nails in both directions. But it is worth practicing, and you will quickly be able to perform such actions. Positive result will not keep you waiting.

Do not shake gel polish before use. This can create bubbles that will create obstacles to creating an even coating. Apply a thin coat. It would be better to make several thin layers and dry each one in a lamp than one thick one, which will spread and cause a sloppy manicure.


Experts strongly recommend capturing the edges of the nails when staining. So you can avoid chips, and stylish manicure will delight you for a long time. Be sure to use a binder. It gives the coating not only a glossy sheen, but also guarantees durability and durability (of course, if all the rules of manicure are followed exactly).


All layers should be dried well in a lamp. The clarity of the pattern and the durability of the entire composition will depend on this. To remove excess gel polish, you need to use a special brush for nail art. It will help to gently cleanse the skin and maintain an attractive appearance of the hands.


It is better to remove gel polish with professional tools. You shouldn't use a saw. In inept hands (and often in skillful ones!) It can injure the nail coating. It is better to protect yourself in order to avoid negative consequences.


If you want to create a unique decor, but do not have the necessary experience, you should start with simple drawings. You can also use improvised means: stencils, stamping, decor elements. They will help create a creative manicure.

Well-groomed hands noticeably adorn any girl, regardless of her age. A neat manicure emphasizes the uniqueness and perfectly enlivens any look. Masters of the nail industry prefer a unique coating, which is complemented by drawings, patterns and other decorations. How to learn to draw on nails for a beginner?
Drawing Rules
A true professional is able to create any composition on the nails. But what about girls who do not have so much time to visit beauty salons or drawing courses? How to make an unusual nail design yourself? How to learn to draw on nails at home for beginner girls? Let's figure it out.
Drawing is not only soothing, but also very exciting. But to achieve the ideal result, you need to train and experiment a lot, mastering more and more new techniques. Knowing the simplest basics, you can relax and let your imagination go forward, depicting what the subconscious advises. For your convenience, we have compiled the most simple rules and step by step diagrams to help you create the perfect finish.
Required Tools
What tools will be useful in the work of a novice master or a home user? After all, only with the help of them you can create the perfect nail design. To get started, you do not need to spend a lot of money on professional materials and tool kits. If necessary, they can always be purchased in addition.
In the first couple at home, you can use improvised means:
- toothpick;
- hairpin;
- Scotch;
- sponge / sponge;
- tweezers;
- sliced orange stick;
- artistic brushes.
With a needle or a toothpick, you can draw graceful monograms, elegant patterns or small flowers. Brushes allow you to stroke, draw small elements, or paint over objects.
Secrets of specialists
Our simple tips will help you create an unusual coverage:
- it is best to equip a special place for drawing on nails: let it be a comfortable desk, on which bright daylight falls;
- varnishes can be mixed on paper, plastic surface or foil;
- all tools are best stored in special boxes;
- in order not to damage the surface of the nail with a sharp needle, it is necessary to apply a base coat or a clear varnish.
Drawing techniques
First you need to decide on the nature and style of the picture. After all, different patterns are suitable for each female bow. It is images and patterns that can distinguish you from the crowd and complement the image. Let's look at the basic techniques for creating patterns on nails. Now we will explain how to learn to draw on nails.
brushes
Which brushes to choose for manicure from the whole variety? Let's see:
| Brush | Characteristic |
| dots (spot) | Dots instead of a pile has a ball at its tip. There are a huge number of nozzles for dots available, ranging from the smallest to the largest. It is easy for them to put peas and dots different sizes, as well as draw rounded flower petals. |
| fan | A fan-shaped brush helps to draw various stains and waves. With it, you can mix a few drops of varnishes together, creating an unusual composition. |
| hair | Typically, the length of the brush tip is 2-3 cm long and about 2 mm wide. This allows you to display various curved lines, monograms and curls. |
| flat | A 4 mm flat brush is suitable for drawing patterns, strokes or decorative painting. |
| petal | The brush is somewhat reminiscent of a flat brush, but the petal brush has a cut corner. Thanks to this structure, it is convenient to display various petals with it. |
| fluffy | With a brush with increased fluffiness, it is easy to sprinkle glitter on the nail plate. |
| thin | The medium thin brush has a length of 5-8 mm and is suitable for drawing dots, stripes, lines and other patterns. The short one has a length of no more than 4 mm, and it can be used to draw the smallest details in the composition. |
| Chinese | A popular brush that is used for . Most often it can be found in special sets. |
Painting with brushes is pretty easy. It uses exactly the same principle as when drawing on paper. It is only important to correctly calculate the parameters, because the nail bed is much smaller than the landscape sheet.
Needle
If you cannot find brushes at hand, then a needle will come to the rescue. How to learn to draw on nails with a needle? Here is a step by step guide:
- Apply any varnish on your nails as a substrate.
- After complete drying, scoop up the desired shade of varnish with a needle.
- Put on the nail several points parallel to each other.
- Until the varnish is dry, gently connect the dots with a needle, creating unusual patterns.
- Cover the nail design with a top fixer.
Step by step diagrams can be seen below:


With the help of varnishes
Do not write off the most common varnishes. Even with the help of them you can make unusual patterns on the nails. Here it is important to choose a comfortable native brush of varnish. It should not be too thick and not very long, otherwise it will be impossible to work with it. Make sure that the background substrate blends perfectly with the shade of the applied pattern.
Before drawing patterns, you can practice on tips or on paper.
Tape drawings
Who would have thought, but with the help of adhesive tape you can also draw! This is a universal tool that almost every home has for sure. Fortunately, beauties from the nail industry have found the use of Velcro tape even in nail design.
How to do a manicure with scotch tape:
- Apply a base on the nails, and then 1-2 layers of color coating.
- Using nail scissors, cut a stencil of the desired shape from adhesive tape.
- Apply a different shade of polish to your nails and let it dry.
- Carefully remove the tape.
- After all, cover the nails with a top coat.
Scotch tape is an ideal option for creating, which is so popular in the new year. This may be in which multi-colored horizontal and vertical lines alternate. With the help of such an improvised tool, you can draw a Christmas tree, zig-zag, rhombuses, triangles and others. geometric figures.
Step-by-step instructions for creating drawings using adhesive tape and nail tape:


Acrylic paints
Painting with acrylic paints is a popular method for creating the simplest and most uncomplicated patterns. Of course, this method is much more difficult than painting with varnishes, but each of you is able to learn this, because there is nothing difficult about it.
How to draw branches on nails:
- Cover the nails with a base and 1-2 layers of delicate varnish.
- Using a thin brush with a contrasting color of paint, draw thin and curved branches, starting from the cuticle and leading to the tip of the nail.
- Carefully draw small leaves on the branches.
- Color the leaves.
- Apply a top coat to secure the design.
Drawings on nails with acrylic paints step by step for beginners:


decorative patterns
How to learn to draw various decorative, but simple patterns on nails? After all, in addition to straight lines, waves and peas, I want to somehow diversify my coverage. Let's see how to embody the best ideas on nails.
Easy peasy
Flowers can be painted using brushes of different thicknesses. It is they who help draw the various curved lines and texture of the petals. The core of such a flower can be decorated with rhinestones, sequins or a drop of shiny varnish. And if you circle the petals with acrylic paints, they will stand out in the overall composition. Flowers are usually located in the lower corner of the nail near the cuticle. The shape of the petals can be round or curved.
Elongated drops, wavy bends, stars, lettering nail design, abstract patterns can be made with a needle. But you need to draw with a needle very quickly, until the varnish is dry. Of course, if it is an ordinary varnish. And for starters, you can practice on the palette.
monogram
- These are royal elegant patterns that look quite aristocratic. It is simple monograms that can add status to your image. They can be drawn with both dots and a thin brush. As a material, it is better to take thick varnish, colored gel or acrylic paints. The main thing in monograms is symmetry. Both sides should mirror each other.
How to learn to draw monograms on nails:
- Cover the nails with base and colored nail polish in several layers.
- Pick up varnish / gel / paint on the brush and put a drop on the tip of the nail near the cuticle.
- Carefully stretch the monogram, bringing a smooth arc to the tip of the nail.
- Repeat a few more “branches” of the monogram.
- To add volume, you can apply a second layer of paint or gel.
The best place to place the monogram is the lower corner of the nail plate near the cuticle.


Symbolism
How to draw simple drawings can be seen below in the video.
Flowers
Girls' favorite elements are floristry. It is she who sets a special mood not only for the entire manicure, but also for the image as a whole.
How to learn to draw flowers on nails:
- Apply base coat and colored polish in 1-2 layers on nails.
- Until the varnish is dry, you need to draw semi-twisted short strokes on the nail plate with a thin brush, which you need to scoop up the second shade of varnish.
- Since the wet varnish has not yet dried, the second varnish will slowly spread over the surface and create unusual patterns.
- After drying or polymerization, cover the nail design with a top coat.

Now you know how to learn how to draw on nails. All techniques and methods are quite simple and do not require much of your time or money. Feel free to experiment and move from simple drawings to complex ones, constantly improving.
To make fashionable nail designs with thematic elements, we most often use ready-made prints and simply transfer water stickers, prints from stamping stamps or stencil airbrushing onto the main nail cover. But hand-made drawings make the manicure original, add zest and special charm to the whole image. Absolutely every woman can learn how to draw on nails not only simple drawings, but also master artistic painting. Modern nail art allows you to create very unusual compositions for fashion manicure in any technique using different tools and special devices. But before you paint on your nails beautiful drawings, practice orderly making simple patterns of dots, straight lines, curls on cardboard or on artificial (false) nails. Having gained experience, try to create a light geometric manicure with the simplest shapes (triangle, square, circle) on a plain surface, and then try to depict Maple leaves, flower, butterflies for nail design.
It is not necessary to decorate with images all the nails on each hand. Now it is fashionable to focus on one finger, decorating the nail with an interesting pattern with the addition of shiny rhinestones, glitter, crystal stones. You can draw on the hardened coating and ordinary varnish, but it has a rather dense texture and it is very difficult to apply elements of different thicknesses with smooth transitions with a brush. It is best to use acrylic paints, which are quite suitable for painting on gel polish after drying the color layer in a UV lamp. The top gel will protect the dried drawing on the gel polish and the manicure will remain in perfect condition for several weeks. In order to draw maple leaves, flowers, bows and other drawings on your nails, use the video tutorials below and step by step master classes for beginners.
♦ NAIL DESIGN TOOLS
Thin brush.
A brush with synthetic bristles, the bundle of which tapers at the end. With this tool it is easy to draw small details, edges, shadows of the picture;
Fan brush.
With this brush it is convenient to make background elements, gradient transitions, flow of colors. Often used for Chinese painting on nails;
Flat brush.
The pile in the bundle is evenly distributed, the piles are adjacent to each other in dense rows. such a tool is convenient to depict large elements of the picture, three-dimensional patterns, fill, mix acrylic paints;
Liner brush.
A very thin brush with an elastic bristle for painting fragments of a pattern along the contour line, for making thin uniform stripes;
Dots with different tips.
With the help of a dots with a ball at the end, you can draw tapering lines, dots and circles of different diameters, curls and monograms on your nails;
Additionally.
Pieces of foam rubber, sponges, sewing needles, orange sticks.
♦ LEAF AND FLOWER NAIL DESIGN
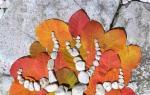
How to draw maple leaves on nails, as well as birch and oak leaves:
In the photo: step by step drawing of leaves
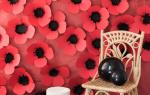
How to draw a flower on the nails:
In the photo: step by step drawing flowers
♦ USEFUL TIPS FOR BEGINNERS
❶ There is no need to buy a large palette of acrylic paints. It is quite possible to get by with a set of 6-7 colors (it must be white), from which you can get any desired shade;
❷ Any drawing starts with an outline. If you carefully draw the contour lines, then coloring the drawing with acrylic paints will not be difficult. Conveniently position your elbow and hand on the table, take care of comfortable lighting of the workplace;
❸ Under a layer of varnish or gel polish, there must be a base to protect the nail plate, and the drawing itself must be covered with a fixative (top gel);
❹ The background coat must be completely dry on the nails before painting on it;
❺ Large drawings and compositions look harmonious on long nails, and on short nails it is appropriate to draw small prints (can be repeated);
❻ In order to visually lengthen the fingers, you can make a colored jacket with a neat pattern along the "smile line". Lengthen fingers and repetitive prints in the form vertical stripes;
❼ It is advisable to start doing nail design on the little finger in order to reduce the likelihood of smearing already completed drawings on other nails;
❽ The background coat must be perfectly even. For this
Manicure with gel polish Lately gained great popularity among women. It is comfortable, practical, suitable for any nails, strengthens them. In addition, it is combined with various decorative elements - sequins, rhinestones, foil for manicure and so on. To diversify the manicure, the masters learn how to make drawings with gel polish on the nails and offer their clients a wide choice.

What is needed for a manicure with gel polish with a pattern?
For such a manicure, you will need much more tools than for a regular one. Here is their list:
- basic and top coat;
- gel polish of colors in which the manicure will be performed;
- dots for drawing a picture or pattern;
- lint-free wipes and a manicure lamp;
- liquid that removes the gel coating;
- decorative items as desired.

How to make a simple manicure with gel polish in stages?
- First, as for a monophonic manicure, a base coat is applied, then the nails are varnished with the main color. To perform a flower manicure, it is recommended to choose a dark varnish for the base, and light for the flower itself.
- Via special means neutralize sticky surfaces.
- Drawing the drawing itself with the help of dots. It is better to make the drawings as simple as possible by dipping a dots ball into the varnish and making a flower pattern, as shown in the photo below. The most colorful and dense pattern is usually applied only to a couple of nails, the rest are applied only with an element of the pattern or completely left without a pattern.
- After applying the pattern, the nails are dried in a lamp and covered with a top coat.
This manicure is perfect for beginners. It looks neat and interesting, and it is difficult to spoil it.


How to make a drawing on a wet surface?
After the first independent tests, the girls begin to wonder how to draw more complex drawings with gel polish? After all, you want to achieve mastery in this matter and do a manicure no worse than in the salon. One of the techniques involves applying a pattern to a wet coating with a needle. Instructions on how to do it step by step.
- As in any manicure, gel polish is first applied to the base, then the coating is dried in a lamp.
- Lacquer of the main color, the so-called background, is applied. Leave dots with varnish in certain places with a needle or toothpick (depending on the pattern) and immediately begin painting until the coating has dried.
- You should get a smooth uniform pattern. If there are straight lines in it, you need to be as focused as possible on the work.
- After the drawing is done, the nails must be dried in a lamp and covered with a top coat.
Smoother and neater patterns may not work with a needle, especially for beginners. To get out of this situation, there are varnishes with a special thin brush, which allows you to make the most incredible and sophisticated nail design.


French manicure with gel polish
French is a classic and the king of manicure, and holds a leading position to this day. It is suitable for both young girls and adult women, for any length and for any occasion. How to learn how to make french gel polish? After all, this manicure is quite difficult to perform and make the perfect smile line, and the slightest defects will be immediately noticeable.
- Nails are thoroughly prepared, polished with a nail file, degreased. Apply a base coat and place your nails under a lamp to dry.
- The next layer of varnish is the base for a French manicure. I generally opt for a pinkish or beige base as it looks the most natural and versatile. The new layer also needs to be dried.
- Draw a smile line with white or any other varnish. To make it smoother, you can use special strips for a jacket. On the short nails make a thin smile than longer nails, the wider you need to draw a smile.
- If you want to complement the manicure, make a drawing. It is better not to violate the conciseness of the jacket and make a drawing only on the ring finger. It can be flowers, hearts, curls and various patterns.
- As a result, a top coat is applied, and the nails must be dried.


How to quickly make a beautiful manicure with a pattern?
By itself, a gel polish manicure takes a lot of time, especially when a beginner does it himself. And for patterns, you need more time and dexterity. Therefore, there are several ways to speed up the process.
Apply a base and base coat, of course you have to dry them. But when it comes to drawing, you can simply stick a special nail sticker under the top coat. This will greatly reduce the time.
To create an unusual coating, you can use a special powder. It is applied to a special glue, simply poured onto the surface of the nail. It is not necessary to apply a final coat over it. You can also attach rhinestones and stones to glue, they are now very popular. Rhinestones are different colors, from which you can lay out any composition. A large number of it is better to attach rhinestones to special glue, a few pieces will hold on well if you place them on a non-dried layer of gel polish. It should be covered with a thin layer of top coat so that the shine of the rhinestones is not lost.


Photo instructions on how to complete the drawing step by step.


At first it will be a little difficult, but each time the lesson becomes easier, the patterns are more diverse, and the experiments with the execution technique are bolder.
The main rule: nails must be prepared at the highest level:
- baths with warm water for nail plates soften the skin and cuticles in 10 minutes;
- with the help of a wooden stick, a manicure tool, cut off the coarsened tissue around the nails;
- polish the nail plates (once / month) or simply degrease the nails with acetone;
- on their dry, clean surface, it is necessary to apply a base for varnish (the pattern fits better, looks neater);
- After 15-20 minutes you can start drawing.
What do you need to have to create patterns? Varnishes: transparent, healing, several decorative colors, gloss, lacquer fixer. Materials - stickers, templates, ready-made nail stickers, glitter, other decorations, a few needles, thin brushes. Acrylic paints will come in handy in the future.
Simple Patterns:
- Stickers. The plates are painted with the chosen color of decorative varnish, they are expected to dry completely, another layer is applied. After drying - attach a sticker (instruction on the package), cover with a transparent varnish. Photo stickers glue over the applied base.
- Drawings: geometric shapes, lines, fruits (berries, strawberries, others), various symbols (heart, emoticons). On the prepared plates (with two layers of a single-color coating) a pattern is applied with contrasting colors of other varnishes.
- Camouflage. Apply light green (left side), dark green (center), brown or gray (right) color to the nail while they are wet - mix randomly with a needle.
- Contrasting network (black/white, beige/brown, black/red, other combinations). On top of the dried finished coating of one color, lines are applied with another varnish in the form of a grid, a diamond-shaped grid.
- Nail decorations: stars, flowers, beads, other shapes. They are attached to the wet coating, according to the invented design, adhere until completely dry.
- Blurred pattern (two contrasting colors or light and dark tone of one). A pattern (waves, circles, spiral) is applied over the wet layer with a brush with another varnish. Errors are corrected with a toothpick.
- (two-tone: a classic combination of white with a pink or beige tone; outside the classics, it is also two-tone, but they combine contrasting tones). Application sequence:
- paint the entire nail plate with the main tone, dry it;
- close the nail with an adhesive strip, leaving only its outer edge (about a third of it);
- We paint over the open part with a white tone, let it dry, remove the strip.
It should be remembered! Before applying the main pattern, be sure to apply, and then completely dry, one layer of the main color of the lacquer surface. After the drawing is completed, it is fixed with the last layer with a transparent or medical varnish so that it can hold on longer. 


Creating a pattern with a needle
Should be prepared in advance essential tool(manicure set + sewing needle), think over nail design, if necessary - purchase necessary materials for a pattern.
How to use the needle:
- first, they make a sketch of the pattern on paper, choosing the closest proportions to their nails;
- the pictures should indicate the sequence of applying the elements when painting;
- apply on the nail plate the 1st layer of coating - base;
- when the base dries, the following is applied - the entire plate is covered with white varnish (do not allow to dry!);
- on top of the white layer in the middle, three medium-sized red dots are placed with a brush;
- in the center of the red dots drip a drop of white;
- quickly create an ornament: dip the needle in the middle of the dot and pull in the right direction (the trace will be red with a white line in the middle), drawing straight or curved lines, curls, the like;
- when the ornament is dry, everything is covered on top with a fixative, a colorless varnish layer.
Naturally, creating an individual design - the color palette for use is quite wide. You can thus draw the silhouettes of animals, insects, create geometric shapes, entire landscapes and many other images. Little "but". All of them will be too miniature, therefore, it is better to use contrasting shades or colors of varnish materials. So the pattern will not merge.
Creating a picture with varnishes
This technique of applying an ornament is a little more complicated than using a needle, but it is also easy to learn. To acquire the skill of working with a thin long brush, at first they train on artificial nails: it’s not a pity to constantly wash a badly successful pattern with acetone. Paper is also suitable for training.
Instructions for applying varnish with a brush:
- Prepare nails for painting: bath, skin treatment, plate polishing.
- The nail plate is covered with a base (colorless or medical varnish).
- The coating dries (in the future: each painted fresh layer must dry completely).
- A background coating is applied: a color is used that will act as a contrast to any other tone used in painting. First, in one movement, they brush in the center up to the edge, starting from the cuticle, then they paint the left side of the plate and the right one - just three strokes of the brush.
- A thin brush is dipped into varnish, its excess is slightly removed (as in school, painting with gouache) and an element of the pattern is applied (usually from 2 to 6 colors are used). Beginners opt for hearts, flowers, lines, only a little later moving on to more complex images.
The completion of the work is the fixation of the ornament with a colorless coating.
When buying varnishes, pay attention - their manufacturers are equipped with either ordinary brushes or thin ones designed for painting. In the absence of this type of material at hand, you can use a thin silicone watercolor brush.
The process of painting with acrylic paints with a brush
They are very popular among fashionistas: they are easy to draw, dry quickly, do not smear, are harmless to human health, when using them, colorists achieve about 2000 shades. This type of paint is long term shelf life, properly applied painting lasts a very long time.
Acrylic paints are:
- transparent;
- half transparent;
- overlapping the previous color (opaque);
- pasty.
They are water-soluble, easy to mix, but after drying, you can safely display the next element of the ornament on top of the picture - erosion is excluded. The patterns are breathable, do not fade, look very bright. There is no obligation to prime the nail plate before painting.
What are the techniques of painting with acrylic paint:
- Oil. Use undiluted or pasty paint. The name was given because of the similarity with oil paintings on canvas.
- Pastose (similar to the test). The paint is not diluted, you can first add any pigment, put in thick strokes. The dried layer resembles a gouache drawing.
- Watercolor. Water is mixed with an acrylic binder, then the paint is thinned. Finished ornaments look like high-quality watercolor drawings.
- Sliding. Acrylic paints are mixed with structural gels. Sophisticated technique, since it is difficult for beginners to guess the final color result.
- Glaze. Each superimposed layer should be extremely thin, almost translucent. Mona Lisa's smile is drawn with this technique.
The painting is done with different types of brushes: synthetic, natural bristles, different thicknesses. While using one brush, the rest should be in the water.
At first, working with such paints is enough to buy 6 basic colors plus white to correct errors. To understand how they lie on top of each other (what shade is obtained), draw a chessboard (6X6 squares for six colors, each square is 2X2 cm), then alternately paint over the horizontal lines with another pigment, and then vertical squares (36 colors will turn out) .
How to draw a pattern "twigs":
- the background should be a delicate shade that goes well with a yellow or green tone;
- two curved lines-twigs are drawn along the length of the nail in green or yellow paint; decorate them with leaves (the same paint as the branch);
- the veins on the leaves are made a couple of tones lighter from the main color;
- the dried pattern is fixed with transparent paint.
By the way, several painting techniques can be used in one ornament.
Other ways to design nails
Creation of ornaments with adhesive tape.
You need adhesive tape, a colorless coating, two decorative varnishes. First, the base is made, then the background coating (all layers are dried in turn). A stencil is prepared from adhesive tape (strips, various shapes are cut out with a clerical knife), glued over the background coating, and a different color is applied. When it dries completely, the tape is removed, painted on top with a transparent varnish.
What is useful sponge for a beautiful manicure.
The nails are prepared in the most usual way, which ends with the application of the base, and then the background coat. While the background is still wet, the sponge is dipped in a contrasting shade and the edge of the nail is slammed with it (it turns out a pimply edge - the “ambre” effect).
Manicure "Caviar".
A thick wet layer of a transparent base is sprinkled with the smallest black or red beads. Press it against the nail with a film, wait for it to dry completely.
The best works of masters
Design will remain fashionable french manicure. Although a “zest” appeared - there should not be an even white line on the edge of the nail, it should lie in careless strokes.
The combination of glossy/matte varnish is welcome in one image.
The best is the design with the “ombre” effect, the design of which combines color transitions from the dark beginning to the translucent edge of the nail. Add shine.
Nails are decorated with lace (glued to a wet base), black stickers are attached to a white background - “letters of the alphabet”.


Designers consider monochrome to be fashionable: red, black, white - with a translucent hint of the image: a smoky effect.
The best remains geometric pattern with sharp corners.
The “broken” design is considered a hit: a thin black line is drawn along the plate, the right side is painted bright color, and the left - natural or transparent without shine.
Each person has a certain type of nail plate. The desired shape of the manicure is adjusted with a nail file.
It should be remembered that:
- plump, short fingers are given an elongated, oval shape plates;
- the square shape of the nail visually enlarges the fingers;
- on long thin fingers there should not be a pointed shape in the form of a claw.
Lovely women, well-groomed nails look wonderful on the hands of ladies of any age, a gentle manicure pattern is appropriate even at the most advanced age. In addition, decorating it with various images on your own is actually an interesting and exciting activity.