How to make a model of a geometric figure. How to make paper shapes
Origami opens up incredible possibilities for imagination and creativity. Craftsmen learned to make a wide variety of crafts from paper. These are different animals, birds and even plants. But today we will take a closer look at how to make geometric shapes quickly and easily from paper.
Such figures will help develop an understanding of three-dimensional figures, as well as a general understanding of them. They are best suited for those who have difficulty with trigonometry, as this branch of geometry requires a very good visual representation different figures.
We study step by step the principle of making geometric shapes from paper
Origami in most cases involves folding various shapes from paper. In our case it will be similar, but a little different.
A diagram, or as it is also called a development, is a mandatory element in the manufacture of any geometric figure. The diagram is a two-dimensional image of the “scan” of our figure on paper. Let's imagine a cube. And we deployed it, what happened in the end? A column of four identical squares and two identical squares on the side. A kind of letter "T".
After you have made or found a development, you need to fold it into a shape and very carefully glue all the elements.
Without development, it is impossible to make a single correct geometric figure that would be as smooth as possible and would not contain errors. You can find it on the Internet great amount various patterns, for a variety of figures. We will consider, as an example, the manufacture of a top hat and a hat.
Solid cylinder.The cylinder is one of the simplest shapes in origami. Even a beginner can handle its production. And so, let's move on to our first creation.
First, we look for or make a diagram ourselves. The cylinder diagram is a rectangle, the length of which is calculated using the formula 2PiR, where R is the radius of your cylinder, that is, if you want to get a cylinder with a diameter of 10 centimeters, then its radius will be equal to five. And then there is the inverse relationship: if you have already drawn a rectangle, for example, 40 centimeters long, then the radius of the circle will accordingly be equal to 40/2Pi. Approximately 6.2 centimeters.
In the diagram, draw a neat line exactly in the center of the rectangle. We continue our line beyond its sides, that is, the line must intersect the rectangle. Next, we must know exactly the diameter of the cylinder in order to calculate the radius of the circle, but if you first drew a rectangle, then use the formula l/2Pi, where l is the length of your rectangle. After you have determined the radius, take a compass and place it at the intersection of our line of symmetry and the side of the rectangle. We begin to figuratively draw a circle and look where the second point of intersection with the line of symmetry will be; it should be outside the rectangle. This point will be the center of the circle. We repeat the steps on the other side. Our craft, for example, was made according to the following scheme:

If you find a diagram on the Internet, then just print it out. And cut it out.
After we cut it out, we need to move on to folding it. We begin to fold our cylinder from its main part. To do this, roll a rectangle into a tube. We fold from both ends at once, that is, we take one end of the rectangle and the other, and pull them towards each other. So that you get a kind of pipe with two circles “open”.
Then we bend both “windows” inward and change the thickness of the tube as necessary so that these windows fit perfectly inside. Then we glue the resulting cylinder.
Paper hat.
The hat is the same cylinder, but its bottom window will be open to the outside. We need cardboard, scissors, plate, glue . Let's begin!
First, cut a sheet of cardboard into two strips, the width of which will be equal to the height of the cylinder.
The length of the stripes will depend on what diameter you want the hat to be. If you want to wear a hat on your head, you should measure the circumference of your head and divide the resulting number by two.
Glue the parts together to form a single long strip.
We roll the strip into a cylinder and fasten it.
We choose, according to your taste, one of the round sides and make even cuts on it, the depth of which is equal to two centimeters. We bend the resulting petals and put the cylinder aside.
We take another small piece of cardboard and trace the plate we prepared earlier. Place your cylinder in the center of the resulting circle and circle it. First cut out a large circle from the sheet, and then a small one. In the end we should get a ring.
We place the cylinder on a stable, flat surface with the petals facing down and glue pieces of double-sided tape to each of them.
The hat is ready!
A small selection of videos on the topic of the article
It's all in the hat!
In that detailed master class describes how to make a hat out of paper.
But don’t let such unreliable material scare you, because once you learn how to work with it, you can easily build yourself a headdress from anything, because the most important thing in a hat is, of course, the pattern. Namely, a lot of attention is paid to it in this article.
So let's begin.
![]()
We will need a sheet of whatman paper of the Goznak brand, drawing tools, PVA glue and finishing material. All calculations are presented for a head circumference with a length of 56 cm. The radius of the top of the hat is 8.9 cm!!! We must try to strictly follow the specified dimensions so that all the parts match when gluing.
![]()
To use whatman paper economically, you can place a piece of the top of the hat inside to make the brim of the hat.
![]()
The red color indicates the lines that need to be pressed with a handle to better bend the flaps for gluing, the width of which is 1 cm.
![]()
Glue the brim of the hat together. In our work, the margin width is 14 cm, but it can be changed at your discretion.
![]()
This is the crown of our hat: a strip 56 cm long and 12 cm wide. There are flaps on three sides for gluing. The valves on the larger side must be cut into 0.5 cm fragments and bent to different sides. The width of the crown can be changed depending on your design.
![]()
Apply glue to the top edge of the brim of the hat and glue it to the crown. Having gone a full circle, glue the valve on the smaller side of the crown. It may happen that the length of the crown will have to be reduced by cutting off a strip of “extra” width.
![]()
The process of gluing the crown to the top edge of the brim of a hat.
![]()
The crown is glued to the brim of the hat. The photo was taken in the light.
![]()
We begin, perhaps, the most important stage of the work: gluing the top of the hat to the crown. Lubricate all the valves with glue at once and close the hole with a prepared circle of radius 8.9 cm!!! Turn it over onto the table and try to align the flaps with the edge of the circle.
![]()
We press the crown flaps to the edge of the circle. We hold it for a long time for high-quality gluing.
![]()
All is ready!
![]()
Let's start decorating our hat. There are many options!!!
To give a clear shape, additional strength and, perhaps, to hide gluing errors, we will decorate the base of the hat with ready-made bias satin trim 2.5 cm wide. ATTENTION!!! The glue must be applied with a brush to the hat itself in a THIN layer so that it fixes the trim, but does not saturate it!!! It's better to practice first.
![]()
We fix the tape with glue along the lower edge of the hat brim from the inside.
![]()
All that remains is to fix the tape with glue along the bottom edge of the hat brim from the top side.
![]()
The hat is decorated with flowers made using the quilling technique.
![]()
Option for decorating a hat.
![]()
And another option using nylon tapes.
![]()
The crown of this hat has a different shape and its brim is 16 cm wide. The design is made using corrugated paper butterflies.
![]()
The hat is decorated with flowers made from circles of nylon fabric with a pearl inside.
![]()
The base of the hat is made of whatman paper and duplicated from corrugated paper.
![]()
By drawing mountain-valley lines on the brim of the hat with a pen with empty paste and bending them along them, and then gluing them together, you can change the shape of the brim.
![]()
The base of the hat is made of whatman paper and covered with polka dot crepe de Chine. The fabric was glued to flour paste.
![]()
Have you noticed how interested children are small age paper figures? Maybe it's the natural desire of all of us to see the whole world in a combination of simple geometric shapes. And it is all the more interesting to see circles, ovals, squares or triangles in every object that surrounds us. And a child can get acquainted with three-dimensional figures long before the school geometry course in a fun, game form.
Geometric shapes made of paper
Each book contains early development Along with colors, letters and numbers, the first step is to study basic geometric shapes. After all, this is how a child learns to understand what the form of things is, what it is and how it can be characterized. In a playful way, with the help of educational videos, poems, examples from surrounding things, the child learns to distinguish between a square and a triangle, a circle and a rhombus. Having studied the pictures in the book, the child can remember the names of the figures, but the further task is to consolidate this information in a playful way. Here they will come to our aid geometric shapes made of paper.
We will collect from various figures. She will demonstrate to the child in the best possible way that any drawing can be obtained if you arrange simple geometric figures familiar to him in correct sequence. Here is an application with the image of a clown. For this you will need to first cut out the basic shapes from colored paper. These will be multi-colored circles, an oval, a triangle, a star, semicircles. You can stick them on double-sided tape if the base is cardboard with a smooth surface. Or you can use a glue stick, which is very easy to use.

Another simple example of geometric appliqué is a landscape. On it you can depict a square house with a triangular roof, trees with a round and triangular (Christmas tree) crown, and a round sun. Having completed these on their own, the child will be able to better understand how to draw the same landscape with a pencil, that for a house you need to draw a square with a triangle on top, and also provide the home with a square window and a rectangular door.
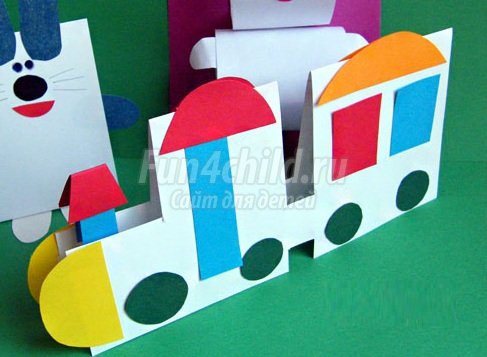
You can make some kind of symbiosis between and geometric applique by making such a smart train. Cut a blank from a sheet of standard-sized paper by first folding the sheet in half. Next, invite your child to stick geometric shapes from colored paper on their respective places: a yellow semicircle will become the nose of the train, small circles will become wheels, and blue rectangles will become windows in which you can even draw traveling passengers.
Volumetric paper figures
Don't be afraid to introduce your child to three-dimensional paper figures it will be early, and he may not understand something. On the contrary, it is a little like the magic that parents can make with their own hands, when a three-dimensional toy suddenly appears from a flat sheet of paper. These can become both a teaching item and, for example, part of any design.

Explain to your child that every flat figure has a relative, a three-dimensional figure, which may have a different name, but always contains the outlines of a flat geometric figure. It's probably easiest to start with a cube, because it's a classic toy. At first, you can simply draw the child's attention to the fact that each face of the cube has square shape, after that you can begin to get acquainted with the layout drawing.
This word is complex, however, the child will be able to understand how the cube is ultimately assembled, to see that there are four squares depicted on flat paper, exactly as many as are needed for the finished cube. Over time, already in school, it will be easier for him to do calculations. square figures on checkered paper, because he will receive this knowledge at a young age. To begin with, you can draw the layout exactly on notebook sheets into a cell, then moving on to a denser material. You can also buy ready-made layouts in the store for almost all geometric shapes, for example, cubes with ready-made letters and designs on each surface.

You can fold this two-color paper cube with your child if you are into paper crafts such as origami. Fold a square sheet of paper in half, and then in half again to make four parts. Then, following the instructions, bend the edges of the figure so that you end up with a piece with two full surfaces and two sharp corners. All you have to do is make a second blank of the same type and combine it with the first, placing the sharp corners in paper pockets.
How to make paper shapes
Naturally, we won’t stop only at cube, because there is still so much ahead interesting crafts. Let's find out how to make paper shapes different form.

Each such figure has its own name and it will be easier to remember it if you pick up any associations with this object from your child. Now, there’s no need to invent anything for the cube, the baby already knows the name of his favorite children’s toy very well. Of course, we don’t have to mention the parallelepiped for now (especially for “advanced” children), but it’s easy to think of what a cylinder or a pyramid can be associated with.
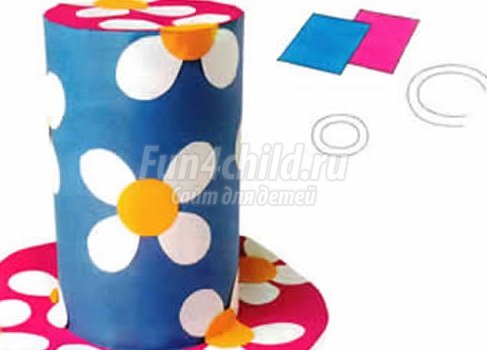
If you decide to make a cylinder with your child, ask him what object it resembles. Maybe it's a glass, or maybe a drainpipe. Tell us about the funny top hats that wizards or magicians wear in the circus. You can try to make such a hat together. To do this, you will need to take whatman paper, and the denser it is, the stronger your cylinder will ultimately be. On this sheet we draw a long rectangle, the width of which will be equal to the future height of your cylinder. We retreat a few centimeters from the smaller edge of the rectangle and draw a circle that will touch the rectangle at its top point. We cut out this shape carefully so as not to cut the circle from the rectangle. Now, we begin to wrap the rectangle into a tube, and the circle covers this tube like a lid. Using tape, secure the circle and the edge of the rectangle. Now we cut out another circle, but of a larger diameter, cut a hole inside it, and glue this circle to the cylinder. All that remains is to cover our craft with colored paper and decorate it with applique.

Our generation may associate the cone with a bag for seeds, but for our children we need to look for other associations. Christmas trees are made on the basis of the cone. New Year's topiary, and you can also make funny figures, for example, . To do this, you need to use a compass to draw a circle on a sheet of thick paper and visually divide it into three parts. On one third in the upper corner in the center we draw the face of the future snowman, eyes, nose and mouth. Cut out this third of the circle. We spread a thin strip of glue on one of the edges, bend the cone and glue the two edges. From colorful wrapping paper we twist a small cylinder (now we already know how to do this) and secure it on top of the cone. From black corrugated paper we twist the bundles, rolling the paper between our palms. We glue mittens made of colored paper to these strands, cut out and glue a scarf from the same paper. We strengthen the ability to twist a cone by making it from a piece of orange paper - this will be a carrot nose, which any self-respecting snowman cannot do without.
Make a geometric shape out of paper
Offer to practice again make a geometric shape out of paper, this time - a pyramid. It can also be created using origami patterns, but we can take another, simpler route by fastening the finished figure with glue.

The layout for the pyramid is a four-pointed star. Since it won’t be easy to draw it correctly on regular white paper, you can draw figures on checkered paper, and then transfer it to the sheet as from the template. So, draw a square in the center of the sheet. From each side we draw an isosceles triangle, providing one of its sides with an additional small strip for gluing. Cut out the finished star from paper and apply it to a sheet of thick and colored paper (you can also use thin cardboard). We bend all the lines between the square and the triangles well, spread the gluing strips with glue and bring all the faces of the pyramid to one point. It's time to play, after all. On the layout planes we draw images of animals and after gluing we get new pyramid toys: a fish, a cat, a dog, a bird. In addition to the patterns on the pyramids themselves, you can add additional elements to the paper figures.

Pyramids also make great homemade gift wrapping. The more beautiful it will be raw material- cardboard, the more beautiful the packaging will be in the end. You can use cardboard from boxes for this purpose. beautiful pattern. You can see how to make a fastening on a pyramid using a rope in the presented photo. On all planes we make small holes the size of the fastening cord. We pull it through all the holes, like a lace, and tie the ends with a bow. In order to get the contents of such a package, you just need to untie the ends of the lace and pull it out of one hole.
Volumetric geometric shapes
Volumetric geometric shapes can be quite complex. Once you have mastered the basics, you can move on to them.

For example, try making an icosahedron - a polyhedron consisting of twenty faces, each of which is a triangle with equal sides. For such geometric paper figures diagrams require special care, because even a small error in the parallelism of the lines will make the finished figure crooked. You can also fold half of the icosahedron and make an original gift box out of it.

It will not be difficult to make an unusual three-dimensional figure - a torus, if in your work you use a special assembly diagram, which you can download on the Internet. It consists of many ovals of different sizes, on which many cuts need to be made. The ovals are cut out of thick paper, then they begin to be connected to each other using a system of cuts. As a result, you should end up with a three-dimensional donut, the geometric name of which is torus.
After such fun activities, no geometry will be too difficult for your child in the future process of schooling.
Key news tags:
Other news
Creating crafts with your own hands is interesting not only for children, but also for adults. However, a sufficient number of models have been invented for adults, which differ in the complexity of execution and the time spent on their creation. Recently, adults and children have become interested in creating complex geometric shapes. This type of figure includes the icosahedron, which is a regular polygon and is one of the Platonic solids - regular polyhedra. This figure has 20 triangular faces (equilateral triangles), 30 edges and 12 vertices, which are the junction of 5 edges. Assembling a correct icosahedron from paper is quite difficult, but interesting. If you are passionate about origami, then making a paper icosahedron with your own hands will not be difficult for you. It is made from colored, corrugated paper, foil, and wrapping paper for flowers. Using a variety of materials, you can add even greater beauty and effectiveness to your icosahedron. Everything depends only on the imagination of its creator and the available material on the table.
 |
 |
 |
 |
 |
 |
We offer you several options for icosahedron developments, which can be printed, transferred to thick paper and cardboard, folded along the lines and glued.
How to make an icosahedron from paper: diagram
In order to assemble an icosahedron from a sheet of paper or cardboard, you must first prepare the following materials:
- icosahedron layout;
- PVA glue;
- scissors;
- ruler.


When creating an icosahedron, it is important to reverse Special attention on the process of bending all the parts: in order to bend the paper evenly, you can use a regular ruler.
It is noteworthy that the icosahedron can also be found in Everyday life. For example, in the form of a truncated icosahedron (a polyhedron consisting of 12 pentagons and 20 hexagons correct form) made a soccer ball. This is especially visible if you color the resulting icosahedron in black and white, like the ball itself.
You can make such a soccer ball yourself by first printing out a scan of a truncated icosahedron in 2 copies:

Creating an icosahedron with your own hands is an interesting process that requires thoughtfulness, patience and large quantity paper. However, the final result will please the eye for a long time. The icosahedron can be given to a child to play with if he has already reached three years old. By playing with such a complex geometric figure, he will develop not only imaginative thinking and spatial skills, but also get acquainted with the world of geometry. If an adult decides to create an icosahedron on his own, then such a creative process of constructing an icosahedron will allow him to pass the time and also show off to his loved ones his ability to create complex shapes.

As a child, each of us came across paper crafts: be it appliqués in kindergarten, or airplanes and boats at school, but we all made something with our own hands. Growing up, we encounter this type of “art” less often. But still, some turn this simple hobby into professional activity. At the beginning of this decade, a type of paper creativity such as polygonal modeling, which involves the creation of 3D figures from paper, gained popularity. Nowadays you can often find such figures as decoration, especially in popular establishments. They can be like different sizes, so different shapes: from animal heads decorating the wall to full-size sculptures occupying a huge part of the room. It is about creating such figures from paper, as well as others. various types 3D modeling, we will cover in this article.


How to make 3D shapes from paper

To make 3D figures, paper like thick cardboard is most often used. Necessary materials can be purchased at regular stationery stores, or at specialized stores selling handicraft supplies. The figure can be either monochromatic or multi-colored, depending on what you want to get in the end. The main element in the work is a polygonal mesh - this is a drawing transferred to paper, which consists of polygons that are bent along lines and then glued together, forming a 3D figure.
When creating polygonal shapes, you should definitely follow some rules:
- Don't rush when cutting out parts. The more accurate and precise the cuts are made, the better the figure will be.
- Consider the direction of the fold. To avoid irregular shapes, use a ruler to form curves.
- Start with small details. To avoid inconvenient situations and not to lose the necessary small parts among the large ones, it is worth gradually moving from smaller parts to larger ones.
- Handle the glue carefully. To avoid drowning the sculpture in glue, use a wooden stick. This way you won't have to clean up any excess and your hands will remain clean.
- Keep the glued parts long enough. Take your time and patience. After all, if you do not wait until the moment of complete gluing, then your figure may simply fall apart into components.
To completely bond the parts together and dry, leave your 3D figure in a dry place for a day. After which, if necessary, you can start coloring.
Experiment, cut, glue, create your own decor with your own hands, and let everyone envy your skill in turning ordinary things into works of art.
Schemes 3D paper figure
Option #1: Fox

Option #2: Dog

Option #3: Wolf

Figures from 3D pens, how they are made

A 3D pen is, in fact, a compact 3D printer with which you can create not just drawings, but three-dimensional figures. The principle of its operation is that inside the handle there is plastic, which, under the influence high temperature melts, and when “drawing” it instantly freezes, forming the desired three-dimensional figure.
In addition to the hot type of pen, there is also a cold type. Unlike the first one, which is more affordable option, photopolymers are used to refill a “cold” 3D pen. They harden much faster, they have no bad smell burnt plastic, and this type of 3D pen is more suitable for children.
This gadget is quite easy to use, but requires a lot of care and perseverance. You can create drawings either directly in the air or on any plane, simply by moving a magic pen over them.
The 3D pen is multifunctional and can be used:
- to create original souvenirs and decorations;
- for designing various parts (decorative elements, phone accessories, clothing decor);
- for repairing plastic devices;
- for the development of spatial thinking in both children and adults.
To get the desired result, avoid common mistakes:
- Don't drive too fast 3D pen on the image. To prevent plastic from accumulating at the base of the handle, wait until it begins to come out, and then begin to smoothly trace the design using the stencil. The same goes for shading.
- Don't separate colors from each other. If various colors will not fit closely, then when separating the craft from the stencil, they will be removed separately.
- Follow the instructions. When using a 3D pen, be sure to read the instruction manual. Pay attention to the required plastic, because depending on the type of handle, the material used may differ.
- Don't forget to ventilate the room. No matter how long you work with the gadget, it is better to do it in a room with good ventilation.
Choose a suitable and comfortable 3D pen and start drawing. Having its pros and cons, such a gadget will bring pleasure to both children and adults.
3D pen stencils for three-dimensional figures


How to Draw 3D Shapes

Having a 3D pen and all the necessary components (plastic for filling, stencil) on hand, you can start drawing a 3D figure.
First, let's look at step by step guide on how to use the pen:
- Take out the handle and use the power supply to connect. Then launch it.
- Select the required plastic thread and insert it into the input port of the handle.
- Following the instructions, set the appropriate temperature.
- Find the speed control button, then select the desired mode.
- Start drawing, not forgetting about the specifics of how a 3D pen works.
- After use, unplug the pen and adapter from the outlet, first disconnecting the thread.
Follow safety precautions when working with an electrical appliance:
- Observe temperature regime without allowing the handle to overheat.
- Do not touch the base of the device during operation.
- Do not allow the device to come into contact with materials that are easily flammable.
- If a malfunction occurs, do not use the handle.
- Not recommended for use by children under 8 years of age.
Let's consider How draw a 3D figure in the form of a flower:

- We take a stencil, or you can draw it yourself. You need to draw each detail separately: each petal, leaves, stem.

- Turn on the 3D pen, following the instructions, and draw out parts of the flower using a stencil.
- After they have cooled, separate them from the template and glue them together.
- First it is better to make a bud, and then add a stem with leaves.
- The field is completely dry, your flower is ready. Enjoy.
Using a 3D pen, you can draw various geometric shapes, inscriptions, animals, details, and more. It all depends on your imagination and desire.
3D drawings of geometric shapes

It is with 3D drawings of geometric shapes that it is better to start studying three-dimensional drawing. Some of the simplest geometric shapes are the cube, pyramid and ball. In order to achieve the volume of a figure on paper, you should use shading, the play of light and shadow. It is with the help of this that any artist will be able to add volume and three-dimensionality to his drawing.
It’s worth starting drawing geometric shapes from the basics, gradually moving on to more complex elements:
- Select the figure you want to draw and outline the proportions and dimensions.
- First, draw its flat elements.
- After that, add strokes and shadows, making it more voluminous.
One of the most popular 3D geometric shapes is the sphere. There are quite a few in various ways depict spheres that differ in complexity. But you should always start with the circle. If you don’t have a compass at hand, you can circle, for example, a glass.

In order to give volume to the sphere, it is necessary to shade the surface, defining the corresponding shadow and light areas:
- First of all, we select the place where the light falls, after which we begin to intensively shade the opposite side.
- Gradually reduce the intensity of the shading, moving towards the light part of the sphere.
- The strokes should follow the shape of the ball and not be sharp.
- After finishing the shading, shade the surface of the sphere with a piece of paper or your finger.
- After mastering the standard rules for drawing three-dimensional figures, you can add more complex elements: highlights, shadows, tilt, etc.
Straight lines are especially important when drawing 3D shapes, so use a ruler for more complex drawings. Don't forget about line placement and angles. It's best to use a protractor when drawing shapes like a cube. The main thing is to get your hands on simple elements, and only then take on holistic compositions.
3D cardboard figure

Let's try to delve into the art of 3D paper modeling and make some apples to decorate the living room.

To do this, you need to follow the step-by-step instructions:
- Make several apple-shaped blanks from colored cardboard. You can find samples on the Internet or draw them by hand.

- Cut them out of thick cardboard in the desired color. For one apple you will need from 6 to 8 pieces.
- Fold all the pieces in half and apply glue on the opposite side.

- Glue all the sides together from the inside out.

- Add a dark cardboard stalk on top and your apple is ready!

You can make several colorful apples, put them in a wicker basket and decorate your table. Or hang them, creating the feeling of an apple orchard.
LED acrylic figures 3D

Not so long ago, we didn’t even suspect the existence of LED acrylic figures, and even in 3D. Now such sculptures decorate the landscape and shopping centers for almost every holiday, and in some places this is a completely familiar design.
In addition to attractive appearance, such figures also have high safety indicators, which makes it possible for such figures to serve their owners for years. LED figures are often used by designers to decorate New Year's locations. Deer figurines and small illuminated Christmas trees are especially popular. They can often be found at New Year's fairs, in parks and store windows.
You can also increasingly see LED spruce trees as decorations in the main squares of the city. This spectacle not only attracts the attention of thousands of people who want to get new holiday photos, but it is also much safer for others.
LED figures are also perfect for decorating houses and plots. Give your children joy in the form of a shining Santa Claus and Snow Maiden. And if you don’t want to dazzle your neighbors with such beauty, then you can easily find various fairy-tale characters in the nearest park. And don't forget to ride in a sleigh filled with red-nosed reindeer.
3D foam

When creating various 3D shapes, you can use not only paper, wood or plastic, but also foam. This material has a number of advantages: lightness, ease of use, strength and availability. You can use it to make inscriptions for the photo zone, as well as various figures, and even columns.
Most often, 3D foam figures can be found in ready-made form. In production, special cutting machines are used. This is a rather painstaking process, which becomes more complicated depending on the detail of the figure.
But we will try to create a 3D figure from polystyrene foam at home. First you need to create a sketch of the figure. Let's consider creating a New Year's snowflake:


- Prepare a suitable size piece of foam.


- Find or draw a snowflake stencil on paper. Then carefully transfer it with a pencil onto the foam without damaging its structure.


- An ordinary stationery knife is suitable for cutting. Follow the previously outlined stencil, carefully cutting out all the curves of the future snowflake.


- Inspect the already cut out figure for irregularities. Use a knife to trim the edges to achieve the desired look.


- If desired, paint the finished figure and hang it on the Christmas tree, or place it as an interior decoration.


Creating 3D foam shapes is not as easy as it might seem. Many volumetric figures require polishing for a more presentable appearance. You choose: buy it already ready product or make it yourself.
3D human figure, Santa Claus

On the eve of the New Year holidays, everyone decorates their home. Some for the love of New Year's traditions, others to raise the festive mood, and some to please their children. In any of the options, the main attribute is Christmas tree, which is often accompanied by the figure of Santa Claus.
This year we invite you to get together as a family and create your own personal Grandfather Frost, and maybe even a Snow Maiden, so that he doesn’t feel sad alone.
Santa Claus made of polystyrene foam

- Cut out the body. The figure, resembling a cone with a cut off top, will serve as the basis for the future Santa Claus.


- We divide the body into two parts in a ratio of 1:2, up and down, respectively. We round the top a little towards the bottom and fasten it with glue.
- Then we cut out the boots. They should go under the body, creating support. And we also attach it to the body.


- The next item will be the hands. Select the mittens closer to the hand. Glue to the rest of the figure.

- The most difficult component is the head. If you were unable to cut out the head in shape, then make a ball on which you can complete the necessary elements.
- The hat can be made in the form of a cone with a bubo at the end. It is better to make the base a little wider so that it does not merge with the head.
- If desired, you can cut out the beard, or add it at the coloring stage.

- Connect all the elements with glue and let the figure dry a little.
- After that, start decorating. Draw the missing parts for Santa Claus: eyes, nose, beard.
- The figure itself can be either painted or dressed up in a fabric fur coat, hat and mittens, adding a beard made of cotton wool.
- Add a small bag of “gifts” and your Santa Claus is ready. Happy New Year!

Santa Claus from polymer clay

- Stock up on clay different colors, in the right quantity, depending on the desired size.

- We make preparations. Let's say we take four colors: red for a fur coat and hat, blue for arms and legs, white for hair and fur, and beige for the head.
- We make a cone-shaped body with a rounded top. Using white clay sticks we lay out the frame of the fur coat. Add blue felt boots.


- We form hands from red clay and mittens from blue, fasten them with fur from white clay. We attach the arms to the body.
- We roll a ball of beige clay, it will serve as our head. We attach eyes, eyebrows, nose and beard to it. Then we attach the red hat with white fur.
- We insert two toothpicks into the body and attach the head. Santa Claus is ready!

Choose the desired option, size and start creating your own wizard with the whole family. Also, if you have the desire and skills, you can create Santa Claus from paper, wood, felt and any other available materials. Decorate your home with the whole family and then festive mood you are guaranteed.
Light 3D figures

What do you associate with New Year? With tangerines, a festive tree, gifts, Santa Claus and, of course, shop windows decorated and streets lit with thousands of lights.
It has already become familiar to everyone that in parks and shops there are huge twinkling Christmas trees, Santa Claus with a burning red nose and his faithful reindeer with a sleigh. All these are light figures that give a feeling of joy and the approaching holiday.
These figures are quite realistic and resemble lights imprisoned in an ice shell. Ideal for decorating a winter landscape and immersing yourself in a fabulous atmosphere. You can find light figures not only of white, but also of various other colors, it all depends on the composition and imagination of the master.
The beauty and fabulousness of such figures will not leave anyone indifferent. And what lovely photographs you will get! Probably everyone has a couple of such wonderful colorful photographs in their family archive.
You can also purchase LED strips that will characterize you and will appeal to your loved ones. The main thing is not to forget about the safety rules when working with such materials.


3D modeling is quite an interesting and exciting process. Be it figures made of paper, foam plastic, 3D drawings on paper or figures made with a 3D pen - this activity will keep any adult and child busy for several hours.
And since they will come very soon new year holidays, then you have an excellent reason to try yourself in something new, or take a closer look interesting ideas gifts for friends and family. Start with something simple, like paper. Make snowflakes, snowmen, add Santa Claus from foam plastic, Snow Maiden from polymer clay, buy a small LED deer and assemble a Christmas tree from cardboard. Now the complete set is ready. And how much joy your child will have from so many toys, and even made with his own hands!
Fantasize, try new things and happy holidays!
Video: “3D Shapes”