How to quickly paint short nails beautifully. Glossy highlight is a reality! Learn how to properly paint your nails with regular nail polish. We draw patterns on nails
To get a manicure ordinary varnish need to learn at home correct technique applying the material and get acquainted with some important life hacks that will help you create a neat manicure.
What is needed for a home manicure
Make it simple and beautiful manicure ordinary varnish is possible with a number of tools and materials:
- nail polish remover;
- brushes;
- one or more varnishes;
- oily hand cream, oil or wax;
- cotton pads.
Each girl can create a beautiful manicure with her own hands, for this there is no need to resort to the services of salon masters.
Preparatory stage
To make even the simplest manicure, you need to prepare your nails for painting:
Tip for beginners: Apply base coat first. This step is optional, but this tool helps to level the plate, prevent it from yellowing and penetrating paint pigment into it. Also, in order for the varnish to always lie flat on the plate, it is necessary to regularly moisten it with wax, oils and special moisturizing nail pencils.
Step-by-step instruction
Before proceeding with the actual process of applying varnish, you should be sure that the girl has 40 minutes of free time, eliminate or minimize distractions, and also think over the design. In addition, it is necessary to check the shape of the brush, it should not be narrow and dense. Instructions for creating the perfect manicure:
- Wax or oil should be applied to the periungual area without touching the plate. This will help subsequently to easily remove excess material from the cuticle and rollers.
- It is recommended to apply a base coat to facilitate the subsequent application of colored varnish.

- We take a brush of colored varnish and wipe it on the edge of the bottle so that there is very little varnish left on it, literally at the tip. This way it won't bleed into your skin.

- We paint the nails with ordinary varnish, starting with the little finger. It is necessary to place a drop in the center of the plate, then carefully “adjust” the varnish with a brush to the base.

- After that, with slow movements, holding the brush confidently, it is necessary to bring the varnish onto the side surfaces of the plate. Thus, the varnish does not flow onto the cuticle.

- You need to complete the manipulation with a brush, the end of the nail. Thanks to this, the varnish will last longer.

- Apply another coat of polish to deepen the color.
- When making movements, the elbow should rest on the table and the hand on which we apply the varnish should also lie on the table; you should not apply the varnish while holding your hand on weight.
- Apply top with effect quick drying. This item is optional, but it will extend the wear of the coating and make the manicure perfectly glossy.

On the left, a top is applied to the nail, on the right, a nail without a top

Finished manicure with regular varnish
What to do if the varnish got on the cuticle
It often happens that the varnish got on the cuticle and spoils the whole manicure, but do not be upset, now we will show you how to fix such a manicure.

To do this, we need a lint-free cloth, a flat brush and nail polish remover or acetone.
Wet the brush with nail polish remover and draw from where you want to remove the nail polish. We wiped off the varnish, wiped the brush on a napkin, moistened the brush in nail polish remover, repeated, and so on until clean


The result of the work: before the varnish runs and after
Tips for perfect nails
The following tips on how to properly and beautifully paint your nails will help make your manicure flawless:
- Before you start applying colored varnish, you can practice using a transparent one. Daily coating of plates with medical bases will help you get used to correct work brush.
- To make the coating dense and beautiful, the varnish should be applied in two layers.
- If the coating is damaged during drying, then you can smooth it out with a damp fingertip. It is necessary to gently smooth the coating in a circular motion.
- "Loose" varnish is best applied on a layer of white. Thanks to this, the coating will be more saturated.
- In order for the coating to be perfectly even, the varnish should be applied to the base.
- To make a hole on the plate, you can use strips cut from ordinary adhesive tape.
- If only clear varnish is left at home, then you can make it colored by adding blush particles and two beads to it, which will help the materials to mix.
- PVA glue will help not to stain the area around the plate with varnish; it should first be applied with a cotton swab to the rollers and skin at the base of the nail, without touching the plate itself. When the glue dries, and the nails are already made up, the film must be removed.
- If the product does not dry for a long time, then you can resort to using ice water by dipping your hands into it, the coating will dry much faster.
- To wipe the varnish from one nail and not ruin the manicure on other nails, taking a cotton pad soaked in acetone, you can use the following life hack: you need to put a sponge in a glass jar, pour acetone into it and dip one finger into it. Thus, on other nails, the manicure will remain the same. The jar should be tightly closed.
- A greasy layer of cream will help prevent stains on the area around the plate after erasing the varnish.
- If you bring your nails painted with glossy varnish to a pot of boiling water, the coating will become matte.
Nail care after staining
Nail care after staining consists in following several important rules:
- Wear rubber gloves when working with household chemicals.
- Apply moisturizer to hands twice a day.
- In the cold season, wear gloves made of natural materials.
- Refresh your manicure at the first sign of chipping.
Interesting ideas for manicure with ordinary varnish
Newspaper manicure
 When performing such a manicure, first you need to apply a transparent varnish on the plates, then white, after which you can distribute the holographic varnish, it will give shine to the nails. When the layers dry, apply small newspaper clippings soaked in alcohol (10 seconds) to the nail. The paper must be pressed tightly, and then applied to the nail with a transparent varnish or top.
Lace manicure
 For him you will need an orange stick, a brush, nail polish remover and varnishes. Apply two layers of the product on the plates and wait 7-10 minutes. Then, using an orange stick, create drawings, it is especially easy to do this on glitter. You need to draw drawings on glossy varnish with a regular brush dipped in nail polish remover and an orange stick. Then the nails are topped. Thus, a beautiful nail design is obtained with ordinary varnish.
Manicure with a pattern
 For it you will need a thin needle and varnishes of different colors.
The first option: you need to apply three red vertical stripes on a layer of white varnish, after which you need to make a pattern with a needle with gentle movements, moving it from the side of one side roller to the other, gradually moving towards the free edge of the nail.
The second option: on a nail covered with dark varnish, three white drops must be applied so that they are located on the same line, then draw a needle along this line from the edge of the plate to the base.
The third option: place a few drops of pink on a white varnish, and a smaller drop of white on them, then connect the circles in a chaotic manner with a needle.
Volumetric manicure
 Manicure on short nails may be bulky. After waiting for the complete drying of the varnish layer, you can start creating a knitted manicure. It is necessary to mix white varnish and the one that has already been used to cover the plate, and use a brush to create a pattern as in the image.
Manicure with dots
 To create an unusual manicure, you will need a toothpick and two varnishes. After waiting for the layer of one varnish to dry, you should create several points on the nail with a toothpick, moving from the free edge of the nail to the base, they should become less and less.
ombre
 To create it, you need a sponge and three varnishes. You need to apply white varnish on the plate, and successively a strip of white, blue, for example, and blue on the sponge. Then you should cover the area around the nail with PVA glue. Then, with patting movements, transfer the material from the sponge to the nail, cover it with a top coat and remove the adhesive film.
Thus, to create the perfect manicure at home, it will take a little time and skill.
Most often it implies a monochrome design - only varnish of one color is used to cover the nails. But even such a simple method of nail art often causes difficulties: the varnish does not lay down uniformly, the colors spread, the fingers and skin near the nail get dirty. It is possible to achieve the ideal result, and it is quite easy. To do this, you just need to learn the technique that describes how to paint your nails beautifully at home, and clearly follow all the instructions!
Preparing nails for applying polish
It would seem that it is difficult to paint nails. You take the varnish of the desired color and cover the nails several times with the brush in it. But not everything is so elementary. It turns out that there is a technique for applying nail polish, as well as mandatory preliminary steps for a quality manicure.
It’s worth starting with putting your nails in order - taking care of your hands and giving them a pleasant appearance. The best ways care is:
- baths with essential oils;
- masks.
Even a little care for your hands will make them look great and make the next step, which will be a hygienic manicure, easier. Its task is to give the nails a neat appearance and fashionable shape. Today, ladies are offered many options for hygienic manicure:
- figurative;
- hardware.
After completing all the preliminary procedures, you can proceed directly to applying nail polish.

A simple algorithm: how to paint your nails beautifully at home!
Do you want to see an excellent monophonic manicure on your nails? Then do not ignore the simple advice of professional masters! Applying decorative nail polish is carried out in several stages:
- Covering the nail with a protective composition. This step is ignored by many women, and absolutely in vain. A high-quality tool will help not only save the nail from the harmful chemical effects of varnish, but also create the basis for a high-quality manicure. Depending on the type of nails you should choose protective agent firming, smoothing, masking cracks and irregularities of the nail.
- Applying the lacquer. This is done in three fairly quick movements. The first stroke of the brush passes exactly in the center of the nail - to the edge of the nail plate, starting from the cuticle. The second and third are on the sides. At the same time, it is not at all necessary to stain the cuticle with colored varnish - at the first movement, it is worth retreating from the nail root by a couple of millimeters, and after staining is completed, close the remaining gap with shearing movements.
- Coating with a second layer. Often this is a necessary step, since the first time it is not possible to achieve the perfect thick saturated color on the nails.
- Applying a protective coating. It is done at will, but it should be understood that under the protective layer, the manicure will retain its attractiveness for a long time.

Sometimes it’s impossible to immediately understand how to beautifully paint your nails at home. The varnish lays down unevenly and non-uniformly. The reason may be a bad brush or wrong actions when staining. It is important that before applying varnish on each nail, dip the brush completely into the coloring composition and, if necessary, remove excess.
Now every girl will easily figure out how to paint her nails beautifully at home and will perfectly complete all the steps without any problems. decorative manicure. And even if you wish, decorate it with simple drawings, or.
Paint your nails with varnish and do it neatly is quite real. For this, it is not necessary to go to a beauty salon! It is necessary to use interesting and useful tips this article.
Every woman wants to look good. To do this, among a dozen other procedures, she regularly does a manicure. But it often happens that there is simply no extra money or time to go to a professional master in a salon. In such cases, home manicure comes to the rescue.
The disadvantage of a home manicure is that it does not always turn out neat due to inexperience, inconvenience, work with the left (and maybe right) hand, lack of good tools, varnishes and conditions.
But do not get upset ahead of time, because it is quite possible to make a neat and beautiful manicure at home. To do this, you need to have time and certain knowledge. For example, a color scheme.
The scheme of painting nails with varnish allows you to correctly apply the product on the nail plate and, with the help of smooth movements of the tube brush, spread the varnish over the entire nail.
How to paint a nail polish?
How to paint your nails with varnish so that they look neat:
- Pay attention to the condition of your nail, it is necessary to thoroughly clean it before painting and wash off all the remnants of the previous varnish with acetone. Be careful: before painting your nails, do not apply cream on your hands, because the surface of the plate must be completely degreased for an even layer.
- If you want to protect your nails from unpleasant yellowing and even out their surface, you need to apply a layer of clear varnish-coating. Such varnish can be bought at any store or department of manicure supplies.
- The first drop of varnish should be applied to the nails a little above the cuticle itself, and only then with a brush pull this drop a little down so as not to touch the cuticle in any way
- After that, stretch the entire drop of varnish up to the very edge of the nail. You should get a fairly straight and even line of painted varnish
- The next step is to put the brush exactly where the first drop was and use the brush to stretch the fresh varnish first along one side, then along the other as carefully as possible. Do not press hard on the brush, so that when pressed, it does not spread and does not touch the skin on the side of the nail
- Wait until the first layer of varnish is completely dry and only then apply the second layer, which will give the nail a rich and deep color

 how to properly and accurately paint nails with varnish?
 How to paint nails with adhesive tape?
It turns out that scotch tape is a good helper in beautiful nail polishing. Skillful gluing it will help not only to make drawings on the nails, but also to carefully paint them.
To do this, you need to prepare templates in advance and cut them out, so that later you don’t bother with this issue with wet nails (especially since it will be quite difficult not to catch freshly painted varnish on one hand).
Use for such purposes only narrow adhesive tape, not wider than two centimeters. With a wide tape, it will be difficult for you to carefully stick it to the sides of your finger.
You literally need three pieces of tape for each finger. They are glued alternately: first from the sides vertically and carefully pressed to the sides, and then a horizontal strip, which, when glued, you can try to bend in the shape of the nail.
For accurate nail painting, you can use several types of adhesive tape. Transparent stationery is perfect, as it has a width of one centimeter. Masking tape is no less convenient, as well as electrical tape that can take any shape and bend in any way.

 how to neatly paint nails with adhesive tape?
 On a dry layer of varnish, you can also stick some cutouts of tape strips, which, when applied and removed, will leave an interesting geometric pattern on the nails.

 blanks for decorating nails with adhesive tape
 drawing on nails with adhesive tape
 geometric manicure with adhesive tape
 How to paint nails with a sponge?
It is possible to make a beautiful manicure with the help of such a simple device as a sponge. There are several basic secrets of such nail painting, but the most basic is choosing the right sponge. An ordinary dry kitchen sponge is best suited for this purpose. It has a suitable structure with small bubbles, which are imprinted on the nail.
You can also purchase a special sponge in a store or department of manicure supplies.

 sponge manicure
 How to make a manicure with transitional colors using a regular sponge:
- Paint your nails neatly with polish as you normally would. The applied layer of varnish will serve as the base. It is best to take light colors as a basis: white, beige, pink. So, you can play on contrasts and give your nails volume.
- After that, wait for the varnish to dry completely, otherwise you will not be able to apply a high-quality and beautiful drawing sponge
- After the base varnish has dried, take up preparatory work: on the work surface (a piece of oilcloth or a plastic surface), apply several colors of varnish in turn. Drops should be wide enough. Using a toothpick, try to mix the colors of the desired varnish until smooth, so that you get a beautiful gradient.
- Dip the prepared sponge into a puddle of varnish. Sponge should grab a certain amount of liquid
- Such a sponge should first be tested on some surface in order to remove excess varnish from it and only then applied to the nail with soft pressing movements.
- In this technique, you can’t do without smearing all the skin around the nail, because the sponge should not be too small (this is the secret of its application of varnish). Excess varnish from the skin can be carefully removed with a cotton swab or toothpick wrapped in cotton wool. You can also dip the brush into nail polish remover and gently go over the edges.
- After you have removed all the imperfections of your painting, you should proceed to other decorative elements (if you wish, you can stick rhinestones, stickers or draw something)
- The final stage of work is the coating of the painted nail with a fixative varnish. It is necessary in order to protect the varnish, make the manicure stronger and shiny, create gloss
The procedure for creating a blot on the work surface from the desired colors and dipping a sponge into it is repeated each time for each finger.
 nail painted with a sponge. double color
 how to paint a nail with a sponge
  nail design and painting with a sponge
 gradient manicure created with a sponge
 three-color gradient manicure on long nails, created with a sponge
 How to quickly and beautifully paint nails short nails, photo?
Some women are owners of short nails. This is due to personal preferences, beliefs, the woman's activities, or simply the inability to grow her own.
Do not be upset, as short and beautifully painted nails are a trend in our time. Long nails are increasingly being replaced by cute "shorty", decorated with various decorative elements, lacquered and skillfully painted with lacquer.
There are several ways to decorate original and beautifully short nails:
For example, you can draw on them dot pattern. To do this, you will need either a special manicure tool for drawing with a metal ball at the end, or a regular toothpick. Unlike a special tool, toothpicks will have to be changed several times during work, as they quickly deteriorate.
Applying a bitmap on nails is very simple, it is enough to have a wide variety of lacquer colors for the design.
You dip the tip of your tool into fresh liquid polish (put a drop on your work surface) and transfer the dot to the freshly painted base coat.
To make your drawing as accurate and interesting as possible, you should focus on special templates or examples of a finished manicure.

 bitmap on short nails with varnish
  dot pattern nail decor
 speckled manicure on short nails
 You can also surprise others with the help of another interesting technique - nail painting in different colors . Such a manicure is especially popular in the summer, as it evokes pleasant associations of summer, sweets, joy and childhood.
Choose only actual colors, do not give preference to metallic or glitter colors. Lacquer must be monophonic - enamel. Repeat the colors, depending on the finger, on both hands.

 multi-colored nails in pastel colors, decorated with rhinestones
  colorful short nails
 You can also decorate short nails with:
- gluing rhinestones
- creating a simple geometric pattern
- creating a miniature short jacket
- creating a gradient with a sponge
- creating or sticking a print on the nail (a pattern on the entire nail plate)
- animal style drawings (leopard spots, which are drawn with a special manicure brush)
 rhinestones on short nails
 short manicure in animalistic style
 slides (stickers) on short nails
 How to make up your nails to make them look longer?
Among all the secrets, of course, there are those that allow even the shortest nails to make a little longer visually.
To do this, you need to resort to special secrets of painting the nail, focused on stretching the area of \u200b\u200bthe nail plate using drawings, lines and other techniques.
The easiest way to visually stretch your nails French manicure. To do this, you need to paint the entire nail with a neutral beige or pink and only the extreme part of the nail in three or four millimeters should be painted white.
Such a manicure is covered with a fixative varnish for durability and gloss. It is noteworthy that over time, the nail will grow and become more beautiful with the help of such a manicure.

 jacket with decorative patterns on the ring fingers for short nails
 Another tricky but extremely effective technique is oblique french. Such a jacket has not a horizontal, but a beveled strip on the nail from one edge to the other.
Visually and on the one hand, the white part of the nail becomes longer and therefore it seems that the nail itself is much larger than it really is. An oblique jacket can also be decorated with rhinestones, sand or sparkles.

 beveled jacket option
 avant-garde oblique french
 Visually lengthen the nail will also help drawing oblong lines or patterns on the nail. A drawing or a strip must necessarily stretch from the bottom up or obliquely so that the nail becomes visually larger and longer.
Such a pattern can be safely decorated with sparkles or rhinestones to give it elegance and festivity, as well as remove simplicity.

 longitudinal line on the nail - drawing for visual lengthening of the nail
  manicure that visually lengthens the nails
 geometric patterns on the nails and a gradient also visually lengthen the nail
 How to make beautiful toenails?
The most popular type of pedicure - French perhaps this is the only way to "ennoble" toenails and make them well-groomed, neat and clean.
Making a jacket on your own legs is difficult, but real. Nails are not always large and perfectly even. In order for the jacket to turn out, you will need either special stickers or adhesive tape.
Paint your nails with a neutral color, wait for it to dry, apply the sticker, cover the nail area with white and remove the sticker. Apply a fixer and wait again to dry.
The most difficult thing is to try to do everything in order to keep your fingers as wide as possible all the time, in order to avoid spoilage and fresh varnish hooks.
 french on legs
 A few other options for a beautiful pedicure on your feet:

 colorful gradient
 Pedicure also allows you to use gradients and paint your nails with multi-colored varnishes. It is best to pursue this style in manicure as well.
 toe nail decoration
 A pedicure also involves painting small nails with one solid color and decorating, as well as painting the large nail on the thumb.
 pedicure decoration with rhinestones
 You can decorate a pedicure simply and tastefully with the help of the most ordinary rhinestones. The thumb "requires" the maximum number of crystals, and the small ones one at a time.
 simple pedicure in dark colors
 A pedicure in dark colors always looks profitable and feminine, but for this it is not at all necessary to choose black. Cherry and plum tones are considered the best and most popular (as well as incredibly fashionable for several years now).
 bright red pedicure
 The red pedicure is considered the most popular, most feminine and sexy in all years and at all times.
It makes women's legs especially interesting, delicate and sophisticated. Such a pedicure should be as accurate as possible, without spots on the skin and with an even layer of varnish. Any shade of red will do. It is best to combine a red pedicure with a red manicure.
How to paint nails on the right hand itself?
It often happens that having painted the nails on one hand (left), we proceed to the right and we observe an unhappy picture of the result of our labors. The reason for this is not a thorough development of the hand, because the working one is mostly right. But in the pursuit of a neat manicure, it is important to know how to achieve beautiful painting of nails on the right hand.

 how to paint neat nails on the right hand?
 In order for the manicure to be almost perfect, it is important to remember a few secrets:
- Start painting the right hand first. Of course, it’s more convenient to first make up your left hand and admire it, but it’s best if you spend all your strength and patience on a “complex” hand
- Apply a thin layer of varnish, do not dip the brush into the bottle over and over again to pick up the fattest drop. The less varnish, the more accurately the first layer will turn out, and the second one will be easier to do.
- Use a special corrector. It is not difficult to buy it in cosmetic stores. Visually, it resembles a felt-tip pen, but its core is soaked in nail polish remover. It most conveniently cleans the skin of the finger from unnecessary “blunders” and makes the manicure neat.
- Get special "protectors". They are like stickers. they should be attached to the finger around the nail so that the brush with varnish paints over only the nail and leaves an excess amount of varnish on the sticker
How beautiful to paint nails with gel polish or shellac?
Probably every woman noticed how quickly ordinary varnish can lose its attractiveness, crack, peel off and burst. For this, manufacturers have invented a special shellac lacquer.
What is shellac? This is nothing more than the exact combination of the most ordinary varnish with gel polish. It is for this reason that working with such varnish is incredibly easy even at home.
Shellac has its clear advantages:
- it shines (gloss) much more than ordinary varnish
- its coating is many times more durable than conventional varnish
- the reliability of the material allows you to wear a manicure for a long time
- It can be easily put on and taken off by yourself.
- it does not require removal of the top layer of the nail plate
- it has a positive effect on thin and weak nails, making them stronger
- is completely non-toxic
 shellac gel polish
 The difference with this varnish is that it requires a special ultraviolet lamp for its drying.
- the first layer is the base (using the varnish-base)
- the second layer is the main one (colored varnish)
- third layer - fixing (fixing varnish)
Application of gel polish on the nail plate:
- Perform the usual manicure with cleaning the nail, giving it a special shape, removing the cuticle
- Completely degrease the nail with nail polish remover
- Polish the nail with a special grinding nail file so that the varnish “grabs” the plate
- Apply a base coat (it is transparent) and dry it under a UV lamp for about two minutes
- Apply colored varnish - this is the base. This layer also requires about two minutes to dry under a lamp.
- Then the third layer is applied - fixing. It must be applied very carefully, because if its residue touches the skin, it can easily break its integrity.
- After that, the nails are polished with a special napkin, oil can be rubbed into the cuticle. All. Manicure ready

 shellac manicure
 How beautiful to paint nails with two colors, photo
Two-tone manicure is extremely popular. Depending on the season, it color solutions may be different, but nevertheless, it does not lose its relevance. Painting nails with two colors is not too difficult. There are two main ways:
Combination - you combine two colors on one finger. It will take time to create such a manicure. Apply the first layer of varnish in an even layer, wait for it to dry completely. Now, depending on your design, apply the second color of polish. You can use special stickers or plain tape to give your nails special shapes and patterns.
Semicircular stickers, as for French manicure, can be glued not only to the top of the plate, but also to the bottom, creating a hole. Tape can make many stripes and geometric shapes which, when removed, will reveal a beautiful design.
 two-tone manicure
 Alternation - for this, it is proposed to paint all the nails in one color and only certain fingers in a completely different one. You can follow the French manicure style by creating a stripe in the vertical part of the nail with the second color, or you can not do it at all. Everyone will pay attention to your manicure anyway.

 two-tone manicure
 How beautiful to paint your nails with white varnish?
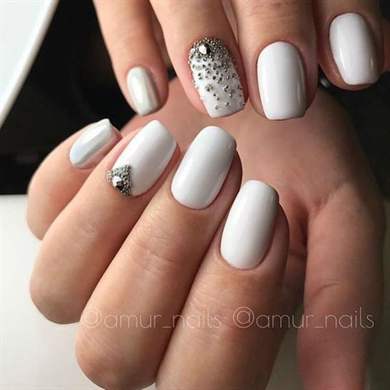
White varnish evokes pleasant associations of purity and femininity, summer, white sand, and the sea. This color is very goes long thin fingers and looks great on nails of any length. Apply white polish on the nails very carefully so as not to touch the entire area around the nail:
- Paint white varnish first on the right hand, and then on the left, so that all diligence is spent on that hand, which is always more difficult to make up
- Apply a thin layer of varnish and in no case keep your hands on weight. Hands should always have some kind of solid support
- Apply white varnish in two layers: the first will paint all the edges and sides, and the second will add saturation to the color
- If desired, decorate the finished manicure with either rhinestones, or sand, or sparkles, or a decorative element
Try to combine white polish with something else: beads, a belt, earrings or a watch to look as impressive as possible.

 white nail polish
 How beautiful to paint your nails with black varnish?
Black polish is a favorite among many women. This is because it suits nails of almost any shape and fingers of any length and thickness. Black lacquer gives mystery and special brutality to its owner. Applying black polish can be tricky just because it can stain the skin around the nail.
- Try to apply black polish first on the right hand and only then on the left
- Do not pick up too much varnish on the brush - it will spread and leave ugly bays on the nail
- Apply the first coat very thin and the second coat thicker to give depth to the color.
- Use a special corrector or a toothpick wrapped in cotton wool soaked in acetone to remove the errors of an untidy manicure.

 black matte lacquer
 How beautiful to paint your nails with pink varnish?
Pink varnish, due to its soft neutral color, allows it to be easily applied to the plate without any special errors. Try to apply the varnish with concentration, without sudden movements and haste.
Do not overload the brush with an excess amount of varnish and do not leave unpainted sides so that the manicure does not look bad. Pink varnish can be decorated with decorative elements, sparkles or rhinestones.
 pink manicure
 How beautiful to paint your nails with red varnish?
Red nail polish on a woman says a lot about her. It testifies to the special sensuality of a woman, hints at the ardor of feelings, passion and love. Red is the color of sexuality and fire. It is for this reason that a red manicure should be as perfect and neat as possible.
Try to apply varnish in complete calmness and only in “small portions”, without overloading the nail large quantity varnish. A thin layer, firstly, will dry faster, and secondly, it will look neater. Cover the red polish with a base fixer so that it is glossy and can let out glare, drawing even more attention to itself.

 red lacquer
 How beautiful to paint your nails with ordinary varnish?
Ordinary varnish gives you the opportunity to correct the situation at any time using acetone or any other nail polish remover. Choose only fresh and liquid varnishes for painting nails. Such varnishes will dry faster and spread better on the nail plate.
Make it a rule to apply a base coat of colorless varnish on your feet and only then color. This will align the nail and save it from disease, eliminating yellowness.
How beautiful to paint nails at home with a pattern?
Inventive fashionistas have found far more than one way to create a simple but spectacular pattern on the nails. To do this, there are many ways and secrets, as well as improvised means. You can learn in detail about how you can paint your nails at home and make a drawing on them from the video.
Video: "Simple drawings on nails with a needle"
How to paint nails beautifully at home is a question of interest to many beginner girls who want to make themselves or friends of their friends manicure at home. To learn how to do perfect manicure, you need to know some skills that are required for this.
Interesting photos:


First you need to know how to properly apply varnish on the nail plate
If you have already encountered this and know how to paint your nails well, then you will be successful in this matter. In fact, there are a lot of ways to cover nails with varnish, which means that even if you don’t know how to paint nails, there may definitely be a way for you.


First, let's analyze the simplest way that any girl can definitely use.
It consists in covering the nail with one color. This is a standard method of coloring nails and there is nothing complicated about it. Since the one-color manicure has become popular again some time after the many options for complex styles, feel free to use this technique, not only because it is simple, but also because it is popular.
Before you start painting your nails, be sure to apply one coat of clear polish to protect your nail from harmful substances further varnishes.
After that, it is already possible to paint the nails with colored varnish, starting from the middle to the bottom of the nail plate in small strokes. Then, in the same way, it is necessary to paint the sides of the nail. When the first layer of colored varnish has dried, in case you are not satisfied with the color, you can make one or two more layers until the result you need. Remember that you can not dip the brush completely into the bottle of varnish, because a large drop on the nail can ruin the whole picture and the layer will be uneven.
In principle, there is nothing complicated in this process, especially if there are at least small ideas about it. If they are not, you can always see how this happens in the video offered in the article. Also, it is worth remembering about the cuticles, the distance from which must be retreated by 1-2 mm for the skin to breathe. In those places where you climbed a little with varnish on the skin or cuticles, you can wipe it later cotton swab by soaking it in nail polish remover. Masters in order for the manicure to last as long as possible, use a transparent varnish at the end. You can do the same. Another little secret to keep in mind is that you should always shake the nail polish bottle before use, as this will help get rid of lumps and thickening.


In this case, we will paint the nails with two colors already.
This method is a little more complicated, but still simple if you follow all the steps correctly. In addition, a manicure in which there are several colors, and in our case there are two of them, is always in the spotlight. As a rule, in this case there are several options for staining. The more popular one now is the gradient one, which also has several directions. For example, horizontal or vertical, smoothly transitioning from one color to another; gradient with sharp transitions of different contrasting colors; french style manicure, in which the tips of the nail are painted in one color, and the main part in another; and the most popular - different colors on all fingers.
All of these double nail styles are more than popular this summer. But if we talk about the first option gradient manicure, then you will still have to try. To do this, you will need two colors of varnishes that will not differ much from each other (hot pink and pale pink) and a makeup sponge, or a regular sponge. After all the tools are ready, you can begin to get down to business. To do this, apply two colors to the sponge (sponge) so that the distance between them is as small as possible. Next, you need to attach the sponge to the nail plate so that the border between the shades becomes blurred. Using this method of applying flowers, you can easily and simply go beyond the boundaries of the nail plate. Therefore, it is necessary to remove the excess as soon as possible.


What is needed for a good result
In order to paint your nails with three or more colors, you need to stock up not only with other tools, but also with patience, because not everything works out the first time, as you know - the first pancake is lumpy. So, in order to achieve more successful color combinations, try to select two shades first, and the third one is brighter and different from them. In our case, let's use pink, white and black as an example.
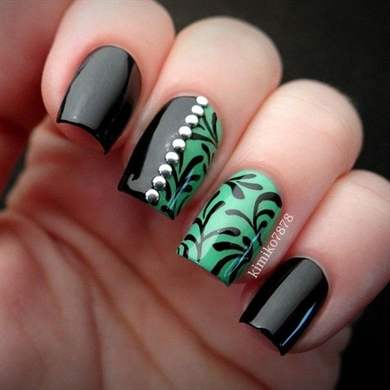
What do we do? With two matching colors, we will apply the main part of the nail and a highlight, and with the third - a drawing. To get a more successful manicure, you should not immediately set yourself a difficult task. For the first time, let it be ordinary images in the form of (not) neat blots. In this case, apply White color as the main one, pink - depicting a large blot, and black - a few dots on a pink spot. There are also other options where you can use multiple colors. For example, a striped manicure in which you will need to add adhesive tape to the list of tools. By separating the strips with adhesive tape, you can achieve an even, neat and most importantly, beautiful result.
An ideal manicure does not at all involve growing long nail plates and in recent times discreet and neat design is in fashion. What is the best way to paint short nails and are dark or very bright, saturated varnishes suitable for this?
What color is better to paint short nails and how to choose the right materials to create a spectacular manicure? Specialists in the field of nail plate design believe that the shade should be chosen taking into account their own taste preferences, as well as the lifestyle, the chosen style of clothing.

Short nails look very impressive. At the same time, varnish can both emphasize them and make them almost invisible. The most popular design option is French manicure. When it is performed, the free edge of the plate is painted in an opaque white color, and the entire nail is covered with translucent enamel. But for such a manicure, it is necessary that the nails grow back by at least 1-2 millimeters. Otherwise, it will be impossible to draw a "smile line". You can dream up a little and paint the free edge not in white, but in red, black or any other contrasting color.
Another option for a discreet manicure is painting the entire surface of the nail with a translucent matte varnish. It is permissible to use transparent enamel or any fixative. Hands will look well-groomed, but at the same time have a natural appearance. This nail design requires short nails. You can even cut them at the root or grow them 1-2 millimeters and give them a square, oval shape. Creamy, coffee, milky, beige, pinkish shades are in fashion. In summer, you can paint short nails with varnishes of bright and rich colors. Ideally suitable can be considered light green, blue, turquoise, orange colors. But it should be remembered that such a manicure is a very strong accent in the image. Clothing, makeup in this case should match the chosen style. Yellow nails look spectacular, but many men consider them asexual.

Lovers of the classics can be advised to choose a red lacquer. Dark red, burgundy, rotten cherry or even red-brown tone looks very beautiful on short nails. The combination of bright enamel and very short nail plates was recognized by many critics as ideal. It is better that the nails are cut at the root or have a very small free edge. As for rhinestones and sparkles, it is better to refuse them, since the bright coating already attracts enough attention.
Mother-of-pearl varnishes on short nails look beautiful, but fashion experts consider this option of manicure outdated and not popular. However, if a girl likes a similar effect, she can also purchase a coating with mother-of-pearl. When choosing a varnish, you should also take into account the condition and shape of your own nails. When nail plates far from ideal, it is better to give preference to soft enamel. Mother-of-pearl and light shimmer hide imperfections, visually hiding them. If you want to paint your nails with bright or dark varnish, it is recommended to contact the salon for the extension procedure. With it, it is very easy to correct the condition of the nails, give them additional volume, even out the length. Nails cut off at the very base look good when they have an elongated shape. Uneven and wide plates need to be adjusted. It is better to paint such nails with exclusively light varnishes so as not to attract even more attention to this shortcoming.