How to decorate a St. George ribbon with kanzashi. Master class on making a brooch from St. George's ribbon. How to make a St. George ribbon with your own hands from paper
In this master class, we will make kanzashi decorations for the St. George ribbon. For work, you can use thinner tapes or fabric, but it is more convenient to try and train on wide satin ribbons Oh.
To connect the parts, we will use hot glue (you can stitch or use instant glue).
Option 1: A simple round kanzashi petal.
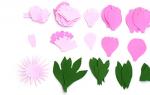
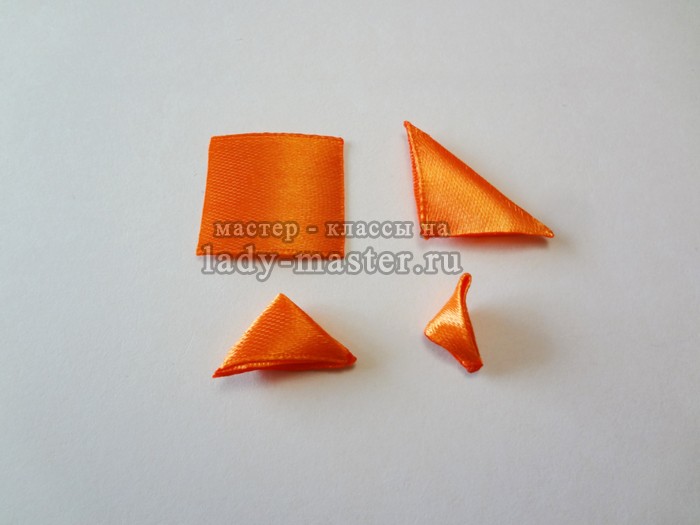
1. From a satin ribbon orange color cut into squares. Of these, we will make 7-8 round petals.
2. Fold the square diagonally.
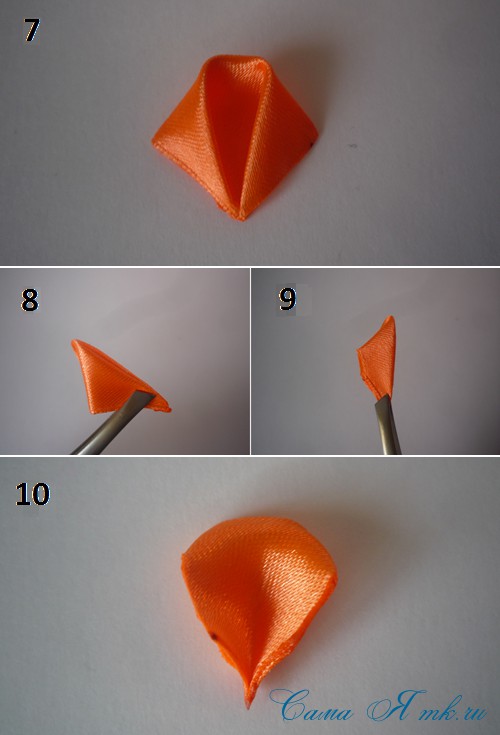
3. Then we bend the corners of the triangle to the top as shown in the photo.
4. It is more convenient (for a beginner) to do this in turn.
5. First, we solder one side on the fire.
6. And then similarly the second.
7. This is how it should turn out.
8. We fold the resulting part in half, that is, with the corners back.
9. Cut off the corners.
10. We solder the lower sections separately.
View of the petal from the front and back ...

We make the required number of petals. For a flower, 7-8 pieces are needed. You can fold it the way I did it, or you can use any other way. I fix it with a hot glue gun.
We fix with hot glue on a small circle of dense black felt so that the flower does not bend in the center, we attach any suitable decoration to the middle.

We fix it on the St. George ribbon and fasten the brooch base with hot glue.


Option 2: double round kanzashi petal.
Additionally you will need: sharp scissors, a candle, a small piece of black felt, a brooch base, a decoration for the middle and a St. George ribbon.
To connect the parts, we use hot glue (you can sew or use instant glue).
2. We fold them diagonally and put them on top of each other as shown in the photo. For convenience, you can use a needle.
3. Bend the side corners to the bottom corner (shown by arrows). It's better to take turns.
4.First one.
5. We solder the shovchik on the candle.
6. Then similarly to the second.
I solder the shovchiki, it seems to me more convenient. If you solder only the corners, then pre-process the edges of the squares on the candle.

7. We fold the resulting part in half, that is, with the corners back. You can solder the base of the petal a little on the candle.
8. Cut off the corners.
9. We solder the lower sections separately. 
View of the petal from the front and back ...

If you solder the lower sections together, you get another version of the petal, but, in my opinion, no less interesting.

We connect 7 petals together on a small circle of felt, decorate the middle.
We strengthen St. George ribbon and a base brooch...


Option 3: Simple sharp kanzashi petal.
Materials: satin ribbon 4-5 cm wide.
1. We cut squares from a satin ribbon. Let's start making sharp petals.
2. Fold the square diagonally.
3. Add it up again.
4. Connect the corners again.

5. We solder the base of the petal well.
6. Cut off the corner.
7. We process the cut on the fire.

View of the petal from the front and back ...

In a similar way, we make the required number of petals of the desired color.
Option 4: Double sharp kanzashi petal.
Materials: satin ribbon 4-5 cm wide in two colors.
Additionally you will need: sharp scissors, a candle, a brooch base, any jewelry and a St. George ribbon.
1. Cut off two squares of different colors from the satin ribbon.
2. We fold them diagonally and put them on top of each other as shown in the photo.
3. We draw each corner in turn to the opposite corner of the resulting figure.
4. Here's what should happen.

5. Fold to the middle and solder the base of the petal well so that it does not fall apart.
6. Cut off the corner.
7. We process the cut on the fire.

This is what the finished double petal looks like.

We make the required number of petals. Can be folded "spikelet" or in any other way. I fix it with a hot glue gun.
We fix it on the St. George ribbon and fasten the base-brooch.


Option 5: Triple sharp kanzashi petal.
A triple kanzashi petal can be made in two ways: combine single and double petals, or solder each petal in turn to the previous one. In the second case, the petal will be smoother.

Or each petal individually...

We make the required number of petals, sew or assemble with hot glue ...


An original decoration for clothes for you or as a gift for Victory Day for relatives and friends is ready!
Create with pleasure!
I was glad to help!
May 9 is a great holiday for the Russian people. On this day, we thank our grandfathers and great-grandfathers for the victory that Soviet soldiers gave to their contemporaries and laid down their lives for it. The symbol of this significant holiday is the St. George ribbon. Many people tie a ribbon on holiday beautiful bow. And we offer to make an original brooch out of it with your own hands. This simple accessory will turn into a symbol of victory.
St. George ribbon brooch in the form of spikelet
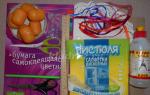
Before starting work, prepare the following set of materials and tools:
- St. George satin ribbon. Buy a ribbon in needlework stores;
- satin ribbons in orange and black;
- scissors, tweezers and glue;
- clasp for brooch;
- lighter or regular candle;
- decorative details for decoration.
Start making a brooch by cutting satin ribbons into segments in the form of squares measuring 5x5 centimeters. Prepare 7 square pieces of black ribbon and 14 orange squares. Scorch the edges of each cooked square with a candle or a lighter, and the ribbon will not crumble.
Proceed to the next steps:
- make petals for a brooch. Take the prepared pieces of tape. Fold the orange square diagonally with tweezers. Fold the resulting triangle again. Fold the blank again, and get a petal with sharp ends. Carefully remove the edge of the ribbon and scorch with a flame. Hold the tweezers along the workpiece and bend it. Cut off the bottom of the petal and flame it. Process all orange squares in this way;
- take the black square and fold it diagonally twice. We apply the resulting part to the orange blank. 3 parts should come out in the petal - the black one is located in the middle, and the orange ones are on the sides;
remove the sharp corners on the petal and treat the ends with a flame. All parts must be firmly connected to each other. You get 7 three-layer petals with sharp ends; - connect all the petals into one whole with glue. Fasten the petals in the form of a spikelet. Decorate the middle of the spikelet with dark beads;
- take the St. George ribbon and glue it with a loop. Attach a spikelet on top. Sew a fastener on the reverse side. The original St. George ribbon brooch is ready.
St. George ribbon brooch in the shape of a flower
This brooch is made in the shape of a flower. First prepare the following:
- orange satin ribbon 5 cm wide;
- glue gun or needle and thread;
- scissors, tweezers and a lighter;
- a small piece of black felt;
- decoration for the middle of the flower;
- St. George Ribbon.
Let's start the master class:
- cut into small squares satin ribbon. Of these, you need to make 7-8 round petals;
- fold the square diagonally. Use tweezers. Bend the corners of the resulting triangle to the top. Scorch the sides of the triangle with fire;
- fold the resulting part in half - corners back. Cut corners with scissors. Do not forget to singe the lower sections with the flame of a lighter. By this principle, make the rest of the petals for the flower. Fold them all together and secure with a hot glue gun;
- take a piece of felt and fix the flower on it. Sew it with thread to the felt or use hot glue. Attach a bead or other decoration to the center of the flower. It remains to fix the flower on the St. George ribbon and attach a clasp to the back of the brooch.
Make flower petals from the St. George ribbon itself, and don't use satin. Buy a striped ribbon 60-80 cm long from the store. Five petals are made in the same way as above. At a piece of guards tape, cut out the edges so that they look like a flag and singe with fire. Fold the ribbon, attach a flower and a clasp to it. It turned out not an orange flower, but a striped one.

The above step by step instructions- this is a small part of all master classes on making a brooch from a St. George ribbon. Even children can make these products and they do not require a lot of materials. Attach a handmade brooch to your clothes and go celebrate Victory Day.
St. George's commemorative ribbon is a popular attribute of May. Everyone associates this most flourishing month of the year with the great Victory, with the gray hairs of modest veterans who have done an invaluable feat for our and subsequent generations. To honor those who are still alive, to honor the memory of those who are no longer with us, we march in the Parade, take part in the action Immortal Regiment. And the St. George ribbon is a thin thread that unites people of the future and the past, entire generations.
This master class tells how to make an elegant St. George ribbon with a hand-made kanzashi flower. The accessory will turn out beautiful and impressive. To decorate the brooch, prepare a black and orange marshmallow and oval pointed petals.
To make a kanzashi brooch you will need:
- 1 piece of St. George (black and orange) ribbon - 2.5 * 16 cm;
- 8 pieces of St. George (black and orange) ribbon - 2.5 * 7 cm;
- 8 pieces of orange satin ribbon - 5 * 5 cm;
- 8 pieces of deep black satin ribbon - 5 * 5 cm;
- black felt base - diameter 4 cm (for St. George petals);
- black felt base - diameter 3 cm (under the central black-orange marshmallow);
- felt rectangle (for a pin);
- hugger 2 cm - 1 element;
- half bead of black color 1.4 cm - 1 element.
How to make a brooch by May 9 in stages:
The lower layer of the flower will be made of pointed petals, the manufacture of which will take a St. George (Rep) ribbon measuring 2.5 cm by 7 cm. To make all the petals, 8 identical cuts should be prepared. Then singe them if necessary for accurate work. Bend each strip at a right angle to mark the middle. Remember that rep is much denser than satin, but it is easier to work with.

Then bend the resulting angle diagonally, aligning the two processes, clearly joining the strips. You will get an acute-angled detail, on one side of which a pocket will be visible. This side will become the back of the petal, turn the workpiece towards you with the whole side. At the bottom of the petal, burn the rep ends and make folds. Striped petals are all done using this technique.

Take a longer St. George ribbon, but the same width. Cut parameters 2.5 cm by 16. Bend, but not at a right angle, but at an acute angle to get the base of the brooch. Prepare a black felt circle bigger size. For the bottom layer of the flower, 8 striped rep petals should be ready.

Glue all the petals into a flower, make a felt circle as the base. Next, stick the resulting workpiece on a large loop. The lower part of the brooch is ready.

Proceed to the second part of the work. To make an elegant center marshmallow, prepare orange and black satin squares with a side of 5 cm. Bend the pieces diagonally.

Pin the black triangle to the orange one (clearly align them over the entire surface). In the resulting multilayer workpiece, bend two sharp corners. There should be a gap in the center.

Cut off the place in the combined tape where all the corners converge, stepping back about 0.5 cm. Then bend the rest, making a fold clearly along the side corners. Bend the resulting triangle in height, combining sharp corners and splitting the central slot, showing a black tape. Glue the corners with a flame.

Prepare 8 identical bright marshmallow tubes. And also at this stage you will need a hugger with a black half-bead.

Glue the marshmallow, glue the core in the center. All parts are glued onto a small black felt circle.

Prepare a felt rectangle with a pin.

Black and orange kanzashi petals look very patriotic together. Why? Yes, because it is these colors that make up the famous St. George ribbon - a symbol Great Victory Soviet people in the Great Patriotic war. If you don’t have a suitable accessory by May 9, be sure to purchase it, or better, make a brooch with your own hands to try on jewelry before the parade or present it as a gift to your grandparents. Even if they did not fight as children, they knew the hardships of war, from a young age they worked hard in the rear, bringing the great Victory Day closer.
If you liked the brooch offered in the creative lesson, take a look step by step description work and get down to business, because May 9 is not far away.
Choose the following from your art supplies chest:
- - 16 pieces of black satin ribbon - 1.2 * 5 cm;
- - 13 pieces of orange ribbon - 1.2 * 5 cm;
- - 10 pieces of gold brocade - 2.5 * 2.5 cm;
- - 9 pieces of orange ribbon - 2.5 * 2.5 cm;
- - a felt circle with a diameter of 3 cm;
- - 3 pieces of gold lace - two 6 cm each and one 8 cm;
- - a hugger with a circumference of 2 cm - 1 piece;
- - a half-bead of black color with a circle diameter of 1.4 cm - 1 piece;
- - black beads - 9 pieces;
- - brooch, St. George ribbon - 4 * 25 cm.
Brooch modeling steps
1. The list of accessories contains all the names of materials that will be needed to model a beautiful brooch for a wonderful May holiday. From a thin ribbon of two colors, narrow pointed petals will be made, from squares, standard sharp kanzashi petals. A half bead with a hugger should be placed in the center of the flower, and small black beads and laces will become pendants that will decorate the brooch.

2. To make oblong petals, take 1.2 cm wide pieces of tape. At this stage, you will need orange and black parts. Lay a piece of tape vertically in front of you, mentally outline the middle. Bend in the central part at an angle of 90 degrees, but not towards you, but to the side. Next, bend the part of the segment, bent to the side, down, aligning the two sides of the right angle. The result should be a figure resembling a house. This will be the base of the flat petal. All such details in orange and black colors will be used on the lower and upper tiers of the flower. At the base, the prepared part should be rolled up to get a special envelope. Use glue or a lighter for this step.

3. According to the method indicated in the previous paragraph, prepare all black (16 pieces) and all orange (13 pieces) petals for further work. Cut out the black felt circle.

4. Bend the orange squares with a side of 2.5 cm in the standard way. As a result, you should get small sharp kanzashi petals (single). Bend diagonally, and then - along the height of the triangle. Round out the details. There is no need to cut the tape at the back, the petals should remain voluminous.
5. Turn all 9 squares of the orange ribbon into such small petals. From gold brocade, also make sharp petals of the same type, but there will be one more of them - 10 pieces.

6. To pieces of golden shoelaces (one of them should be 2 cm longer than the others), glue branches consisting of three orange petals - one trefoil to each string. On the opposite side, string three black beads. These will be elegant pendants for a brooch. Thus, the accessory will resemble an order.

7. Golden sharp petals also fasten into twigs, but combine 5 pieces each. Thus, out of 10 prepared parts, you should get 2 branches.

8. On the prepared felt circle, start sticking the bottom layer of petals (black). Try to place the parts symmetrically.

9. First make the bottom black layer of the flower.

10. Then add an orange layer on top, but move the petals closer to the center. Since the petals are the same size, it is necessary to move the top layer towards the center so that the black details are visible. Glue the half-beaded hugger to the center.

The symbol of the Victory Day is the St. George Ribbon. A beautiful tricolor ribbon is usually worn on clothes and goes to a festive parade and procession. For many, a ribbon with orange and black colors is associated with May 9 and festive events. However, such a familiar accessory can be slightly diversified and decorated in a completely unusual way. We propose to learn how you can easily and simply make a flower from a pre-prepared and purchased St. George ribbon for the festive parade with your own hands.
We make a flower from a St. George's ribbon with our own hands: tips and tricks
We bring to your attention detailed master class to create a holiday symbol with your own hands. In the variant of making a flower described below, the technique of weaving from kanzashi satin ribbons will be used. Thanks to an accessible description and demonstration with the help of visual photos of the process of making a winning accessory, you can handle it yourself.
To make a flower bud using the kanzashi technique, you will need the following materials and tools:
- Rep ribbon with St. George colors three centimeters wide;
- Satin ribbons with a width of two and a half centimeters in black and orange;
- Glue gun;
- Sharp scissors;
- Special tweezers;
- Lighter or candle;
- Black bead to decorate the core of the flower.
After preparing everything required material and tools, start making a flower from a pre-purchased St. George ribbon quickly and simply with your own hands.
Using sharp scissors, cut fifteen centimeters of ribbon. Then fold it at an acute angle, thus forming the basis for your future victorious flower. In order for a piece of your ribbon not to crumble or crumble, you should use only very sharp scissors in your work. After cutting through all the edges, it is necessary to process them with a candle flame or a lighter. Then your sections will be strong and will not fall apart in the process of using a flower from St. George's ribbons.
From the rep St. George ribbon, six segments of seven centimeters in length should be formed. Now each of these individual elements must be bent in the center at a right angle. As a result of manipulations, you will get an unusual triangular shape of a piece of tape. Then bend the workpiece again so as to form a shape with a sharp corner.

At the base of your petal, you need to form two symmetrical folds. Now hold the bottom of your leaf with special tweezers and process it with a candle or lighter flame. Heated and melted under the influence of a hot flame, the rep St. George ribbon easily takes the shape and shape necessary for the composition.
To build the design of your symbolic flower, you will need to form six petals with the same shape. These petals will form the bottom tier of your arrangement. Rep petals perfectly keep their shape and will not lose their properties even from strong wind or rain.

Now you can start assembling the lower tier of your composition. Each individual element should be glued to the base. All these elements should form in the form of a six-pointed flower. Appearance your flower from St. George's ribbons will be better if the elements in the central part are not too close to each other. Leave a small space between the petals.
From a black satin ribbon, make the same petals. However, to form the elements, use segments of six centimeters in length. Glue all black blanks to the holes of the first tier.

Now form five elements from the orange satin ribbon. To form the petals, use segments of five centimeters in length. Due to the fact that the length of the cuts of each color is gradually reduced, smaller petals are created. And in this case, when assembling the flower, all layers are visible.
The orange elements are glued in the shape of a star, that is, one petal will be directed upwards, while the others look sideways in pairs.
Cut twenty-five centimeters from the St. George ribbon, and create an element that has the shape of a loop. On top of it, glue the previously created ribbon flower.

For convenient fixation and wearing of the finished product, it is necessary to turn the work over and glue the base for the brooch or a large pin to the reverse side.
A selection of videos on the topic of the article
We bring to your attention a small selection of videos on the process of making flowers.