Patterns for a fabric needle bed. Do-it-yourself needle bed - how to make a beautiful needle bed with your own hands. Beautiful needle case made of toothpicks, thin fabric and padding polyester
Do-it-yourself needle bed. Master class
In this article, we will tell you how to make a do-it-yourself needle from improvised and waste materials. In the process of sewing, it is very convenient to use the needle bar. It is a pillow or a case for needles and pins. Working with a needle bar, the possibility of their loss in the process of work is excluded.
A modern and diverse selection of stylish, beautiful needle beds will please any needlewoman, will decorate her workplace and will not allow needles to get lost ...
Causes true admiration and the material from which the needle beds are made, and the great variety of forms that are used in the manufacture of needle beds. Some of them are worthy of being elevated to the rank of works of art in their design. Absolutely everyone can make an interesting and original needle bar with their own hands. who has mastered the elementary basics of needlework.
Needle cushions often created for decorative purposes. There may be forms for every taste: a circle, a heart, a square - the forms are simple, or more complex - in the form of an animal figure, a flower shape, a handbag. You can make a needle bed yourself from cotton wool, fabric, foam rubber and decorate it with your own hands with appliqué or embroidery.
So, let's try to make a needle bed with our own hands. And let it become not only a "keeper" of needles, but also decorate the interior of your home.
1. Immediately before starting work, we will choose a cross stitch pattern with a diameter of no more than 12 cm and perform the embroidery itself on a square piece of canvas.
2. After the embroidery is finished, we erase it, iron it well from the inside to align the pattern. Then we will give our embroidery a convex shape with the help of a steam iron and any object of a convex shape.
3. You can fill the needle bed with any accessories that are in the arsenal of every housewife: these are cotton wool, synthetic winterizer, and household sponges.
4. Choose the size for our needle bed. For this, a canning lid with a diameter of 10 cm is suitable.
5. An extra canvas is cut off in a circle, leaving only allowances of about 3 cm.
6. Then we take a dense piece of cardboard and cut out a circle from it with a diameter slightly smaller than the lid itself. We turn the fabric with the washed and ironed embroidery over, lay the cardboard, foam, then tighten it with a thread and fasten it.
7. Lubricate the prepared canning lid with glue and put our pad there. You need to press it down a little and wait until it dries completely.
Well, we ourselves made a needle bed. If you have time and desire, then you can do decoupage on the back of the needle bar, and glue a decorative cord or rhinestones on the lid. You can put the needle bar on the desktop, or you can sew a loop to it and hang it on the wall.
If for some reason you do not want to embroider yourself, you can, as an option, use decorative braid or colored fabric. Such a needle bed will also be a wonderful gift and, at the same time, a decoration for the workplace of a needlewoman.
How to do a beautiful needle bed in the form of a small booklet with their own hands. Master Class
We make an original needle bed from shirt fabric, dense linen fabric and filler. Master class for beginners.
Beautiful needle case made of toothpicks, thin fabric and padding polyester.
How to make a functional needle bar from a jar, thin fabric and filler with your own hands. Master Class.
Next article.
Any hostess loves to have order and comfort everywhere in her house. Despite the fact that in Lately a lot of useful inventions appeared (pen holders, needle cases, caskets and others), yet different handmade products create an unusual, homely atmosphere. Any little thing made by hand will please not only the eye, but also give the interior a certain zest. Even the simplest needle pillow can decorate a needlewoman’s corner and turn out to be a very useful and convenient little thing. Types of needle beds - master classes and photos in our selection.
The simplest and most convenient version of the needle bar for those who sew is an elastic pad that is comfortable to put on your hand. How to sew easy options, see this video:

On the Internet you can find a lot of options for homemade needle beds. They can be made of felt, foam rubber, embroidered on canvas and stuffed with padding polyester or regular cotton wool. Making a beautiful needle bed is a creative process for a needlewoman. 
Crocheted needle beds
For those who know how to knit, it will not be difficult to make a gift for yourself or a friend. It can be absolutely any object or character. But of course, prickly hedgehogs, cacti or Christmas trees are most associated with needles.
For example, a beautiful cactus in a pot turned out in this video:
We also have four knitting master classes:


You can link, for example, this:

Or any flowers
And this is my needle bed, knitted a long time ago - "Amanita".


Crochet turtle:
But the most original idea- tie yourself a little helper, as in these videos from YouTube:
Felt needle beds
"Amanitas"
Mom is the dearest and closest person to everyone. I want to make my mother pleasant, give her a gift that will pleasantly surprise her. You can go to the store and buy, or you can make a souvenir with your own hands.
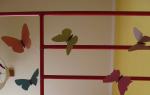
Mom always has a lot to do, including repairs and tailoring. Sometimes needles get lost. Our needle bed is very convenient because it can be hung on the wall. Beautiful and practical. Felt is associated with warmth, tenderness.
At all times, the creations of nature were considered beautiful and perfect. Walking through the forest in autumn, you can meet fly agaric mushrooms. Everyone knows that they are poisonous, but how bright and beautiful they are. I really want to take them with me. The “Fly agaric” needle bed made of felt will be a pleasure to receive as a gift for any mother.

Target:
To teach how to make a souvenir needle bed "Fly agaric" from felt.
Tasks:
1. Explore technological sequence and techniques for making a needle case.
2. Develop Creative skills, spatial imagination.
3. Cultivate accuracy, aesthetic taste.
Materials and tools:
1. felt (red, white green);
2. sewing threads (red, white, green);
3. scissors;
4. needles, pins;
5. paper, pencil, chalk;
6. Sintepon or synthetic winterizer.
Description of work:
1. Draw patterns in life size and cut them out.

2. We select the fabric for fly agaric hats and trace the templates with chalk. Cut out. Each part should be two.
3. We select the fabric for the legs. Pin the pattern to the fabric with a pin. We do not circle, because the chalk on the white fabric will not be visible, and the dirt will remain from the pencil. Cut out. Each part should be two.
4. Cut out circles for hats.
5. Before we start stitching, let's assemble our composition, see if we like everything.

6. Let's start sewing from the legs. We fold the corresponding parts and sew on the sides with a “Forward needle” seam. At the end of each line, be sure to make a knot. Leave the bottom part unstitched. Later, through it we will fill with padding polyester. We do the same operation with other legs.

7. Now let's take on the hats. We set aside the lower part, and work with the upper one.
Sew on circles. This can be done in two ways. The first - with a seam “Forward the needle”, the second - “Over the edge”. We use the method that we like best. I have used both.

8. We sew the details of the hat with a seam "Forward the needle." We do not sew to the end, leaving the lower part for stuffing with padding polyester. We make a knot, but do not cut the thread. We will continue to sew further with the same thread.

9. We insert the corresponding part of the leg into the lower part of the cap part. On the left side, pin with a pin.
10. Fill with padding polyester. Sew up the bottom of the hat.
11. Sew to the end, tie a knot. Stuff the leg of the mushroom with a padding polyester. We repeat the same with other mushrooms.
12. We cut out a clearing.
13. We assemble the composition, we cut it off with pins.

14. We sew a clearing, from below we leave a place for stuffing with synthetic winterizer. We stuff and sew.

15. So that the mushrooms do not fall apart, on the left side we will grab them at the junctions with several stitches.

16. In order for the needle bar to be hung, we make a loop.

Our needle bed "Amanita" is ready. We hang on the wall and stick needles.
Creative success to you.
A simple needle bed made of felt "Cactus" can be done even by children, students of grades 2-5:

Beautiful and functional - 2-in-1 needle bar and stand for needlewomen's tools:
Pincushion from a jar
needle bed can be combined with button jar. It is very convenient. By removing the needle cover, you can easily get the desired button. Colored buttons in a transparent jar will serve great decoration tailor's workplace.

Pincushion-storage for various sewing trifles, the top opens. Galina Egorova.


Pincushion-capacity for storing small things
A small needle case is a little thing that any housewife needs, and a container for storing all kinds of little things, such as buttons, cabochons, beads or sequins, will also be useful. You can make such a product with your own hands and decorate it with a flower bouquet, then bright model will become suitable gift. You can give such a souvenir to your mother or grandmother, and it will definitely find a use. Real housewives love to have everything in its place and beautifully decorated. Master class by Elena Nikolaeva.

What you need to prepare to create a needle bed:
a small glass jar with a lid (from caviar or any canned food);
a small piece of fabric (about 10 by 10 cm);
thread with a needle;
scissors;
synthetic winterizer or cotton wool;
special gun and glue stick;
lace;
rhinestones on a thread (large, in the form of hearts or any other);
a variety of decor elements to create a bouquet: green twigs and leaves, decorative stamens, complex stamens, berries and so on.
How to make a decorative pincushion from a glass jar step by step
1. The basis of the product will be an ordinary food jar -. Be sure to wash it and wipe the glass with alcohol so that there are no smudges or fingerprints left. The top tin cover must be decorated. If the side of the cover appearance if you are not satisfied, for example, inscriptions are visible on it, then additionally use braid or a thin ribbon to decorate it.
 2. Remove the cover and start creating a needle bar on it. Prepare first beautiful lace and glue it with a glue gun around the circumference. Try to evenly distribute the details of the ring. You can either fold the tape at the time of gluing, layering small teeth on top, or divide the lace into separate segments and make the ring uniform.
 3. From the prepared fabric (this can be a simple chintz), cut a circle a little larger than the base cover. Take a thread with a needle and sew stitches at the very edge of the circle.
 4. Sew the edge of the fabric with thread and tighten it, stretching the edges evenly. Place cotton wool or synthetic winterizer inside.
 5. Make a round pillow by tightening the thread. Turn over to face you and level the surface. Glue the upper soft part of the needle bar to the lid.

6. Decorate the joint of lace and pads with rhinestones on the thread. Gently glue the strip (if there is no such material, then use a braid or thin tape of a suitable size and color).  7. Prepare, berries, stamens and leaves for decorating crafts. You can use absolutely any materials that you have that will make an interesting composition. Stick the prepared decorations on the side, collecting the bouquet.

 8. A beautiful needle bed is ready. All that remains is to place beautiful buttons, buttons, invisibles or other little things used by women in the container and close the lid. Now you can give this craft for March 8th. Delicate flowers look great on the surface of an ordinary jar.

Oksana Dubrovskaya offers another option - a “reverse” pincushion from an ordinary glass jar. This can be a great gift for a grandmother or mother, because it is made by hand. And besides, the needles are securely hidden inside - they will not prick and will not be lost.
Bank-pincushion reverse
How often do we meet with whom it is impossible to part. And the shape is perfect for creating something unusual. You can, for example, use them to store threads, buttons, beads. And the lid can be adapted to store needles.

For work you will need:
a jar with a lid;
paints (acrylic, stained glass);
varnish;
paint brushes;
universal glue;
synthetic winterizer;
a piece of blue cloth;
sewing threads;
scissors with a needle.

Before applying the paint, it is better to wipe the jar with window cleaner to remove grease and dust. The drawing can be very different. Because under New Year the theme of winter is relevant, you can draw snow, snowmen, fir trees with toys. By March 8, flowers, birds, spring landscapes are better suited.
 A similar pattern can be applied to the lid of the jar. After drying, it is desirable to apply varnish to fix the pattern.
 To make the jar more functional, you can make a pillow out of fabric and padding polyester. To do this, the fabric with synthetic winterizer must be stitched with threads.

The finished pillow can be glued to the bottom of the lid. It is important not to stuff the synthetic winterizer around the edges of the fabric so that the lid can twist freely.

The needle bar itself can, of course, be made on the outside of the lid. However, this is not very safe, as the needles will be accessible to small children, if any. Therefore, it is wiser to make it inside.
 After complete drying, the pincushion jar is ready. She will be able to decorate the shelf of the needlewoman. Or it can be a cute and practical gift for your grandmother, made by yourself.

Needle beds of Galina Egorova:
From a plastic jar, needles and satin ribbons you can make such a beautiful pincushion in the form of a basket:
How to sew a needle bed
There are many options for embroidered needle cushions most different forms and sizes. For those who know how to embroider, it will not be a problem to choose the right pattern. The pattern can be simple or unique. The choice depends on the needlewoman.


pad
 To make this item you will need:
- a small piece of canvas, for example, 10 x 10 cm in size - 2 small squares;
- floss threads of a suitable color;
- scheme;
- scissors.
First you need to choose a simple pattern for cross stitching (for example, “scissors with spools of thread”, ornament, bugs, leaves, etc.). There are a lot of such schemes, but the drawing should fit in the size of the intended pillow.


In the "scissors and spools" scheme, you can use the remains of floss threads different color. Embroidery is done quickly and easily, causing indescribable delight at the end of the work.
So, at the initial stage, you need to determine the center of the canvas and distribute the future pattern so that it fits into the selected blank. Next - cross-stitch embroidery according to the scheme. When both squares are embroidered, it is not necessary to embroider a complete pattern on both sides, since the needle bed has a “top” where needles are stuck and a bottom - the bottom on which it lies or stands.
The pillow case can be sewn in different ways. There are standard and non-standard, more interesting options for this product.
Iron the finished (embroidered) parts so that the pattern looks beautiful and then start sewing with a blind seam, but it is not necessary to sew the square with a “back needle” seam. You can connect products by catching the longitudinal thread of the canvas itself.

"Pillow" can be sewn in the usual way, making it square, or you can make its shape interesting and unusual (more original) by stitching it according to the pattern. To do this, you need to do the following:
- determine the center of the embroidered details;

- sew the parts to each other, leaving a small area unsewn.

This is done in order to fill the needle bed with padding polyester (you can also use cotton wool, but cotton wool is poorly pierced by needles, which means that such a needle bed will be inconvenient to use), it is best to take synthetic fluff for filling.

 Then sew the remaining section and fasten the thread. You can sew with colored thread, the seam will also turn out beautiful. Further, a bead or button is sewn in the center of the needle bar. It needs to be stitched through.

The needle bed is ready, cute and nice!


Embroidered needle bed

I bring to your attention another master class by Oksana Dubrovskaya, this time she will show how to sew a needle bed with cross-embroidered buttons and a spool of thread.
To make a needlepoint you will need:
fabric blanks with an embroidered pattern;
needle;
threads for sewing;
synthetic winterizer or other filler;
scissors.
Before starting work, it is necessary to embroider a pattern on the canvas for the future needle bed. You can use the proposed scheme or find another picture.

Everyone whose work or hobby is related to sewing or embroidery, sooner or later thinks about sewing a needle case, and not a simple, ordinary pillow, but a special, exclusive one! This very small sewing accessory makes life a lot easier for a needlewoman, making it safer to store numerous needles and pins, and also makes it easier to find the right needle among dozens, if not hundreds, of others thriftily bought “just in case”. In addition, the original pincushion will serve not only as a practical accessory, but also decorate the craftswoman's desktop, becoming a kind of business card of a professional. Today we will try together to sew a needle bed with our own hands according to the pattern and descriptions! Stock up on fabric, felt, cardboard, glue and thread, we have a lot of unfinished business! 😉
tools and materials:
- cotton fabric;
- sewing threads;
- scissors;
- small Velcro;
- button;
- any filler (we recommend using holofiber).
How to sew a hand needle bed with your own hands: a master class
pad

We cut out two circles with a diameter of 10 cm and a strip of 10 cm wide from the fabric. The length of the strip should be equal to the girth of your wrist + 3-4 cm.

We put the rounds together, face to face, and sew them, leaving a small gap. We cut the allowances.

We turn the workpiece on front side and stuff it more tightly with holofiber. The remaining hole is sewn by hand with a hidden seam.

We thread a strong thread into the needle, tying a knot at the end, and pierce the center of the round blank with the needle, after which we throw the thread over the edge of the pad and stick the needle into the center, but on the other side of the pad, tighten it tightly. Repeat until the pillow is divided into eight equal petal segments. Tie a knot and cut the thread.

We choose the side that looks neater, sew a button in the center of the pillow.
Bracelet

We fold the rectangular blank in half lengthwise and hide the cuts inward, ironing the edges with an iron. We sew the bracelet around the perimeter.

We sew a small Velcro (one piece to one edge of the bracelet, the second to the second).

Sew a flower pillow to the bracelet. Needle on hand is ready!
Do-it-yourself needle bed for fitting: video mk
Do-it-yourself needle bed "Sewing machine"


For work we need the following tools and materials:
- two small pieces of fabric - plain and variegated;
- one big button;
- two ordinary toothpicks;
- half a spool of plain sewing thread;
- a small piece of thick cardboard for the base of the machine;
- stuffing filler (holofiber, synthetic winterizer or cotton wool);
- sewing threads;
- pins;
- scissors.
How to sew a needle bed with your own hands: a master class
First, we are waiting for a pattern of an unusual needle bed in the form sewing machine:

Then we need to sew both parts of the base, and to the upper part, to one half, pin a piece of fabric with pins - the middle of the sewing machine. This is an optional step, but if you ignore it, the needle bar will be "thin".

Now we start sewing: we sew or sew first one side of the workpiece, then the other, turn the part inside out.


At this stage, we insert the cardboard into the base of the sewing machine. It is cut exactly to the size of the pattern.


Carefully sew the top of the needle bar to the stand. We insert the first toothpick in place of the needle, and the second one where the coil will be attached. We wind the threads of any color you like on the half of the spool and sew on the button in the place where the wheel is located.
Pincushion "Elephant"

For work we need the following tools and materials:
- thick cotton fabric;
- lace to match;
- threads "Iris";
- black beads for the eyes;
- piece of felt;
- sewing threads;
- needle;
- scissors;
- marker;
- filler (cotton wool or holofiber).
We sew an elephant: a step-by-step master class
First, print the pattern:

Now we transfer it to the fabric: we fold the canvas in half face to face, apply the cut out pattern, circle it with a marker or pencil. We cut out the baby elephant taking into account the allowances for the seams and sew it around the entire perimeter, leaving very little space for stuffing the product.

Using special zigzag scissors or any ordinary ones with a sharp end, we make zigzag notches along the edges without touching the line.

We turn the workpiece on the front side.

We tightly stuff the future needle bed with filler, starting with the trunk.


We tie a knot on a tight cord, then we stick a needle with a cord in the right place into the needle bar, pull out the cord and fasten it.

Having tied the cord, we fluff its tip, forming a brush.

We finally sew the body of the baby elephant with a hidden seam.

Now cut out the ears from the scraps of felt.

With a thread "iris" in the tone of felt, we sew the eyelet on the outside with an overcast seam.

With the same overcast seam, we sew an ear to the elephant. We repeat the same with the second eye, not forgetting the symmetrical arrangement of parts.

We thread the black thread into the needle and stick it in those places where the eyes will be located. Sew on beads, embroider eyelashes with the same thread.

Elephant pincushion is ready!

Do-it-yourself needle case "Pumpkin" made of fabric

For work we need the following tools and materials:
- colorful bright orange fabric with two different options pattern;
- a piece of green fabric or felt for a leaf;
- brown flat lace for twigs;
- sewing threads in orange and green;
- needle;
- filler (holofiber or cotton wool);
- scissors.
How to sew a needle bed in the form of a pumpkin: a step-by-step master class

cut out of orange thick fabric two circles of the same diameter, each with a different pattern.

Each circle is folded in half, cut into two rugs, each of which is folded in half again and cut. As a result, we get eight "quarters". We combine the blanks in such a way that each new circle consisted of 4 parts (two parts from different fabrics).

Sew the quarters together, iron the seam allowances. We fold the two circles face to face, sew them together, leaving quite a bit of room to turn inside out and stuff the pillow.

We turn it inside out and fill the needle bar with filler, manually sew the hole with a blind seam.


Now let's start decorating the needle bar: cut out a small leaf from green felt or fabric (in the latter case, we sew two leaves together without stuffing). Cut off a small piece of brown ribbon and twist it into a spiral with scissors. We sew a twig and a leaf to the pumpkin and our bright needle bed or pumpkin toy is ready.
Practical needle holder on hand "Flower"

For work we need the following tools and materials:
- a small piece of yellow felt;
- dense cut cotton fabric of blue color;
- a small piece of wide elastic band;
- blue sewing thread;
- a piece of thick cardboard for patterns;
- holofiber for stuffing the middle of the flower.

How to sew a needle bar on your hand: a step-by-step master class
Stage one
To sew a needle bed with your own hands, save the patterns:

Cut them out and transfer them to cardboard or thick plastic. Next, we cut six squares of blue dense cotton 8x11 cm, fold them in half in length with the front side inward, using the pattern for the petal, transfer the contours to the fabric.

We cut out six such elements, cutting them along the marked contour without taking into account seam allowances.

Stage two
We fold the petal in half along the wrong side inward and, taking a longer thread, we lay a manual basting seam next to the cutting line.
Then we need to tighten the thread as much as possible, forming a petal, and fix it so that it does not diverge to its original position. With the same thread we do the same with all the other petal blanks.

This is the flower we ended up with. We fix two extreme petals with an inconspicuous stitch (one at the beginning and at the end of the chain).

Stage three
From a piece of yellow felt we cut out the largest circle, its diameter should be 8 cm. We pass along the edge of the circle with a basting seam, leaving the thread with the needle.

Slightly tighten the thread on the felt blank, tightly fill the newly formed “pouch” with holofiber, tighten the thread to the maximum. We fasten, but do not cut the thread. Using it, with the help of a hidden seam, we sew the middle to the petals, like this:

Stage four
Let's start sewing a bracelet for the needle bar.
At this stage, we need a rectangular piece of fabric 6.5x20 cm, a piece of thin plastic and a wide elastic band 2.5x6 cm. The length of the fabric for the bracelet is selected individually! To do this, measure the circumference of your wrist, add 2 cm for seam allowances.
Using a round pattern with a diameter of 5 cm, transfer the markings to the felt and cut out the blank. This detail will serve as a substrate for the flower and will be located between it and the bracelet.
We make one round circle with a diameter of 4 cm from plastic (it is also possible from cardboard). Here a simple plastic bottle for water. This part is needed in order to protect the hand from being punctured by a needle during the operation of the needle bar.

We fold the fabric rectangle in half lengthwise with the right side inward, sew two long sides, turn it out on the face. We straighten the bracelet and smooth it with a hot iron. Sew a felt circle with a diameter of 5 cm to the center of the fabric strap. We sew the elastic first to one short side of the strap, then to the other.

With the help of a hidden seam, we sew the flower to the base (yellow round felt sewn to the bracelet), not forgetting to lay a plastic or cardboard blank inside.

Pincushion in the form of a mini puppet doll: video mk
Pincushion in the form of a hat

For work we need the following tools and materials:
- a sheet of thick cardboard;
- cut of any fabric (we recommend using knitwear);
- cutter for circles or simple scissors;
- needle;
- sewing threads;
- holofiber;
- vintage ribbons;
- sewing pins for decor;
- small decorative flowers;
- glue gun or just fabric glue.
Sewing a needle-hat: a master class
First, cut out a round template with a diameter of 10.5 cm from thick cardboard.

And now - two circles of fabric: one with a diameter of 22 cm, the second - 14 cm.
 We connect the fabric, as shown in the photo, and sew, laying out the edges with neat folds. If you use elastic fabric, you will pass this step without problems.


Now a circle with a diameter of 14 cm and a little holofiber is used.

Sew first four opposite edges, and then sew everything together.

We connect and sew the fabric.

We connect the two parts of the hat together.

We attach the tape with decorative pins or glue it to the base with a glue gun.


We fix the flowers in the place indicated in the photo:

That's all, the hat is ready!
Jar - needle bed: video master class
Do-it-yourself needle bed "Mannequin"

For work we need the following tools and materials:
- piece of dense fabric;
- synthetic winterizer or holofiber for stuffing;
- Chinese stick 22-23 cm (you can use a regular pencil as a substitute);
- a large spool for threads or something else, the main thing is that the stand is stable;
- fabric glue.
Mannequin sewing: master class
First, we make a life-size pattern of a mannequin and transfer it to the fabric.

Next, prepare the Chinese stick. To avoid twisting and slipping of the mannequin from the stick, in the places where the chest and hips will be located, we wind a strip of fabric smeared in glue, as shown in the photo below.

We sew or sew manually only the sides and tucks, we make zigzag notches on the bends.
We turn the workpiece inside out, insert a Chinese stick into it and tightly stuff the part with holofiber. We tuck and sheathe the neck so that it fits snugly against the wooden base.
In the bottom, clearly in the center, we make a small hole, string a stick on it, sew the bottom to the main fabric part of the mannequin. We insert the stick into the coil preliminarily well lubricated with glue. The mannequin is ready!
Optionally, it can be decorated: wrap the stick with bright satin ribbon, tie a small bow around the neck. Decorate the body of the needle bar with fabric or lace.
Do-it-yourself needle case "Cactus" made of felt

For work we need the following tools and materials:
- scraps of colorful fabric for a pot;
- white and orange felt for a flower;
- lace;
- sea pebbles for a pot;
- holofiber, synthetic winterizer or any other filler;
- a sheet of thick cardboard;
- a small paper cup;
- silicone glue;
- scissors;
- sewing threads;
- needle.
How to sew a felt cactus: a step-by-step master class for beginners
Stage one
First, we make the basis for the needle bed cactus. We cut off a small paper cup, leaving only its lower part for work. We fill the glass with sea pebbles or some other heavy filler, pour glue into the glass and cover the pot with a circle cut out of a cardboard sheet.

Now you need to sew a case for a cardboard pot from a piece of thick colorful cotton and glue it to the glass. On the upper edge we attach a ribbon or lace in the color of the canvas.

Stage two
Now let's start sewing the cactus itself. We cut out eight blanks from green felt of such a shape, which is shown in the photo below:

We sew six blanks two together with a simple overcasting seam, as a result we get three double parts.

We sew all the blanks together, like this:


We sew freely all the remaining edges with an overcast seam, leaving a little space in the upper part of the cactus for stuffing the needle bar with holofiber (you can use synthetic winterizer or ordinary cotton wool as a substitute).

The cactus itself can be stuffed more tightly or strengthened with a Chinese sushi stick. The flower should be as voluminous as possible and keep its shape well.

We cover the upper part of the flower with a square piece of green felt, sewing all the elements of the needle bar with an overcast seam.

With the help of a dense green thread, we give the cactus the correct, natural shape, tightly bandaging it crosswise.

Stage three
Now let's take a decorative flower. Cut out from felt white color two flowers with sharp petals and one brush. From the orange felt we cut out a small circle, cut it around the entire perimeter.

Place the white brush in the circle orange color, then - in the central part of the white flowers. We bend our blank into a bud and sew a flower.

We sew the decoration directly to the needle bar.

We glue the sewn cactus to the pot, decorate the "soil" with small sea pebbles, beads or beads.

That's all, the felt cactus pincushion is ready to delight you during the workflow :)
How the needle bed "Stump" is sewn

For work we need the following tools and materials:
- sheets of colored felt brown (25x15 cm), beige (9x9 cm), red (5x8 cm), beige (9x8 cm), white (10x7 cm), green (5.5x6.5 cm) and lime (5x6 cm) colors;
- sewing thread thicker and thinner;
- a couple of black beads;
- glue gun or glue with a brush;
- needle;
- scissors;
- holofiber for hemp stuffing.
How to sew a felt needle bed: a step-by-step master class
First, we print out the template, if desired, increasing it to a suitable size.

We sew or sew vertical stripes on a piece of brown felt - they will imitate cracks in the bark of our stump. We use a thread of dark brown color.

We hook the edges of the material with an overlap, leaving 1 cm.

We sew on beads-eyes, sew in a mouth, glue cheeks from pieces of any red cloth.

On the upper “cut” of the hemp, we embroider the annual circles of the tree with a thick brown thread. We sew the top of the stump with the bark.

We tightly stuff the stumps with holofiber (you can replace it with cotton wool or padding polyester), then sew the bottom, leaving a small area not stitched. We add a little more holofiber, so that the workpiece is tightly packed and holds its shape well.

Now green and light green felt is used: cut out the grass and sew it to the top of the stump.

Next, we sew fly agarics: we sew a hat consisting of two elements (a circle of red and white), then we sew a beige felt leg, fill the blanks with holofiber, sew a felt hat and a leg, glue small white circles to the mushroom cap.


Sew the grass to the bottom of the stump.

Amanitas are glued or sewn to the top of the needle bed.

That's all, the original stump is ready! 🙂
In order to protect yourself and loved ones, you must carefully monitor the location of the needles when sewing. In this case, you can not do without a needle bar, which you can make with your own hands.
How to make a hat-shaped pincushion
For the manufacture of the so-called house for needles, we need:
- the cloth;
- thick cardboard;
- synthetic winterizer;
- threads;
- needle;
- scissors;
- glue;
- hat decoration.
Let's start making a cute needle case:
- Cut a circle out of thick cardboard with scissors. Depending on what diameter of the circle you choose, this size will be the future needle holder.
- With fabric scissors, cut out a circle twice as large as a cardboard circle.
- Cut out a circle from the fabric the size of a circle from cardboard.
- We wrap the cardboard circle in the cut out fabric.
- Using a needle and thread, we sew a cardboard circle with a cloth, making the same folds. The base of the hat is ready, set it aside for a few minutes.
- Let's start making the second part of the hat. We put a synthetic winterizer on the second fabric circle.
- We sew the edges of the circle, we get a soft ball.
- We connect the two parts with a thread and a needle or glue.
- We decorate the hat with any decor, for example, a ribbon, flowers, beads, etc.
A funny hat is ready, it will take about 20 minutes to make it.
How to make a pincushion from a jar
To make an unusual needle case from a small jar, we need:
- small jar;
- the cloth;
- thick cardboard;
- synthetic winterizer;
- threads;
- needle;
- scissors;
- glue;
- jar decorations.
Let's move on to creating a soft ottoman from a can:
- Rinse thoroughly and dry the jar.
- From cardboard, cut out a circle of the diameter of the lid.
- From the fabric, cut out a circle twice the diameter of the lid.
- We lay out the synthetic winterizer on the cut out fabric circle.
- Baste along the edge of the fabric.
- Insert the cardboard circle inside the pillow.
- We tighten the pillow and fasten with a knot.
- Glue a soft pillow to the lid.
- We turn to decoration, we choose decorations to our taste.
The pincushion from the can is ready! In the jar itself, you can put a sewing headset or personal items.


How to make a needle bed out of felt
To create a stylish felt pincushion, we need:
- paper;
- felt of several colors;
- threads;
- needle;
- synthetic winterizer;
- pencil;
- button.
And so, let's move on to creating a needle bed from felt:
- On paper, we draw patterns for the details of the needle bed or print it from the Internet.
- On the felt, trace around the contour of the pattern.
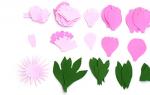
- We cut out the details of the needle bed from felt, namely a cactus, a process of a cactus, a flower, pebbles.
- We sew 2 flowers one to one and sew a button in the center of the flower.
- We sew the same parts of the cactus, while leaving a small hole, so that later we can fill it with padding polyester.
- We sew felt pebbles and fill them with padding polyester.
- We sew a process, a flower and stones to the main cactus.
The felt cactus is ready! To complete the image, you need to stick real needles.

How to make a pillow case
To sew an original needle pad, we need:
- the cloth;
- synthetic winterizer;
- threads;
- needle;
- pencil;
- scissors;
- hot glue;
- beads.
Let's start sewing pillows for needles:
- Draw a circle on the fabric with a pencil and cut it out.
- We fold the two cut out circles with the front sides one to one.
- We outline them in a circle, stepping back from the edge of 5 mm.
- We sew two circles.
- We make an incision in the middle of one of the circles.
- Turn right side out and fill pillow with padding polyester.

- Sew up the previously made incision.
- We thread a long thread into the needle, we stick it in the center from top to bottom and circle it from under the bottom to the initial position, it is necessary to tighten it with force. We stick back in the center, so it is necessary to repeat several times. With such actions, we divide the pillow into sectors. The number of sectors depends on your preference. At the end of the division into sectors, you need to tighten and make a strong knot.
- In the place of the knot, at the intersection of the threads, beads of various sizes should be glued. The pillow case is ready! It takes a minimum of time to make such a practical needle bed, and the result will surprise you.


needle bed irreplaceable thing in the owner's arsenal. You can create it yourself from various materials. The presence of a needle bar in the house will bring convenience when sewing and prevent the loss of such a dangerous tool.
![]()
Usually, needlewomen begin their journey into creativity with this accessory, and often this happens even in childhood or adolescence. Naturally, the first do-it-yourself needle bed is easy to perform, however, more complex technologies are gradually being mastered, allowing you to make lovely gifts comfortable and practical.
Today, on the Internet, you can find a lot of detailed master classes, both for children and adult mistresses, of varying complexity and the use of materials. Needle beds - bracelets, pillows, hats and little animals. You can find any design and even come up with your own if there is nothing suitable. The following are several options - easy to implement, but very interesting.
A pincushion of this shape is a pretty cute, playful accessory, and besides, it is very useful. Such a little thing is quite easy to make by choosing the right scheme and suitable materials. For its manufacture you will need:

Having prepared everything that is required, we proceed directly to the manufacture of the needle bar:
- Pattern making.
Cut out 2 circles from plastic (you can take a bottle) or cardboard. The diameter of one is 11 cm, the other 5 cm. Experienced needlewomen can take a cup for these purposes - circle the bottom, and then turn it over and circle it again. - Cutting out pieces of fabric.
Circles are applied to the fabric, and 0.5 cm is added to the hem and seams. Then the details are carefully cut out. - Filling the needle bar and its formation.
Each circle needs to be picked up along the edge and slightly tightened. It is best to see a photo of how this is done correctly, since the assembly is distributed unevenly - thicker on one side, and less often on the other. The resulting small blank is filled with padding polyester, and a round piece - plastic or cardboard - is placed in a large one. The threads are pulled up and pulled together in such a way that a flat part of the bottom of the hat and a voluminous top are obtained. - Decoration and decor.
To make the needle hat look elegant, you need to give Special attention her decoration. The seam line is connected, stitched and decorated with lace. And the top of the hat is a traditional ribbon. After that, you can make a flower, for example, a rose from a ribbon, and there is always the opportunity to purchase finished decoration and attach it to the finished product.
Such a master class helps to make a wide variety of hats - for souvenirs or for your own needs, aesthetic, attractive and truly feminine.
How to make a needle bed out of a can?
Quite often, craftswomen make needle cases from a jar, and in such a way that it is not immediately possible to recognize such a familiar object in the product, they decorate it so skillfully. It is desirable that the jar be whole, small in size and, if there is a choice, beautiful. But you can also put into action ordinary material- container with baby food or sauce.
What is the difference between these needle cases from other similar products? First of all, a jar, supplemented with a pillow with needles and pins, is considered a suitable container for the safety of all kinds of accessories - buttons, sequins or beads. Thus, a simple accessory becomes both quite beautiful and practical.
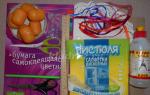
In order to make such a needle case, you will need the following materials:
- jar, always with a lid;
- material (preferably dense in structure);
- decor - linen ribbon, lace, paper flowers, silk ribbons;
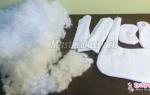
- sintepuh or synthetic winterizer for filling;
- glue;
- thick cardboard.
Then follows an algorithm on how to make a needle bed with your own hands from a similar set:
- Foundation preparation.
The jar and lid should be thoroughly washed and dried. - Making a pillow-cushion.
2 circles are cut out, twice the diameter of the lid itself. For the first, cardboard is taken, the second - fabric. A little bit of filler is placed and a cardboard circle to firmly fix it. Then, using stitches, the made cardboard circle is tightened with a cloth and fixed, and the filler is pressed. The pad made in this way is glued to the lid of the jar (to improve adhesion, you can pre-sand it). - We decorate the product.
Beautiful needle beds are decorated products, and here you can turn on your imagination. However, do not forget that if you seal the place where the lid is attached, you will not be able to use it to store sewing trifles. If the needlewoman does not pursue such a goal, then you can completely close the jar, depriving it of its resemblance to this object. You can use braid, ribbons, lace and other materials.
Such do-it-yourself pincushion jars will delight the eye and perform their functions perfectly.
We make a beautiful felt needle bed
Felt is perhaps one of the most popular materials in needlework. They sew toys from it, including tilde ones, make slippers, handbags and all sorts of different things. Of course, its softness and excellent qualities, important for work, allow you to sew anything from it, including needle beds. Moreover, you can find schemes for a wide variety of products - animals, flowers, household items and other items.
Among current models you can meet cute cacti, because subsequently stuck needles and pins on such a product look very harmonious, as they say, where necessary.
A master class allows even beginners who have no experience to create such a needle bed with their own hands. This will require:
- green felt;
- threads that match the tone of the fabric;
- stuffing;
- decor - flowers or material for their creation, and buttons or beads for the core.
 Such a product is quite simple to perform:
- All parts of the needle bar are cut out of the material. The pattern can be done independently or you can take the finished one. Don't forget about seam allowances.
- The resulting parts are sewn together, turned inside out and stuffed with padding polyester, padding polyester or ordinary cotton wool.
- The parts are connected to make a one-piece cactus.
- The needle bed is decorated with flowers. If there are no ready-made ones, you can cut them out of felt or felt of any, preferably bright, juicy shade - red, pink, lilac, etc. A button or bead is sewn in the center of each flower.
A wonderful cactus needle bed is ready, and you can give your present to your mother, grandmother, familiar seamstress or neighbor. Naturally, the gift will cause only positive emotions.
The needle bar is a necessary accessory for any seamstress or needlewoman, and you can buy it in any sewing department. But, of course, he will not be able to replace a hand-made product - elegant, professional or simple, but made by a child with great love. Modern master classes allow even beginners to plunge into the world of creativity and create a masterpiece with their own hands.